9 September 2020

Flashcards Coupling and Cohesion

Transition Coupling FLIRT-SBBLow Coupling and High Cohesion are basic design principles in both functional programming and object orientation. What is coupling? Coupling is the measure of the strength of association by a connection from one module to another. At least that is one of the definitions I found when researching the topic. Another one is that Coupling is the degree of interaction between modules. Following some original research from 1974 by W. P. Stevens, G. J. Myers and L. L. Constantine, Structured Design, IBM Systems Journal Volume 13, Issue 2, Pages 115-139, there are several types of coupling and different degrees of its strength. The same is true for cohesion. These are a lot of definitions to remember - flashcards to the rescue.

Flashcards
So I created a deck of cards about coupling and cohesion. It contains 115 questions and covers
  • Definition of Coupling
  • Coupling based on the type of its dependency.
  • Types of coupling by strength.
  • Examples of code elements with certain types of coupling.
  • Postel's Law
  • Coupling Contributing Factors
  • Definition of Cohesion
  • Cohesion based on the type of the module's elements' relationship.
  • Types of cohesion by strength.
  • Examples of code elements with certain types of cohesion.
  • Problems caused by low strength cohesion.
These are just basic definitions and code samples. Some definitions seem outdated or incomplete but I wanted to follow the original wording from Stevens, Myers and Constantine. So take them in the light of 1974. ;-) Also I am missing newer and more high level aspects of coupling and cohesion, e.g. Connascence.

Download
I use Anki digital flashcards. Its apkg files can be used with Anki for Windows, Linux, Mac and Android. For iOS there is AnkiApp but I did not confirm that it works with apkg. (Liviu Jianu reports that its desktop version does not work with my decks. Thank you Liviu.) Download the Coupling_and_Cohesion.apkg here.

30 August 2020

TDD a UI with Fast Tests

AndroidsThis is another part of my series of TDD-ing user interfaces. Earlier this year I looked at test driving classic, fat, state based UIs like Swing or WinForms and then web component libraries like Vaadin. In both situations it was possible to TDD the UI using the Model View Presenter (MVP) pattern and a decent test bed for testing the implementation of the view. Later I explored test driving an immediate mode GUI, which was even easier than doing so for retained mode: There was no need to search for components, capture events or trigger events. This time I want to experiment with test driving a user interface by only using UI tests. In theory I could do that with Swing or Vaadin, but the UI tests of these technologies are too slow. For my TDD cycle I want fast tests!

Android UI Tests
My friend Bastien David told me that Android UI tests are pretty fast and I talked him into running this experiment with me. I had never done any Android development and had only little knowledge of the Kotlin language - it is good to have friends who know. Bastien's Kotlin/​Android starting point used Espresso and Robolectric for testing the Android UIs. The sample test
import androidx.test.espresso.Espresso.onView
import androidx.test.espresso.assertion.ViewAssertions.matches
import androidx.test.espresso.matcher.ViewMatchers.withId
import androidx.test.espresso.matcher.ViewMatchers.withText
import androidx.test.ext.junit.rules.activityScenarioRule
import androidx.test.ext.junit.runners.AndroidJUnit4
import org.junit.Rule
import org.junit.Test
import org.junit.runner.RunWith

@RunWith(AndroidJUnit4::class)
class HelloActivityTest {

  @get:Rule
  var activityScenarioRule = activityScenarioRule<HelloActivity>()

  @Test
  fun hello_activity_has_some_hello_text() {
    onView(withId(R.id.text_hello)).check(matches(withText("Hello!")))
  }

}
used Espresso's matchers to find the text "Hello" on the view of the HelloActivity.

First Few Tests
We worked on the same exercise used in my previous articles, the Login Form exercise. The first tests for UI elements of the LoginActivity, i.e. user name field and login button were
@RunWith(AndroidJUnit4::class)
class LoginActivityTest {

  @get:Rule
  var activityScenarioRule = activityScenarioRule<LoginActivity>()

  @Test
  fun `has username field with max length of 20`() {
    onView(withId(R.id.username))
      .check(matches(checkMaxLength(20))) // custom matcher
  }

  @Test
  fun `has label for username`() {
    onView(withId(R.id.username_label))
      .check(matches(withText("Phone, email or username")))
  }

  @Test
  fun `has login button`() {
    onView(withId(R.id.login_button))
      .check(matches(withText("Log in")))
      .check(matches(not(isEnabled())))
  }
}
These tests did not create any code, we declared the UI elements in the layout app/​src/​main/​res/​layout/​activity_login.xml to make each test pass. On Bastien's machine the tests were fast enough and it was easy to drive UI elements and their attributes. We had to create some custom Hamcrest matchers though, e.g. checkMaxLength. We decided not to go deeper and assert colours, styles or positions, but we could have.

Test Driving Logic
The next test
  @Test
  fun `when username is introduced then login button is enabled`() {
    onView(withId(R.id.username))
      .perform(typeText("a real username"))

    onView(withId(R.id.login_button))
      .check(matches(isEnabled()))
  }
brought a bit of logic into the LoginActivity,
class LoginActivity : AppCompatActivity() {

  override fun onCreate(savedInstanceState: Bundle?) {
    super.onCreate(savedInstanceState)
    setContentView(R.layout.activity_login)

    username.addTextChangedListener {
      login_button.isEnabled = true // new logic
    }
  }
}
We only spent two hours on the exercise and did not get far. Still I could see where we would end. We would inspect every behaviour by its effect on the UI. While we could use the MVP pattern, we did not as the tests were fast enough.

Similar Technologies, e.g. React
Some modern UI technologies come with a fair amount of testing support. For example the same approach should be possible with React. There is a JavaScript/​React starting point in the Login Form Kata. Some people have tried that. I do not know if they went far enough for a definite conclusion.

David Tanzer dedicated some of his React TDD videos on testing the UI: In Part 1: Testing the UI Itself he explains the necessary setup to test React and in Part 2: Value and Cost of Tests he talks about possible test cases. He does not check text elements and style of the UI as he considers these things to have little probability of breaking later. Doing TDD, he looks for tests which influence the design of the code. I highly recommend you watch all of his videos.

Conclusion: Is this still TDD?
Test driving a UI with fast tests like Android or React is certainly possible, maybe even easy. These tests are not unit tests. Is it still TDD? We definitely write the tests first so it is Acceptance test driven (A-TDD) or at least "UI specification test driven". Unlike TDD these tests do not influence the design of the code because the components of the UI are usually specified by the requirements, e.g. in wireframes. As all tests exercise the code through the UI, there is no pressure on the code, its interfaces and collaborators. Still we can evolve the code because we have full test coverage and regression safety.

24 July 2020

Interview Philipp Mayer

It has been more than a year since my last guest interview on ethics in Software Development, and I am very happy that Philipp Mayer found the time to answer my questions. When I asked Philipp about ways to contact him, he said "I do not use any social networks for work related things :)" If you are new to the series, I am talking to people in the area of software development about our social responsibility and ethics in general. I started the series in 2015 as part of my own quest for work with meaning.

Philipp why did you choose to work with software?
I chose to work with software in the third year of junior high school ("Unterstufe"). In maths we used the Texas Instruments Voyage 200 calculator on which one could code in TI Basic. Our teacher showed us a few things and told us we would be allowed to store any formula on there as long as we did it via writing an application for it. This motivated many of us to take a closer look at coding. This then led to choosing the IT department of the high school HTL Krems instead of becoming a chef.

When we met, you said that you rarely eat meat. Why do you do that?
It does for environmental reasons. I am aware of the great impact that meat production has on climate. This has led to not buying meat unless I know it is high quality and from a source that I know. As a (working, but still) student, that means that I do not often buy meat. Nowadays when I eat meat, I see it as something special, even if it is just a pair of sausages. An exception where I do eat meat without taking care of the quality is at other people's home if it were thrown away otherwise.

What do you actually do regarding climate change?
Use of public transport. I am a happy owner of the ÖsterreichCard ticket that allows me to take any train at any time within Austria. I do understand, that public transport just does not make sense for many people's everyday way to work at the moment. So I hope for improvements here. A positive thing I recently found out about is the ÖBB rail and drive service that allows me to book an electric car for less than 2 euros/hour on weekends. This is perfect for weekend trips and motivates me even more to not buy a car anytime soon.

Balance ScaleOutside of climate change, what do you consider the biggest challenges of our times?
The increasing social and financial inequality.

What else could we do to engage in the topic? For example, did you take part in public protests, donate money to NGOs or sign petitions?
  • Protests: no
  • Donate money: little
  • Sign petitions: some
I think I make a bigger impact by living a thrifty lifestyle and trying to convince people around me to do so as well.

Most of these activities are personal choices. This is great but most of our time is spent on regular work. I would like to see more impact on these important topics of my regular work, just working on "the right things". Do you think that is possible?
In general no, as the companies doing "the wrong things" tend to pay more than others. In his book "Die Kunst des guten Lebens, Rolf Dobelli cites the psychologist Paul Dolan saying that a sound consists of two parameters - frequency and amplitude. And that it is the same when it comes to happiness. There's the hedonistic and the eudaimonistic component. So I think that everyone has to find the right mix for oneself.

How do you think about selecting industry, customer and project based on your values and social responsibility?
I would once more go with the statement made in previous answer. I think it never is a pure financial choice but about the people who you work with and to what extent one sees a meaning in the project.

Let's be more specific here: Would you work for an animal factory? Would you work for a sweatshop exploiting kids in Asia?
Unfortunately, I have to be very generic with this one. For me it depends, if in my position I could enhance the situation for the poor ones (animals, children working in factories etc.) in the organization. Otherwise, I do not think I would see value in my work.

Did you ever reject a customer or an actual project, that would bring you money based on your values?
No, as I did not have the chance to do so in my career, yet.

On the other hand, what would be industries, customers and projects that you would love to work on?
Definitely environmental or social - in terms of improving the life of the weakest ones.

Thank you Philipp

21 June 2020

Conway's Squasher Coroutine

Since some time I am researching coroutines. Wikipedia says that a coroutine is a computer program component that generalises subroutines, allowing execution to be suspended and resumed. [...] Subroutines are special cases of coroutines. When subroutines are invoked, execution begins at the start, and once a subroutine exits, it is finished; an instance of a subroutine only returns once, and does not hold state between invocations. By contrast, coroutines can exit at any time, and execution may later return to these points. [...] A coroutine instance holds state, and varies between invocations. Coroutines are useful for many things. For example the Kotlin programming language lists several uses cases including asynchronous computations, generators and implementing state machines in a sequential way. More and more languages provide them.

The Paper
According to Donald Knuth, Melvin E. Conway coined the term coroutine in 1958 when he applied it to the construction of an assembly program. He first published it 1963 in his paper Design of separable transition-diagram compiler. Conway states that the coroutine idea was concurrently developed by him and by Joel Erdwinn. The paper is about implementing a COBOL compiler, the first two pages introduce the coroutine together with its implementation in assembly for the Burroughs model 220, a late vacuum-tube computer.

Code Example
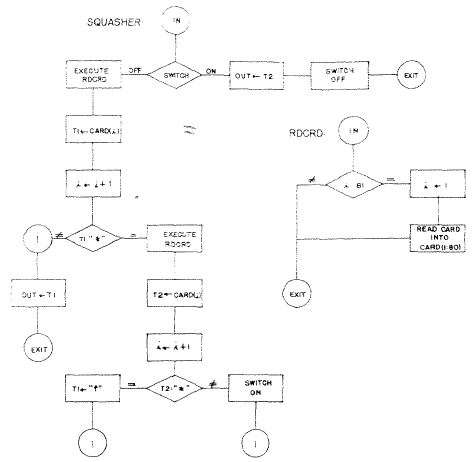
Conway shows an example, the asterisk squasher subroutine, in both subroutine and coroutine form. The mentioned assembly commands are unknown to me and the flowcharts are not 100% readable, so I decided to reimplement the example in modern assembly to see what is going on. The asterisk squasher is a program which reads cards and writes the string of characters it finds, column 1 of card 1 to column 80 of card 1, then column 1 of card 2, and so on, with the following wrinkle: every time there are adjacent asterisks they will be paired off from the left and each "**" will be replaced by the single character "^". This operation is done with the exponentiation operator of FORTRAN and COBOL.

Asterisk Squasher Subroutine
The problem is that out - the output area of the SQUASHER routine - only holds a single byte, which means the routine can only return and subsequentially write a single character. When looking for the second asterisk, the routine reads a second element and thus needs somehow to return it on the next call unless it was a "*". Conway continues that the simple requirement of compressing asterisks requires the introduction of a switch which bifurcates the subroutine and selects the part to be used at each call depending on the situation at the last call. The reason for the switch is that each call of the subroutine must result in output of exactly one character. The second read character is stored in a (module) global variable t2 until the next call. Here is its flowchart:

Figure 1: Asterisk squasher subroutine with environment
I use my trusted Windows assembly setup for Intel IA-32 assembly. The assembly is in NASM format. First define the data:
card_len equ    80

switch: resd    1
%define ON      dword 1
%define OFF     dword 0

i:      resd    1
card:   resb    card_len

t1:     resd    1
t2:     resd    1

out:    resd    1
Let's warm up with the code for RDCRD, which reads 80 characters of a card. The code strictly follows the flowchart above.
RDCRD:
        mov     eax, [i]
        cmp     eax, card_len
        jne     .exit

        mov     [i], dword 0

        ; Omitted using Windows system library functions
        ; _GetStdHandle@4 and _ReadFile@20 to read 80
        ; characters into [card].

.exit:
        ret
The main method is SQUASHER with the switch variable.
SQUASHER:
        mov     eax, [switch]
        cmp     eax, OFF
        je      .off
.on:
        mov     eax, [t2]
        mov     [out], eax

        mov     [switch], OFF
        jmp     .exit

.off:
        call    RDCRD

        mov     esi, [i]
        xor     eax, eax
        mov     al, [card + esi]
        mov     [t1], eax

        inc     esi
        mov     [i], esi

        mov     eax, [t1]               ; redundant, value still in register
        cmp     eax, '*'
        jne     .not_equal_ast

.equal_ast:
        call    RDCRD

        mov     esi, [i]                ; redundant, value still in register
        xor     eax, eax
        mov     al, [card + esi]
        mov     [t2], eax

        inc     esi
        mov     [i], esi

        mov     eax, [t2]               ; redundant, value still in register
        cmp     eax, '*'
        jne     .not_equal_second_ast

.equal_second_ast:
        mov     [t1], dword '^'
        jmp     .not_equal_ast

.not_equal_second_ast:
        mov     [switch], ON
        jmp     .not_equal_ast

.not_equal_ast:                         ; label 1
        mov     eax, [t1]
        mov     [out], eax

.exit:
        ret
There is nothing special happening in the code above. There are the two main branches .on and .off. To run the whole program on a single test card I need a WRITE and a main method. WRITE iterates a card and prints the result of each call to SQUASHER to standard out.
WRITE:
.loop:
        call    SQUASHER

        ; Omitted using Windows system library functions
        ; _GetStdHandle@4 and _WriteFile@20 to write 1
        ; character from [out].

        mov     eax, [i]
        cmp     eax, card_len
        jne     .loop

        ret

; ----------------------------------------
        global  _main
_main:
        ; set up switch
        mov     [switch], OFF

        ; set up global data
        mov     [i], dword card_len

        call    WRITE

        push    0
        call    _ExitProcess@4
Asterisk Squasher as Coroutine
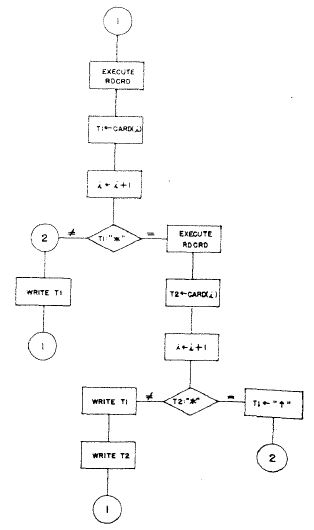
Conway writes further in his paper: The coroutine approach to the same problem accomplishes the switching job implicitly by use of the subroutine calling sequence. When coroutines A and B are connected so that A sends items to B, B runs for a while until it encounters a read command, which means it needs something from A. Then control is transferred to A until it wants to "write," whereupon control is returned to B at the point where it left off. In this situation A is the SQUASHER and B is the WRITE coroutine. The following flowchart shows SQUASHER when both it and the using program (WRITE) are coroutines.

Figure 2: Asterisk squasher as coroutine
Coroutine in Assembly?
While some architectures provide support for coroutines, according to the Art of Assembly Language 80x86 CPUs do not provide a COCALL instruction. Conway describes the coroutine linkage on the Burroughs 220 as follows: The UNCONDITIONAL BRANCH instruction BUN A works by placing its address A into the P-register (the Instruction Pointer). The STORE P instruction STP B places the contents of P plus one into the address part of the contents of location B. The standard subroutine call is
1:      STP EXIT                        ; store 3 into target address of address EXIT
2:      BUN ENTRANCE                    ; jump to address ENTRANCE
3:
where location EXIT contains a BUN instruction whose address will be altered by the STP instruction in the call. (So this is self-modifying code and the return of the subroutine is then EXIT: BUN 3 or something like that.) A pair of subroutines becomes a pair of coroutines by adding to each an isolated BUN instruction which we can call its router, and by changing the addresses of the STP and BUN calls as follows: when coroutine A calls coroutine B the call is
        STP AROUTER
        BUN BROUTER
That seems a small change for the Burroughs but how could I recreate that?

Coroutine in Assembly!
The BUN is a JMP on Intel. Unfortunately not all instructions are one byte, so using the current IP + 1 as done by STP does not work. I tried to follow the original idea with a short macro. When coroutine A calls coroutine B the call is coro A B,
%macro coro 2
        mov     ebx, %%_cnt             ; basically IP + 1
        mov     [route_%1], ebx         ; store it in target of router A
        jmp     %2                      ; jump to router B
%%_cnt: nop
%endmacro

route_SQUASHER: resd 1
route_WRITE:    resd 1

SQUASHER:
        jmp     [route_SQUASHER]

WRITE:
        jmp     [route_WRITE]
This needs storage for the route of each coroutine. The call of the macro does not look so good as it needs the name of the current coroutine as first argument for the macro to use the right route storage. If each coroutine would be its own module, I could drop that and just use [route]. The router variables [route_*] will be initialised at startup. The code of the two routines SQUASHER and WRITE changes slightly, strictly following the second flowchart above.
; router
SQUASHER:
        jmp     [route_SQUASHER]

; coroutine
SQUASHER_CORO:                          ; label 1
        call    RDCRD

        mov     esi, [i]
        xor     eax, eax
        mov     al, [card + esi]
        mov     [t1], eax

        inc     esi
        mov     [i], esi

        mov     eax, [t1]               ; redundant, value still in register
        cmp     eax, '*'
        jne     .not_equal_ast

.equal_ast:
        call    RDCRD

        mov     esi, [i]                ; redundant, value still in register
        xor     eax, eax
        mov     al, [card + esi]
        mov     [t2], eax

        inc     esi
        mov     [i], esi

        mov     eax, [t2]               ; redundant, value still in register
        cmp     eax, '*'
        jne     .not_equal_second_ast

.equal_second_ast:
        mov     [t1], dword '^'
        jmp     .not_equal_ast

.not_equal_second_ast:
        mov     eax, [t1]
        mov     [out], eax
        coro    SQUASHER, WRITE

        mov     eax, [t2]
        mov     [out], eax
        coro    SQUASHER, WRITE

        jmp     SQUASHER_CORO

.not_equal_ast:                         ; label 2
        mov     eax, [t1]
        mov     [out], eax
        coro    SQUASHER, WRITE

        jmp     SQUASHER_CORO

; ----------------------------------------
; router
WRITE:
        jmp     [route_WRITE]

; coroutine
WRITE_CORO:
.loop:
        coro    WRITE, SQUASHER

        ; Omitted using Windows system library functions
        ; _GetStdHandle@4 and _WriteFile@20 to write 1
        ; character from [out].

        mov     eax, [i]
        cmp     eax, card_len
        jne     .loop

        ret

; ----------------------------------------
        global  _main
_main:
        ; set up coroutine routers
        mov     ebx, SQUASHER_CORO
        mov     [route_SQUASHER], ebx

        mov     ebx, WRITE_CORO
        mov     [route_WRITE], ebx

        ; set up global data
        mov     [i], dword card_len

        call    WRITE

        push    0
        call    _ExitProcess@4

Conslusion
I hope that clarifies how the first coroutine presented in 1963 worked. Re-coding the example was a lot of work and in the end it paid off because everything is clear now, even more so after I wrote this blog post about it. This is the golden triangle of learning: theory (e.g. reading about it), practice (e.g. creating it) and finally teaching (documenting and sharing it).

Full Source Code
After I published this article Dmitry Kandalov pushed me to make the code available on GitHub. And then we went to port it to macOS, so he could play with it as well. To compile and run the code you need GNU make, NASM and a linker depending to your platform. Thanks to Samir Talwar's Smoke, it even comes with tests. Give it a try: Conway's Squasher Coroutine @ GitHub.

12 June 2020

A New Dog

Last year our dog Ruby died. We took some time to cope with the loss and now is the time for a new dog. After we loved a Great Dane once, there is no other dog we want. Here is a picture of our new puppy Ronja:

Great Dane puppy Ronja
While I chose the name of our previous dog - Ruby - my wife chose the name of this one. Ronja or Ronia is the daughter of the leader of a clan of robbers. Obviously she has little manners and does what she likes - and that is exactly the nature of our little Ronja ;-)

Raising a Puppy
Like software development, raising a puppy is a detailed process which can be improved continuously. Today we know more than ten years ago and we want to do much better. There are many misconceptions how to raise dogs and I learnt again that knowing how to handle certain situations is not enough - I have to practice them. For example, grabbing the puppy on time so it will not pee on the carpet is a skill. If you ever plan to raise a puppy I recommend to check out the books by Ian Dunbar, BEFORE You Get Your Puppy and AFTER You Get Your Puppy. These are small books, fun and easy to read. Both books are provided as e-books courtesy of simpawtico dog training in the downloads section. And even if you do not own any dogs, reading these books will help you understand why dogs behave how they do - especially if they have been trained badly.

BEFORE You Get Your Puppy book cover AFTER You Get Your Puppy book cover

4 June 2020

Flashcards and Microlearning

I like learning in all its aspects. A large part of software work is hands-on, so I experiment a lot and work through old and new code katas alike. For theory I rely on classic books like Clean Code. Sometimes I struggle to internalise theoretical knowledge and take notes, create extracts, mind maps or sketch notes. For material I need to memorise I like (digital) flashcards.

Applications of Flashcards
I use flashcards for a lot of different things.
  • The common case is to study tiny facts like words or numbers. IDE shortcuts and spelling alphabets are in this category. These flashcards work very well for me.
  • Then I tried visualising keys, which did not work as well.
  • I also use them to remember key points from books, e.g. The Little Schemer or Gerald M. Weinberg's Secrets of Consulting. Key learnings from books, i.e. phrases or sentences, are more difficult to remember. I am still experimenting with these - maybe flashcards are not ideal here.
  • In the past I created decks of cards to accompany some of my training workshops, e.g. Design Patterns. While participants were enthusiastic about them, I am pretty sure they did not use them to deepen their newfound knowledge. People use different phones, so the availability of flashcard apps is also an issue.
  • Even when I fail to study the cards later, creating them is a learning experience on its own. I have to collect and structure the material, formulate the questions and find precise answers. For example I created cards around Coupling and Cohesion which helped me understand more of these two concepts.
Micro GardenMicrolearning
By researching flashcards, I came across Microlearning. This is kind of a buzz word - everything is micro today, e.g. Micro-Workouts. (You practice for five minutes a day and then the exercise gear folds under your bed ;-) Wikipedia says that Microlearning deals with relatively small learning units and short-term learning activities. [...] In a wide sense, Microlearning can be understood as a metaphor which refers to micro aspects of a variety of learning models, concepts and processes. It is a new concept and there is no clear definition. It contains a lot of things. Besides the obvious reading, listening or watching short pieces of information, Microlearning activities include flashcards, quizzes, answering multiple-choice questions, micro games and more.

Conclusion
I was surprised to learn that sorting and organising learning content like tagging it (e.g. Social Bookmarking) is considered Microlearning. I like sorting and connecting information, I even sort my code katas. The most fun activity listed on Wikipedia is composing a haiku or a short poem. I did compose a poem in the past but never considered it a tool for learning. I like the idea. Maybe I will write a poem about TDD or Micro Services in the future.

I do not consider a whole deck of flashcards Microlearning. A whole deck is so much more as it contains all the aspects and details about a certain topic. In addition, creating it takes several hours. I am seeing that because I create most of my decks myself. Probably I am putting too much information into them as well. Sometimes I am overwhelmed by my own questions. For example my Design Patterns deck contains more than 360 questions including class diagrams and all. On the other hand, learning a few cards now and then - especially from an unknown deck - is fine.

Listening and watching short audio or video recordings is Microlearning, too. I like to listen to podcasts, especially if each episode is focused and not too long. That means it is shorter than ten minutes. Short episodes are easy to consume between other activities, e.g. when commuting. It is easier to stay focused. (Yes, maybe I am getting old. I have less time and energy for prolonged learning.) That is the reason I plan for episodes of eight minutes in my own podcast on Coderetreat Facilitation. Short episodes are easier to produce, which allows me to publish more often.

Bonus Material
The German Wikipedia entry on Microlearning contains a paragraph on Microlearning in the context of software development. It lists Test Driven Development as an example. This is an interesting angle. When the test - an assumption - goes green, the implementation moved forward a micro step and the developer knows a tiny bit more about the system.

6 May 2020

Learning yet another Programming Language

In 2000 Andrew Hunt and David Thomas wrote their influential book The Pragmatic Programmer, which is listed as second single most influential book every programmer should read. (I listed it in my book recommendations both 2012 and 2006.) Chapter one, tip eight Invest Regularly in Your Knowledge Portfolio says: Learn at least one new language every year. Different languages solve the same problems in different ways. By learning several different approaches, you can help broaden your thinking and avoid getting stuck in a rut.

Filled Tool Box (licensed CC BY-NC by hmboo Electrician and Adventurer)I started out as Java developer. Since than I have studied XSLT, Ruby, Scala, Forth, JavaScript, Scheme, Python, TypeScript, Go, C# and C. Out of these I even ran trainings for developers teaching them Python and TypeScript. In addition I had a glimpse of Visual Basic, Dart, Clojure, R, PHP, NATURAL, PowerShell, Kotlin and have relearned Assembly. I still need to learn Smalltalk, F#, maybe Haskell, J and of course Prolog.

I like programming languages and my learning approach is driven by curiosity and fun. Today I will describe my "standard", step by step way to get into a new language. I will assume you are an experienced developer, able to code in Java or C# who understands basic programming principles. I believe this approach is not suitable for programming newbies. I never use all these steps and sometimes change their order - like starting with the last one. Feel free to reorder or skip any steps not adding knowledge or fun.

1) Get an overview of core language features.
I start reading Wikipedia about the programming language I want to dive into. I am looking for the core features, used concepts and paradigms in the language. Code examples of these features provide a first idea of the language's syntax. The idea is not to know everything, just to be able to write some code. Writing code is the fun part, not reading. The more languages you know the easier and faster this step is. When learning Go one hour on Wikipedia during commute was enough. On the other hand for TypeScript I spent several hours reading the language reference (Handbook). For C# I skipped this step as I had seen most of the language features while facilitating Mob Programming sessions. You are done with this step when you have some idea what the language can do.

2) Figure out the usual setup and get it working.
Most programming languages come with their own ecosystem of runtimes, documentation, dependency and packaging mechanisms, testing frameworks, editors and other tools. When starting with a new language I try to use its typical tooling. Or at least I look for a decent IDE plugin to keep some level of comfort and productivity. Often this is painful and full of compromise. E.g. when working with Scheme I should have used Emacs but started with a basic editor and used VS Code in the end. For Go I needed 2 to 3 hours to set up the command line tools and VS Code integration. For C it took me 2 hours to compile and run a sample test alone - due to incompatible architecture binaries, sigh. I am still staying away from make tools due to the additional complexity. Eventually I will have to work through them if I want to use high level IDEs like Eclipse or CLion. If your interest in the language is purely educational, a simple editor might be enough to get started, like I used for Forth. You are done when you are able to edit, compile, test and run a Hello World application, e.g. in Windows Assembly.

3) Port small pieces of code (from a similar language if possible).
This helped me when learning C. I knew its basic features and had figured out how to compile and run a single file. And then I ported some small (refactoring) code katas. Porting code katas was easier than coding them because the solution and its code were already there and all I needed to deal with was syntax. If there is a similar language to start from, e.g. Java to C#, Java to PHP, C++ to C, even Java to C, then some of the syntax is proper right from the start. There was a lot of Google and StackOverflow involved and I managed to convert a small kata in around one hour. In the end I had ported several code katas to C. Emily Bache keeps inventing fun and interesting refactoring katas, which always need ports to other languages. For example I have ported her Parrot-Refactoring-Kata to TypeScript, Go and recently C. I have also contributed a Scheme version, but that was after I had learnt the language. You are done when you have contributed at least two ports of small refactoring katas.

4) Work through koans of the language.
Koans are an effective way to learn new programming languages. Programming language koans are a progressive sequence of little exercises, starting with basic things and building on each other to move to more advanced topics. The goal is to learn the language and core libraries. Usually the exercises contain failing test cases, where tiny pieces of code have to be filled in to make them pass. (I have used this idea to teach unit testing in Java and PHP as well as Python and C#. Porting the koans from JUnit to xUnit also helped me to get into C# - see the paragraph on porting small pieces of code.) Koans are awesome and I use them regularly. I worked through some Python koans, two third of Kotlin koans and all C Koans. The koans vary in size. While Kotlin contained 6 lessons, Python had 39 and JavaScript even 78. Working all these 78 exercises took me more than three full work days in total. You are done when you have completed (almost) all of the koans for the new language.

Ninety-Nine Problems
In case there are no koans for your language, look for "Ninety-Nine Problems". The idea is based on Werner Hett's P-99: Ninety-Nine Prolog Problems. These are little problems with different levels of difficulty. Sample solutions are available in Java, Scala, Haskell, Kotlin, F#, OCaml and probably others.

scratches - What is the connection between this image and item 6? (licensed CC BY-NC-ND by Sue)5) Watch some recorded talks and online presentations.
This is the most obvious step. I like to watch recorded presentations, during my commute. Sometimes some extra (passive) information helps me understand a language, or even this specific weird feature. Depending on time and interest this can be a few talks, or whole months of commute.

6) TDD some code katas from scratch.
Now is the time to write some code from scratch. I recommend starting with simple exercises. There is no point in getting frustrated right at the start. Manage the difficulty of your exercises: Use simple katas like FizzBuzz, Prime Factors, Roman Numerals or Word Wrap to get started. For example I used FizzBuzz to practice some XSLT and Prime Factors when revisiting old languages I used to know many years ago - like BASIC. I reuse these katas - and know their solutions - I just want to try them in a new language. Later I move to more complicated assignments like Bowling, Minesweeper (when I revisited Assembly after 20 years), Bank OCR (when I studied Scheme) or Conway's Game of Life. You are done when you have implemented a few code katas from scratch including tests.

7) Write more code, e.g. tackle a larger code base.
There is no other way of getting deeper into a programming language than using it. This calls for a larger side project. It can be a complex code kata, a little video game like Pong or Tron (Nibbles) - including graphics of course - or whatever comes to your mind. As I am fond of Scheme, I have build several Scheme interpreters in new languages. You could even implement your own unit testing framework, which is also recommended by Kent Beck as an exercise to get into a new language. (And I did that for Pascal, Assembly and Scheme.) Depending on the time invested into the previous steps, a side project includes more or less trial and error. If there is too much hassle, I stop and go back to previous steps to learn more about the basics. There is no point in being stuck. For example when studying Go, I went for the side project after 3 hours of researching the language, which was too early. So I spent some more time on theory and then continued working on my idea. My usual learning side projects take around 15 to 20 hours - or that is the time when I lose interest. You are done when you have worked on a larger code base for at least 15 to 20 hours.

8) At last get *all* the details.
Now that I am familiar with the basics of the language and its ecosystem, it is time to dive deeper. After some month of experimenting and hands-on practice - steps 2, 3, 4, 6 and 7 all involve writing code - I am drawn back to theory. I like to balance my learning between theory, experiments and practice. To conclude learning a new language I might study a classic book about that language. It should cover the language and its features completely and I read it from cover to cover. At that time I am already familiar with many parts of the language, reading progress is fast. I am interested in the all the details, the bits and pieces I did not encounter during my experiments. Language specifications are usually dry and perfectly suited for this step as well as classic titles like the "Pickaxe book", K&R and SICP (although SICP is so much more than a Scheme book...) You are done when you read a classic book on the new language from cover to cover.

Conclusion
I like programming languages and learning new ones is adventurous and fun. I try to learn a new language every year. Not all learning goes deep. Not all languages stick. Unless you are working on real projects in all of these languages at the same time, it is natural to forget some details. And that is perfectly fine. It is all about incorporating new paradigms and widening your perspective. So keep learning!

27 March 2020

TDD an Immediate Mode UI

Today I continue my experiments with test driving user interfaces. First I looked at test driving classic, fat, state based UIs like Swing or WinForms and later web component libraries like Vaadin. I need to explore different programming environments and platforms to see what is possible. In this post I want to have a look at immediate mode GUIs. An immediate mode GUI is a GUI where the event processing is directly controlled by the application. When I first read a similar sentence on Wikipedia, it did not help me at all. So what is an immediate mode GUI?

User InterfaceRetained Mode
A better question would be "what is retained mode?" Wikipedia states that retained mode is a style of API design in which the graphics library retains the complete object model of the rendering primitives to be rendered. That means that the widget, e.g. an instance of a JButton, contains all state needed to draw the button, i.e. colours, position, is the button clicked and so forth. When the button is created, or even "drawn", it is not causing the actual rendering. The GUI library decides when and how to render the widget and optimises the actual rendering. This includes double buffering, clipping or partial updates. Retained mode is the dominant style in GUI libraries, all user interfaces you have build were likely of this style.

Immediate Mode
So let's get back to Immediate mode. When using an immediate mode GUI library, the event processing is directly controlled by the application. There is no button object, there is just a Button(bounds Rectangle, text string) function which immediately draws the button with given text at the given position and size (argument bounds). The function returns true if the button was clicked. The application code must call all drawing commands required to describe the entire scene each time a new frame is displayed. This is often used in video games programming and examples of immediate mode rendering systems include Direct2D and OpenGL. If you want to know more about this mode, see this list of immediate mode gui tutorials on StackOverflow.

The (immediate mode) UI framework I am going to use is raylib, a simple and easy to use library to enjoy video games programming. See its cheat sheet for an overview of its functions. It has a simple API which hides everything regarding windowing system and environment. I am writing code in Go, so I am using raylib-go, the Golang bindings for raylib. Honestly I have no idea what I am doing. I have never used an immediate mode framework, not even heard of one before last year. In addition I know little to nothing about the Go language. Nevertheless I managed to talk my fellow crafter, Extreme Programmer and probably Vienna's longest time Go practitioner, Christian Haas into running this experiment with me. We spent one full day working on the Login Form exercise.

The first test: There is a button
import (
  "testing"
  ...
  rl "github.com/gen2brain/raylib-go/raylib"
)

func TestForm_LoginButton(t *testing.T) {
  var form login.Form
  ui := newTestingUI()

  form.Render(ui)

  if !ui.buttonCalled {
    t.Errorf("Button() was not called")
  }
}
Form is the struct containing the form's data, which is empty for now. Render is a receiver function on the form, which creates a button with no bounds and an empty text.
type Form struct{}

func (form Form) Render(ui FormUI) {
  ui.Button(rl.Rectangle{}, "")
}
To check that certain calls into raylib have been made, there is an interface FormUI between the application code and raylib. In the tests this interface is mocked to verify certain calls have been made. (In Go an interface type is defined as a set of method signatures. This is the way to achieve polymorphism.)
type testingUI struct {
  buttonCalled bool
}

func (ui *testingUI) Button(bounds rl.Rectangle, text string) bool {
  ui.buttonCalled = true
  return false
}
This follows an approach I have found as a possible TDD approach:
  • Design and write your methods separated from the actual UI.
  • TDD the elements and behaviour.
  • Mock single UI elements to verify necessary calls but do not show them.
For Swing I cannot see how this approach would be practical, but in this example with immediate mode raylib, it feels natural.

More Code
Soon the number of interactions with the UI made it necessary to add string ids to each drawing primitive. While raylib did not need them, other libaries do, so it did not feel wrong to add them. The mocked UI was growing. Here are the final pieces of code for the login button.
type testingUI struct {
  // verify if Button method has been called (mock)
  buttonCalled  map[string]bool

  // record button's text and bounds for later inspection (spy)
  buttonText    map[string]string
  buttonBounds  map[string]rl.Rectangle

  // return value of the Button method = user interaction (stub)
  buttonResults map[string]bool

  ...
}

func newTestingUI() *testingUI {
  ui := &testingUI{
    buttonCalled:  make(map[string]bool),
    buttonText:    make(map[string]string),
    buttonBounds:  make(map[string]rl.Rectangle),
    buttonResults: make(map[string]bool),
    ...
  }
  return ui
}

func (ui *testingUI) Button(id string, bounds rl.Rectangle, text string) bool {
  ui.buttonCalled[id] = true
  ui.buttonText[id] = text
  ui.buttonBounds[id] = bounds
  result := ui.buttonResults[id]
  ui.buttonResults[id] = false // reset button click after first call
  return result
}

func TestForm_LoginButton(t *testing.T) {
  var form login.Form
  ui := newTestingUI()

  form.Render(ui)

  if !ui.buttonCalled["login"] {
    t.Errorf("not found")
  }
}

func TestForm_LoginButtonText(t *testing.T) {
  var form login.Form
  ui := newTestingUI()

  form.Render(ui)

  if "Log in" != ui.buttonText["login"] {
    t.Errorf("is not \"Log in\"")
  }
}

func TestForm_LoginButtonBounds(t *testing.T) {
  var form login.Form
  ui := newTestingUI()

  form.Render(ui)

  expectedBounds := rl.Rectangle{300, 165, 110, 30}
  if ui.buttonBounds["login"] != expectedBounds {
    t.Errorf("expected %v, but was %v", expectedBounds, ui.buttonBounds)
  }
}
and the production code
type FormUI interface {
  Button(id string, bounds rl.Rectangle, text string) bool
  ...
}

func (form *Form) Render(ui FormUI) bool {
  buttonBounds := rl.Rectangle{X: 300, Y: 165, Width: 110, Height: 30}
  if ui.Button("login", buttonBounds, "Log in") {
    // TODO authenticate
  }

  return false
}
The third test, TestForm_LoginButtonBounds checks the position and size of the button. These properties are considered "layout". I do not like to test layout. I had to open GIMP to decide on the proper rectangle in expectedBounds, which I really dislike. I also expect this values to change a lot during initial development. Additionally Rectangle is a raylib type and so we depend on raylib in our code. Other options would have been:
  • Ignore layout completely. But then we would need to revisit all calls and add the Rectangles later.
  • Use abstract coordinates, i.e. map my coordinates into raylib Rectangles. That seemed like an extra overhead.
  • Move the responsibility of layout into the wrapper. There would be a button method for each button in the application and there would be more code outside my tests.
  • Move out the bounds and store them in the wrapper with a simple lookup on the id. Moving out stuff is against the nature of Immediate mode because the whole UI is expected to be in the code.
The wrapper for raylib is straight forward.
type RaylibFormUI struct{}

func (ui *RaylibFormUI) Button(id string, bounds rl.Rectangle, text string) bool {
  return raygui.Button(bounds, text)
}
This should give you an idea how things worked out. If you want to follow our TDD steps, here are the individual commits.

Is this MVP?
The MVP (Model View Presenter pattern) has a very thin, dumb UI, which is called the view. The model contains the UI data or UI model which might contain information about enabled fields, active buttons and so on. The presenter is a mediator and wires the model and the view. In the Go code above, the Form structure could be seen as an UI model. Later it will hold the user name and password data. The form receiver function func (form *Form) Render(ui FormUI) bool contains the presenter logic. It is not a separate object - there are no objects in Go - but it could be separate. Due to the immediate mode UI, there are no callbacks from the view in case of events. This removes the need for the usual MVP event listeners. The FormUI interface is like a MVP view as it hides the raylib dependency. It does not abstract away the underlying library, it is just a thin wrapper. It is not a MVP view. It could be made a view, i.e. provide more abstract functions in domain language, and then it would need tests on its own. In the experiment, this seemed unnecessary. In the end the FormUI will delegate many functions to raylib, so it could be generated from its original source code. This shows the tight coupling of the FormUI and the underlying UI library.

Water PressureConclusion
We built a login user interface following the requirements using Test Driven Development. It was easy and we did not face any problems, so no big deal. The Immediate mode library made it easier than for retained mode: There was no need to search for components, capture events, trigger events and so forth, definitely easier than my initial experiment. When comparing these experiments for Swing and raylib, I am reminded of the difference of Classic and Mockist TDD. In retained mode, e.g. Swing, I kept checking the state of UI components while in immediate mode I verified expected calls of the library. This approach allows variable depth of checks. We could have asserted colours and styles and we did not. So we will have to look at the finished form in the end. Christian proposed saving the image of the final view and storing it for regression testing.

We used TDD but there was little pressure on the design of the code. There was some pressure on the design of the API of Form, but there was no pressure on its internal workings nor on FormUI at all. The tests drove the creation of the UI - which was dictated by the requirements - there was no space for evolution. A different (UI) design might have been easier to test, but that was not an option. (A different UI would not have been different to test in this example anyway.) So we lost this particular benefit of TDD.

Try it yourself
I will continue my experiments and I would like to hear your ideas on the topic. The Go starting code with raylib-Go, its required dependencies and linter setup is available in the Login Form Kata. Try it yourself!

4 March 2020

TDD a Vaadin UI

As Code Cop I am working to get teams into adopting TDD. I use a mixture of classic training, guided workshops, Coding Dojos, code reviews and coaching to make this happen. One of my clients is working with Vaadin and keeps using it as an excuse to not use TDD. Not good. After my recent experiments with test driving user interfaces I "hijacked" one of our mob programming sessions and we worked on the Login Form Kata.

Vaadin
The client uses Vaadin 8 and the web has several ideas how to test (drive) it:
  • Use the Model View Presenter pattern, see Vaadin Advanced Application Architectures.
  • Gradually separate the UI from the logic, thinking of MVP more as a process than a pattern, starting with separate methods, which are accessible to tests so that the test can invoke them. For more details see Is MVP a Best Practice?
  • Create factories for all UI components so that tests can mock the UI. See this answer on StackOverflow for more details.
  • Running integrated tests in a test bed to simulate UI.​getCurrent() or VaadinSession.​getCurrent(), e.g. using the Karibu-Testing library.
LoginPresenter
We used MVP as described in my previous article. The group decided against a view model, because there was no specific UI model. Next was the presenter. The first two tests made us implement the requirement for a successful login: User name and password given, button "Log in" clicked, back end reports success, then the form is closed.
import org.mockito.Mockito;

import java.util.concurrent.ExecutorService;
import java.util.concurrent.Executors;
import java.util.concurrent.TimeUnit;

public class LoginPresenterTest {

  public static final String USERNAME = "Peter";
  public static final String PASSWORD = "Slovakia";

  private AuthenticationService authenticationService;
  private NavigatorView navigatorView;
  private LoginView loginView;
  private ExecutorService executorService;

  private LoginPresenter loginPresenter;

  @BeforeEach
  public void init() {
    authenticationService = Mockito.mock(AuthenticationService.class);
    navigatorView = Mockito.mock(NavigatorView.class);
    loginView = Mockito.mock(LoginView.class);
    executorService = Executors.newSingleThreadExecutor();

    loginPresenter = new LoginPresenter(authenticationService, navigatorView,
                                        loginView, executorService);
  }

  @Test
  public void should_call_backend_on_button_click() throws InterruptedException {
    Mockito.when(authenticationService.authenticate(USERNAME, PASSWORD))
      .thenReturn(new AuthenticationResult(true, "we do not care!"));

    loginPresenter.login(USERNAME, PASSWORD);
    waitForAuthentification();

    Mockito.verify(authenticationService, Mockito.times(1))
      .authenticate(USERNAME, PASSWORD);
  }

  @Test
  public void should_navigate_on_login_success() throws InterruptedException {
    Mockito.when(authenticationService.authenticate(USERNAME, PASSWORD))
      .thenReturn(new AuthenticationResult(true, "we do not care!"));

    loginPresenter.login(USERNAME, PASSWORD);
    waitForAuthentification();

    Mockito.verify(navigatorView, Mockito.times(1))
      .navigateToDashBoard();
  }

  private void waitForAuthentification() throws InterruptedException {
    executorService.shutdown();
    executorService.awaitTermination(1, TimeUnit.SECONDS);
  }
Using an ExecutorService made the asynchronous execution pretty simple. I like how they wrote two tests for the different aspects of successful login. Using smaller steps helped to get some logic sooner. It turned out that we needed another component for navigation, so we made up the NavigatorView. Then we went for the requirements User name and password given, button "Log in" clicked, back end reports an error, show message in error line, form stays open and While the back end is working, the "Log in" button stays disabled.
import org.mockito.InOrder;
import static org.mockito.ArgumentMatchers.any;

...

  @Test
  public void should_display_error_on_login_error() throws InterruptedException {
    String errorMessage = "error message";
    Mockito.when(authenticationService.authenticate(USERNAME, PASSWORD))
      .thenReturn(new AuthenticationResult(false, errorMessage));

    loginPresenter.login(USERNAME, PASSWORD);
    waitForAuthentification();

    Mockito.verify(navigatorView, Mockito.never())
      .navigateToDashBoard();
    Mockito.verify(loginView, Mockito.times(1))
      .displayErrorMessage(errorMessage);
  }

  @Test
  public void should_register_to_view() {
    Mockito.verify(loginView, Mockito.times(1))
      .addListener(any(LoginListener.class));
  }

  @Test
  public void should_disable_button_while_backend_is_working() throws InterruptedException {
    Mockito.when(authenticationService.authenticate(USERNAME, PASSWORD))
      .thenReturn(new AuthenticationResult(false, "we do not care!"));

    loginPresenter.login(USERNAME, PASSWORD);

    InOrder inOrder = Mockito.inOrder(loginView);
    inOrder.verify(loginView).setLoginButtonEnabled(false);
    waitForAuthentification();
    inOrder.verify(loginView).setLoginButtonEnabled(true);
  }
}
The finished presenter class looked almost like the one for Swing.
import java.util.concurrent.ExecutorService;

public class LoginPresenter implements LoginListener {

  private final AuthenticationService authenticationService;
  private final NavigatorView navigatorView;
  private final LoginView loginView;
  private final ExecutorService executorService;

  public LoginPresenter(AuthenticationService authenticationService,
                        NavigatorView navigatorView, LoginView loginView,
                        ExecutorService executorService) {
    this.authenticationService = authenticationService;
    this.navigatorView = navigatorView;
    this.loginView = loginView;
    this.executorService = executorService;

    loginView.addListener(this);
  }

  @Override
  public void login(String username, String password) {
    loginView.setLoginButtonEnabled(false);
    executorService.submit(() -> invokeLoginService(username, password));
  }

  private void invokeLoginService(String username, String password) {
    AuthenticationResult authenticate =
      authenticationService.authenticate(username, password);
    loginView.setLoginButtonEnabled(true);
    if (authenticate.success) {
      navigatorView.navigateToDashBoard();
    } else {
      loginView.displayErrorMessage(authenticate.message);
    }
  }
}
And the presenter would hide behind the LoginListener interface.
public interface LoginListener {

  void login(String username, String password);

}
Test Bed
As for the Swing version, using a test bed helped testing the view. There is a useable Vaadin testing tool, the Karibu-Testing library. It worked out of the box, no special treatment necessary. We wrote tests that the view forwards actions to the LoginListener, i.e. the LoginPresenter, and that the view can display an error message.
import com.github.mvysny.kaributesting.v8.MockVaadin;
import com.vaadin.ui.Button;
import com.vaadin.ui.Label;
import com.vaadin.ui.TextField;
import org.mockito.Mockito;

import static com.github.mvysny.kaributesting.v8.LocatorJ.*;

class LoginViewTest {

  private final LoginViewImpl content = new LoginViewImpl();

  @BeforeEach
  void beforeEach() {
    MockVaadin.setup(() -> new HelloUI(content));
  }

  @AfterEach
  void afterEach() {
    MockVaadin.tearDown();
  }

  @Test
  void should_pass_on_button_click() {
    LoginListener loginListener = Mockito.mock(LoginListener.class);
    content.addListener(loginListener);

    // simulate a text entry as if entered by the user
    _setValue(
      _get(TextField.class, spec -> spec.withCaption("Phone, email or username")),
      "peter");

    _setValue(
      _get(TextField.class, spec -> spec.withCaption("Password")),
      "Slovakia");

    // simulate a button click as if clicked by the user
    _click(_get(Button.class, spec -> spec.withCaption("Log in")));

    Mockito.verify(loginListener).login("peter", "Slovakia");
  }

  @Test
  void should_display_error_message() {
    content.displayErrorMessage("myError message");

    // simulate a text entry as if entered by the user
    Label label = _get(Label.class, spec -> spec.withValue("myError message"));

    Assertions.assertEquals(label.getStyleName(), "warning");
  }
}
Satisfying these two tests gave us the following view:
import com.vaadin.ui.*;

public class LoginViewImpl extends VerticalLayout implements LoginView {

  private final TextField username = new TextField("Phone, email or username");
  private final TextField password = new PasswordField("Password");
  private final Button loginButton = new Button("Log in");
  private final Label errorLabel = new Label();

  public LoginViewImpl() {
    addComponent(username);
    addComponent(password);
    addComponent(loginButton);
    addComponent(errorLabel);
    errorLabel.setStyleName("warning");
  }

  @Override
  public void addListener(LoginListener loginListener) {
    loginButton.addClickListener(clickEvent -> {
      loginListener.login(username.getValue(), password.getValue());
    });
  }

  @Override
  public void displayErrorMessage(String errorMessage) {
    errorLabel.setValue(errorMessage);
  }

  // ...
}
That was as far as we went during the sessions. We did not finish the whole login window, next tests would drive the logic of setLoginButtonEnabled(boolean).

Conclusion
Besides small differences, the code looks much like the Swing version. The process worked the same, most tests do not deal with the UI. As I do not know many UI frameworks my conclusion is limited. Maybe - hopefully - probably this approach works for state based user interfaces as long as there is a reasonable test bed. I can see how it could work for C# WinForms. On the other hand, Vaadin and WinForms are very similar to Java's Swing. I need to look at other kind of user interfaces.

7 February 2020

TDD Classic State Based UI

Most modern user interface technologies are state based. Classic frameworks like Swing, JavaFX, Eclipse RCP, Windows Forms, Vaadin and many more consist of heavy weight UI widgets that manage all their state and interact with the application using event handlers. Such frameworks are harder to test than plain code. I have not found much information on how to do that, one resource that got me started is chapter eight from Lasse Koskela's Test Driven. I am using many ideas from that book in here.

Model View Presenter (MVP) Pattern
Because these UI technologies are heavy weight, hard to test and often slow to run, one needs to decouple from them as much as possible. The goal is to minimize all UI dependencies. As few classes as possible should be "contaminated" with UI stuff, and the code that needs to do UI should contain as little logic as possible. Common ways to separate concerns between the interface and the underlying logic are MVC, MVP, MVVM or similar architectural patterns. I am using the MVP pattern. Its goal is - obviously - to facilitate automated unit testing and improve the separation of concerns in presentation logic. That means MVP is used to have a very thin, dumb UI, which is called the view. The model contains the UI data or UI model which might contain information about enabled fields, active buttons and so on. The presenter is a mediator and wires the model and the view.

Using Java and Swing
On my research on how to test drive user interfaces I started with Java and Swing. The Wikipedia page lists several UI frameworks which use the MVP patterns themselves, Swing being one of them. That means that Swing uses MVP internally. Larger components like JComboBox or JTable have their own model classes ComboBoxModel and TableModel. This is useful because the models do not depend on the user interface part of Swing and can be TDD'ed in the usual way. It does not mean that Swing can be test driven easily. As example I will run my Login Form Kata. I am going to develop the basic login screen step by step using TDD.

First Test: LoginModel should contain user lookup and password
I start with the model. The model contains the state of the user interface. There is no problem using TDD for that. My first test is
class LoginModelTest {

  LoginModel model = new LoginModel();

  @Test
  void shouldContainUserLookupAndPassword() {
    model.setLookup("user@server.com");
    model.setPassword("secret123");

    assertEquals("user@server.com", model.getLookup());
    assertEquals("secret123", model.getPassword());
  }
}
After seeing it red, I add
public class LoginModel {

  private String lookup;
  private String password;

  // getters and setters for lookup and password
}
Green. Usually I am not testing for getters and setters, but today I have to start somewhere. Depending on the used version of MVP, the model could update the view itself. I choose to keep the model very simple, following the Passive View aka Humble Dialog Box variant of MVP. This seems to be the usual way. In this example of login form, there is no state that goes back from the model into the view yet, e.g. if the login button should be disabled, so it does not make any difference.

Test: LoginPresenter should pass lookup and password to its model
Next is line is the LoginPresenter. The presenter is handling all user input. It is important, that the presenter has no dependency on Swing, too, so there is no problem TDDing that. The presenter will be notified of user input into the lookup or password field and will store the values in the model.
class LoginPresenterTest {

  LoginModel model = new LoginModel();
  LoginPresenter presenter = new LoginPresenter(model);

  @Test
  void shouldPassLookupAndPasswordToModel() {
    presenter.lookupChanged("user");
    presenter.passwordChanged("pass");

    assertEquals("user", model.getLookup());
    assertEquals("pass", model.getPassword());
  }
}

public class LoginPresenter {

  private final LoginModel model;

  public LoginPresenter(LoginModel model) {
    this.model = model;
  }

  public void lookupChanged(String newLookup) {
    model.setLookup(newLookup);
  }

  public void passwordChanged(String newPassword) {
    model.setPassword(newPassword);
  }
}

Empty LoginView
Finally I create the LoginView interface. The view wraps the UI technology completely. It starts as an empty interface. The methods to come will be driven by the needs of the presenter.
public interface LoginView { }

Test: LoginPresenter should close the view on successful login
It is time to go for some real logic. When the login button is clicked, the authentication back end will be called and if the call was successful, the view should be closed. The test uses Mockito to mock the view and verify it has been called.
import static org.mockito.Mockito.mock;
import static org.mockito.Mockito.verify;
import static org.mockito.Mockito.when;

class LoginPresenterTest {

  LoginModel model = new LoginModel();
  LoginView view = mock(LoginView.class);
  AuthenticationService auth = mock(AuthenticationService.class);

  LoginPresenter presenter = new LoginPresenter(model, view, auth);

  @Test
  void shouldCloseViewOnSuccessLogin() {
    model.setLookup("user");
    model.setPassword("secret");
    when(auth.authenticate("user", "secret")).
      thenAnswer(invocation -> {
        return new AuthenticationResult(true, null);
      });

    presenter.loginButtonClicked();

    verify(view).close();
  }
}
This adds a close() method to the LoginView. Because I own the view, I can use domain names and the actual UI technology is not visible from the outside.

Test: LoginPresenter should display an error on failed login
Another test drives the display of an error message if authentication fails. This creates a showError(String message) method in the view.
  @Test
  void shouldDisplayErrorOnFailedLogin() {
    model.setLookup("user2");
    model.setPassword("secret2");
    when(auth.authenticate("user2", "secret2")).
      thenAnswer(invocation -> {
        return new AuthenticationResult(false, "Login failed.");
      });

    presenter.loginButtonClicked();

    verify(view).showError("Login failed.");
  }
And so the loginButtonClicked method is complete.
  public LoginPresenter(LoginModel model, LoginView view,
                      AuthenticationService authenticationService) {
    this.model = model;
    this.view = view;
    this.authenticationService = authenticationService;
  }

  @Override
  public void loginButtonClicked() {
    AuthenticationResult result =
      authenticationService.authenticate(model.getLookup(), model.getPassword());
    if (result.success) {
      view.close();
    } else {
      view.showError(result.message);
    }
  }

Test: LoginPresenter should call Authentication service asynchronously
As stated in the requirements, all calls to the back end need to be asynchronous. Synchronous code would block the Swing event thread and render the UI unresponsive. So I change the tests to force the calls to be asynchronous. I need two java.​util.​concurrent.​CountDownLatchs and have to wait on them to start and finish asynchronous processing.

Test Bed
The last piece is the view - the implementation of the view to be precise. To test the real view it has to be started and sent some events. This is what I wanted to avoid. It is slow and brittle. By following the MVP pattern described above, the view will have as little code as possible. There will only be a few tests executing it. Sometimes it is necessary to call certain methods on UI classes for the UI to work at all, e.g. show. It is not pretty. Best would be to use a test bed or harness to run these UI components in an isolated way, e.g. to have a dedicated window for the component under test and to create the application in a way that allows to exercise UI features independently.

Lasse Koskela mentions Abbot to test stand alone AWT or Swing components. It provides helper code for finding and interacting with UI elements. See how Abbot works in one of its tutorials. It is pretty old and its test support is for JUnit 3, but it gets the job done. It displays a frame while running the tests and there are flickering tests from time to time. This is not a problem of Abbot itself, but is the nature of full UI tests. As I said, these are brittle.

Test: SwingLoginView has a login button with text
A basic start is to assert the existence of UI elements. Abbot offers several ways to find elements, using its getFinder().​find(...) method. An easy way to locate elements is to use ids or names, e.g. with loginButton.​setName("LoginButton").
import javax.swing.JButton;
import javax.swing.JPanel;

import abbot.finder.ComponentSearchException;
import abbot.finder.matchers.NameMatcher;
import junit.extensions.abbot.ComponentTestFixture;

public class SwingLoginViewTest extends ComponentTestFixture {

  LoginView view = new SwingLoginPanel();

  public SwingLoginViewTest(String name) {
    super(name);
  }

  public void testHasLoginButtonWithText() throws ComponentSearchException {
    showFrame((JPanel) view); // Abbot shows the view
    JButton loginButton = findLoginButton();

    assertEquals("Log in", loginButton.getText());
  }

  private JButton findLoginButton() throws ComponentSearchException {
    return (JButton) getFinder().find(new NameMatcher("LoginButton"));
  }
}
This tests forces me to create the initial login panel.
import javax.swing.JButton;
import javax.swing.JPanel;

public class SwingLoginPanel extends JPanel implements LoginView {

  private final JButton loginButton = new JButton("Log in");

  public SwingLoginPanel() {
    createLoginButton();
  }

  private void createLoginButton() {
    loginButton.setName("LoginButton");
    add(loginButton);
  }

  @Override
  public void close() {
  }

  // other empty LoginView methods

}

Observer Pattern
In MVP, the view delegates user input somewhere else and does nothing but rendering. We using the Observer Pattern to get notifications from the UI. The view takes the role of subject and the presenter is observing it. Observer Pattern subjects need to manage the list of observers - in Java usually named listeners - and allow code to register and sometimes deregister them.

Test: SwingLoginView should send button click to presenter
import static org.mockito.Mockito.mock;
import static org.mockito.Mockito.verify;
import abbot.tester.JButtonTester;

...

  public void testSendButtonClickToPresenter() throws ComponentSearchException {
    LoginListener listener = mock(LoginListener.class);
    view.registerLoginListener(listener);

    showFrame((JPanel) view);
    JButton loginButton = findLoginButton();
    JButtonTester tester = new JButtonTester(); // from Abbot
    tester.actionClick(loginButton);

    verify(listener).loginButtonClicked();
  }
As I said, the presenter will be the actual observer, hiding behind the LoginListener interface.
public interface LoginListener {

  void loginButtonClicked();

}
Its implementation is straight forward.
  @Override
  public void registerLoginListener(LoginListener listener) {
    loginButton.addActionListener(ae -> listener.loginButtonClicked());
  }

Test: SwingLoginView has input fields for lookup and password
Like for the login button, I assert the existence of lookup and password fields and that they are wired to the listener. To verify that, the test code enters some text into the fields and checks that the listener mock has been called.
  public void testHasLookupField() throws ComponentSearchException {
    LoginListener listener = mock(LoginListener.class);
    view.registerLoginListener(listener);

    showFrame((JPanel) view);
    JTextField lookupField = findLookupField();

    assertEquals(20, lookupField.getColumns());

    // verify that it is wired as well
    JTextFieldTester tester = new JTextFieldTester(); // from Abbot
    tester.actionEnterText(lookupField, "user");

    verify(listener).lookupChanged("user");
  }

  private JTextField findLookupField() throws ComponentSearchException {
    return (JTextField) getFinder().find(new NameMatcher("LookupField"));
  }
Yes, this is not a good unit test as it tests two things - visible by its two checks, assert and verify. I should split that into two independent tests. Unfortunately these tests are slow, so I want to minimize their number. Together with a similar test for the JPasswordField passwordField the view is taking shape.
  private final JTextField lookupField = new JTextField(20);
  private final JPasswordField passwordField = new JPasswordField(20);

  private void createLookupField() {
    lookupField.setName("LookupField");
    add(lookupField);
  }

  private void createPasswordField() {
    passwordField.setName("PasswordField");
    add(passwordField);
  }

  @Override
  public void registerLoginListener(LoginListener listener) {
    lookupField.getDocument().
      addDocumentListener(new AllDocumentListener() {
        @Override
        protected void fire() {
          listener.lookupChanged(lookupField.getText());
        }
      });

    passwordField.getDocument().
      addDocumentListener(new AllDocumentListener() {
        @Override
        protected void fire() {
          listener.passwordChanged(new String(passwordField.getPassword()));
        }
      });

    loginButton.addActionListener(ae -> listener.loginButtonClicked());
  }
To be notified of each input character, I use Swing's DocumentListener. (AllDocumentListener is my own base class to handle the many methods of it.) This gives the final listener for the observer:
public interface LoginListener {

  void lookupChanged(String lookup);
  void passwordChanged(String password);
  void loginButtonClicked();

}

Test: SwingLoginView should display errors
This is the final test for the view.
  public void testErrorDisplay() throws ComponentSearchException, InterruptedException {
    showFrame((JPanel) view);
    JLabel errorField = findErrorField();

    assertEquals("", errorField.getText());

    view.showError("Alert!");
    Thread.sleep(10); // wait for asynchronous update

    assertEquals("Alert!", errorField.getText());
    assertEquals(Color.RED, errorField.getForeground());
  }

  private JLabel findErrorField() throws ComponentSearchException {
    return (JLabel) getFinder().find(new NameMatcher("ErrorField"));
  }
And the final SwingLoginView:
import java.awt.Color;

import javax.swing.JLabel;
import javax.swing.SwingUtilities;

...

  private static final Color ERROR_COLOR = new Color(255, 0, 0);
  private final JLabel errorField = new JLabel();

  private void createErrorField() {
    errorField.setName("ErrorField");
    errorField.setForeground(ERROR_COLOR);
    add(errorField);
  }

  @Override
  public void showError(String message) {
    SwingUtilities.invokeLater(() -> errorField.setText(message));
  }
SwingUtilities.invokeLater() is needed because showError is called asynchronously. While there is agreement in the TDD community to not assert on layout or styling, I am asserting that the foreground of the error field changed to an colour indicating the error, because it is important to indicate errors also in colour.

Test: LoginPresenter should register itself to the view
To complete the Observer Pattern, the presenter needs to register itself to the view. I started with verify(view).​registerLoginListener(​Mockito.​any(​LoginListener.class)); but that is not what I want. I really want that the methods on the listener trigger the required functionality in the back end or model.
import org.mockito.ArgumentCaptor;

...

  @Test
  void shouldRegisterItselfToView() throws InterruptedException {
    when(auth.authenticate(any(String.class), any(String.class))).
      thenReturn(new AuthenticationResult(true, null));

    ArgumentCaptor<LoginListener> argument = ArgumentCaptor.forClass(LoginListener.class);
    verify(view).registerLoginListener(argument.capture());
    LoginListener listener = argument.getValue();

    listener.lookupChanged("user");
    assertEquals("user", model.getLookup());

    listener.passwordChanged("pass");
    assertEquals("pass", model.getPassword());

    listener.loginButtonClicked();
    Thread.sleep(10);
    verify(auth).authenticate("user", "pass");
  }
When the presenter registers itself to the view, I capture the listener using Mockito's ArgumentCaptor. Then I call the listener and check the wanted behaviour. The sleep time is required because authentication is run asynchronously. Finally the presenter is complete.
public class LoginPresenter implements LoginListener {

  // ...

  public LoginPresenter(LoginModel model, LoginView view,
                        AuthenticationService authenticationService) {
    this.model = model;
    this.view = view;
    this.authenticationService = authenticationService;

    view.registerLoginListener(this);
  }

  // ...
}
and the final view (interface) is
public interface LoginView {

  void close();
  void showError(String message);
  void registerLoginListener(LoginListener listener);

}
The actual commits are here.

Conclusion
This was my first try and it worked well. I conclude that it is possible to TDD UIs at least using Java and Swing. I have working examples and the testing tools are fair. The final code has the usual TDD benefits - more separation between concerns (i.e. logic and UI technology) and a better design using domain methods. I tested the UI elements briefly. I did not go into test driving styling, colours or positions. In Swing components have all these properties accessible, e.g. visibility, colours, positions and more. So I could have asserted them. That is nice because I could go as far as I wanted to. I am undecided if I should test colours and other styling related things. As I said, there seems to be consensus to not assert on layout or styling and I did not. In general it is still unclear (for me) how much automated testing is needed for an UI in such situations. While I did not write tests for everything, I already have a feeling that there are "lots of test but no application".

20 January 2020

Login Form TDD a UI Kata

User interfaces are usually considered hard to test, and people rarely develop their user interfaces using Test Driven Development. So it is considered hard. I like hard and I like challenges. I started to research the topic last year. Actually I went crazy. Besides my own experiments and practice, I hijacked most Coding Dojo and Coderetreat sessions and tried to TDD user interfaces with my pairing partners. I discussed the topic at unconferences and spent dedicated time with people in learning workshops. Besides its use I just wanted to see how far I could go.

This is the first article in a series describing what I learned. I spent more than half a year of my learning time on this topic and tried different approaches. In the past I found myself a different topic to research each year. Previous topics included Scheme and Architectural Refactoring. Currently I am investigating Splitting the Monolith. This makes me leave my research kind of unfinished - probably it is impossible to "finish" learning at all. I want to collect what I have learned during last half year before diving into something else.

The Exercise
To experiment with Test Driven Development of user interfaces, we need some UI to build. What would be a small UI that most people know? A login dialogue. I created a repository to drive the UI of a Login Form using TDD, the Login Form TDD UI kata. Your task is to create a Login window or form or web page. Here are the requirements:

Existing Code Back End
The exercise is focused on the front end part. Let's just assume an Authentication service, facade or end point which will be simulated in the tests. It has a method authenticate() to authenticate a user based on her phone, email or user name and her password. The call returns an AuthenticationResult which indicates success and an optional message for error situations. From now on the combination of a user's phone, email or user name is called the user's lookup. Under certain conditions, the UI logic will invoke this service or back end. Calls to the back end might take some time and/or block, so these calls must done asynchronously to keep the user interface responsive.

Requirements for the Minimum Functionality
  • There is a user name input field, which is limited to 20 characters.
  • The label "Phone, email or username" is left, next to the input field.
  • There is a password field, which is limited to 20 characters.
  • The password is either visible as asterisk or bullet signs.
  • The label "Password" is left, next to the input field.
  • There is a "Log in" button in the bottom right corner of the window.
  • There is a label in a red box above the button. It is only visible if there was an error.
These requirements are just describing the UI. The more interesting part is the logic. The logic uses the Authentication back end described above.
  • When user name and password are given, button "Log in" is clicked and the back end reports success, then the form is closed.
  • When user name and password given, button "Log in" is clicked but the back end reports an error, a message in the error line is shown and the form stays open.
  • While the back end is working, the "Log in" button is disabled.
My friend Thomas said that UI requirements need wireframes. So here is a sketch. Pretty, isn't it? ;-)

Bare Login Form Sketch
More Requirements
The goal of the kata is to experiment with driving the UI using tests. Maybe you want to ignore the styling (most people do) or ignore the visual elements completely. Or maybe you want to focus specifically on styling. Clearly we need more requirements like
  • More functionality while the back end is working
  • More logic in the view itself when username or password is not given
  • More UI elements like titles and logos
  • Detailed styling of all elements
  • Focus and tab order
  • Checkbox to show password
  • Caps Lock Warning
All these requirements and even more are listed in detail in LoginDialogRequirements.md inside the kata repository. The task is progressive: If you want more logic then go for more logic, for more styling add more styling. Thanks to Nick Babich, Software Testing Help and Anton Angelov this will be the most complete login you will ever build. Here is the styled sketch of the final Login:

Login Form Sketch of Everything Styled
Drive the UI of a Login Form using TDD
I created this kata to explore test driving UIs: login-form-tdd-ui-kata. Currently it contains code to get started in the following languages and UI frameworks:
  • Java/Swing
  • Java/Vaadin
  • Kotlin/Android
  • Go/raylib-go
  • JavaScript/plain browser DOM
  • JavaScript/React
Give it a try! If you do, please commit after each TDD step and share your repository so I can analyse it. Have fun!