Showing posts with label Ant. Show all posts

19 October 2018

NATstyle Custom Reports

This summer I wrote about NATstyle, a utility to define and check the coding standard in your NATURAL program. Now NATURAL is not a language you will encounter frequently (hopefully not ;-) but it is an excellent show case for neither being intimidated by strange environments nor accepting idiosyncratic vendor views. First I showed how NATstyle can be used outside of the NATURAL IDE - a prerequisite for setting up Continuous Integration, then I experimented with ways to define my own custom analysis rules. Now is the time to talk about reporting.

Custom Stylesheets
NATstyle creates an XML report. Its structure is
<NATstyle>
  <file type='...' location='...'>
    <error severity='...' message='...' />
    ...
  </file>
  ...
</NATstyle>
NATstyle comes with a stylesheet NATstyleSimple.xsl. The XSLT transformation is not part of the NATstyle execution. Using custom stylesheets allows you to convert the XML into arbitrary reports.

Suitable Target Structure
When working on weird environments, I try to use standard tools as much as possible. Emulating common output formats is the way to go. For example in the case of test results, the JUnit XML format is used in similar scenarios, e.g. Erlang, Cobol and others.

What would be a good structure for reporting static code analysis findings? PMD is a common tool in the Java space and it creates XML reports which are understood by tools like Jenkins, making integration much easier. In the report, violations are grouped by files:
<pmd version="..." timestamp="...">
  <file name="SampleClass.java">
    <violation beginline="2" endline="16"
               begincolumn="8" endcolumn="1"
               rule="TooManyFields" ruleset="Code Size"
               externalInfoUrl="..." priority="3">
      Too many fields
    </violation>
  </file>
</pmd>
XML Parser
Changing the NATstyle result to PMD's format is possible using XSLT alone, but I favour XML parsers for more complex transformations. I established the following process to convert the results: As I used Ant to execute NATstyle on Jenkins, I created an Ant task NatStyleResultToPmdTask.java. (Ant declaration for that task is in ant/ant_NatStyleResultToPmd.xml.) The Ant task sets the input and output XML file names and invokes the NatStyleToPmd.java conversion which uses a SAX parser to parse the NATstyle result and feeds the violations into net.​sourceforge.​pmd.​Report#​addRuleViolation. Then core PMD classes create the final XML report. (The project containing the Ant task and complete, working setup is here.)

Conclusion
In legacy environments it is often possible to "bridge" to standard tools and make use of the rich tooling we have. We can apply modern practises like automated code reviews or Continuous Integration. Another example is bringing TDD and automated testing to the mainframe platform. It is 2018, we have all these great tools, let's make use of them!

3 July 2018

Using NATstyle from the commandline

Last year a new client contracted me to help them make their development process, their development environment and tooling "state of the art" (aka up do date). From the coding perspective that included - among other things - using a decent IDE, writing unit tests, having some Continuous Delivery pipeline in place and using static code analysis. I thought that it should not be too difficult, right? It was, but that is not the goal of this article. Today I want to describe the static analysis features and how to use it.

Earth Sapphire Progress Picture 30 july-2011NATURAL
The code base was NATURAL. NATURAL is an application development and deployment environment using a proprietary language maintained by Software AG. It was created in 1979. André describes it as Cobol's ugly, brain-damaged, BABBLING IN ALL-CAPS - but regrettably still healthy and strong - cousin.. ;-) Well, it is a procedural language structured using modules, subroutines and functions. It feels as old as it is. For example, module names are limited to eight (8!) characters and there is no way to structure the modules further. An enterprise application might contain 5.000 to 10.000 modules. To me NATURAL feels much like early Pascal: units (modules), subroutines and functions together with the eight characters DOS name limit. I really liked Pascal back then and I do not feel that bad about NATURAL. Probably also because I do not have to use it on a daily basis.

NaturalONE and NATstyle
NaturalONE is the Eclipse-based tool for NATURAL by Software AG. It looks pretty good, similar to what you would expect from Eclipse. It contains the usual features like Outline, Search, Debug and something called NATstyle. Now NATstyle - which probably on purpose sounds similar to the well known Checkstyle - is an utility to define and check the coding standard in your programs. It is used inside NaturalONE, see a NATstyle Demo by Software AG. (For more information refer to the Eclipse/NaturalONE help topic Checking Natural Code with NATstyle.)

Invoking NATstyle from outside NaturalONE
I like static code analysis and consider it a mandatory component of every delivery pipeline. As I said above, I wanted to have some static code analysis and was wondering if I would be able to run NATstyle in the pipeline? I did not find any information on the topic and was forced to experiment. I used NaturalONE 8.3.5.0.242 CE (November 2016) and figured out several ways, which were hardly documented, and might be subject to change. Likely there are other options available in newer versions of NaturalONE and NATstyle.

Invoking NATstyle from command line
NATstyle is just an Eclipse plugin inside NaturalONE. In my edition it is the folder C:\Natural-CE\​Designer\​eclipse\​plugins\​com.​softwareag.​naturalone.​natural.​natstyle_8.3.5.0000-0242. With the proper class path it is possible to invoke NATstyle's main method, which prints help on its usage:
Usage: com.softwareag.naturalone.natural.natstyle.NATstyle [-options]

where options include:
  -projectpath <directory> Specify where to find the Natural project.
  -rootfolder              Library root folder support enabled.
  -c <file>                Specify the configuration file.
  -o <file>                Specify the output file.
  -sourcefiles <srcList>   Specify list of source files to be loaded.
                           separated with ;
  -libraries <libList>     Specify list of libraries to be loaded.
                           separated with ;
  -exclude <libList>       Specify a list of libraries to exclude.
                           separated with ;
  -p <directory>           Specify where to find additional packages.
  -help                    Display command line options and exit.

Make sure the following classes can be found in your class path:

com.softwareag.naturalone.natural.auxiliary
com.softwareag.naturalone.natural.common
com.softwareag.naturalone.natural.parser
Nice, that looks like the developers from Software AG prepared NATstyle to be called stand-alone in my pipeline. +1. All the necessary classes can be found in the following plugins of Eclipse/NaturalONE:
  • Folder com.softwareag.naturalone.natural.natstyle_8.3.5.0000-0242
  • Jar com.softwareag.naturalone.natural.auxiliary_*.jar
  • Folder com.softwareag.naturalone.natural.common_8.3.5.0000-0242
  • Jar com.softwareag.naturalone.natural.parser_*.jar
  • Jar org.eclipse.equinox.common_*.jar
These are all bundles defined by Eclipse/OSGi. The list of dependencies of these bundles also contains the following Jars
  • org.eclipse.swt.win32.*.jar
  • org.eclipse.ui.console_*.jar
which (in my experience) are not needed to use NATstyle. NATstyle does not use any other OSGi features and we can set the needed class path by hand. Here is an example how to do that in the Windows shell when NaturalONE is installed:
set N1=C:\Natural-CE\Designer\eclipse\plugins
set CLASSPATH=^
%N1%\com.softwareag.naturalone.natural.natstyle_8.3.5.0000-0242;^
%N1%\com.softwareag.naturalone.natural.auxiliary_8.3.5.0000-0242.jar;^
%N1%\com.softwareag.naturalone.natural.common_8.3.5.0000-0242;^
%N1%\com.softwareag.naturalone.natural.parser_8.3.5.0000-0242.jar;^
%N1%\org.eclipse.equinox.common_3.6.200.v20130402-1505.jar

java com.softwareag.naturalone.natural.natstyle.NATstyle %*
Download the source and see bin/run_natstyle for the script I used to run NATstyle directly. Copying the needed folders and Jars to another machine works well. I recommend to create a Jar from the folders before copying them around. bin/_create_jar shows how to do that. Make sure not to include META-INF\*.RSA or META-INF\*.SF into the new Jars because the checksums do not match. bin/copy_jars does the actual copying into the lib folder.

Invoking NATstyle from Ant
NaturalONE supports Ant for some automation tasks. There is no specific NATstyle Ant task, but calling it from Ant is straight forward. If the path <path id="natstyle.classpath"> is set up to contain all the Folders and Jars, NATstyle is executed via Ant's java task:
<java taskname="natstyle"
      classname="com.softwareag.naturalone.natural.natstyle.NATstyle"
      dir="${basedir}" fork="true" maxmemory="128m"
      failonerror="true"
      classpathref="natstyle.classpath">
  <arg value="-projectpath" />
  <arg value="../NatUnit/NatUnit_L4N" />
  ...
</java>
A new JVM needs to be forked because NATstyle calls System.exit() at the end. All parameters are the same as for the command-line invocation and are passed in via the <arg /> element. In the source, see ant/ant_NatStyle.xml for the complete Ant script.

Reporting
NATstyle writes an XML report of all files if worked and found rule violations. The structure is
<NATstyle>
  <file type='...' location='...'>
    <error severity='...' message='...' />
    ...
  </file>
  ...
</NATstyle>
Inside the folder of NATstyle (i.e. com.softwareag.naturalone.natural.natstyle_8.3.5.0000-0242) there is a subfolder NATstyle. It contains sample files. Using the provided NATstyleSimple.xsl the report XML (e.g. NATstyleResult.xml) can be transformed into a human-readable format (e.g. NATstyleSimple.html). When using NATstyle stand-alone, you might want to copy this folder as well. XSLT transformation task is part of Ant and converts the XML to HTML.
<xslt basedir="${basedir}"
      destdir="${basedir}/report"
      style="${basedir}/NATstyle/NATstyleSimple.xsl">
  <include name="NATstyleResult_*.xml" />
</xslt>
See ant/ant_NatStyleResultToHtml.xml for the complete Ant build script to convert the NATstyle result XML into a readable HTML report. Using your own stylesheet (.xsl) allows you to customize the report. See how to convert the report into more complex formats.

Next time I will show you how to write your own NATstyle rules.

31 May 2014

Game of Life Apache Ant

This post is about the second half of my quest to create Conway's Game of Life using a plain Apache Ant build script. In the first half I test-drove the code up to target apply_rules which determined if a given cell would be reborn, live on or die. This part is about applying the rules of the game to whole generations. Here are the test cases to identify the next generation.
<target name="all-test-targets" description="run all test targets">
    ...
    <antcall target="test-next-gen-living-with-no-neighbours-dies" />
    <antcall target="test-next-gen-empty-with-three-neighbours-comes-alive" />
</target>

<target name="test-next-gen-empty-with-three-neighbours-comes-alive">
    <make-tmp-dir />
    <antcall target="create_3x3_grid" />
    <touch file="${test.temp_dir}/.y/.x.x/cell" />
    <touch file="${test.temp_dir}/.y.y/.x/cell" />
    <touch file="${test.temp_dir}/.y.y/.x.x/cell" />

    <antcall target="next_generation">
        <param name="p_cell_location" value="${test.temp_dir}/.y/.x" />
    </antcall>
    <assert-file-exists file="${test.temp_dir}/.y/.x/next" />
</target>

...

<property name="cell.marker_will_live" value="next" />

<target name="next_generation" depends="apply_rules" if="cell.will_live"
      description="creates a 'next' file if a cell in the given location
                   'p_cell_location' will be in the next generation.">

    <touch file="${p_cell_location}/${cell.marker_will_live}" />
</target>
The target next_generation marks a cell which will live (on) by creating an empty marker file inside its folder.

Center of the Milky Way Galaxy (NASA, Chandra, 111009)The Universe is (maybe) infinite
In the previous part I defined the universe as a folder structure containing all cells.
universe/
    .y/
      .x/
      .x.x/
      ...
    .y.y/
      .x/
      .x.x/
      ...
    .y.y.y/
    ...
The universe is 2-dimensional and has a certain size. To support universes of arbitrary size I started testing for 2 times 2 grids,
<import file="lib/asserts.xml" />
<import file="universe-build.xml" />

<target name="test-create-empty-2x2-universe">
    <make-tmp-dir />

    <antcall target="create_universe">
        <param name="p_universe_location" value="${test.temp_dir}" />
        <param name="p_universe_size" value="2" />
    </antcall>

    <assert-file-exists file="${test.temp_dir}/universe/.y/.x" />
    <assert-file-exists file="${test.temp_dir}/universe/.y/.x.x" />
    <assert-file-exists file="${test.temp_dir}/universe/.y.y/.x" />
    <assert-file-exists file="${test.temp_dir}/universe/.y.y/.x.x" />
</target>
and then for 3 times 3, 4 times 4 and so on. The creation of each universe was straight forward, but there was a lot of duplication in the different creation targets. Creating an 1 by 1 universe was trivial and adding dimensions step by step seemed a good way to remove duplication.
<target name="create_universe_3" depends="create_universe_2">
    <antcall target="universe_add_dimension" />
</target>

<target name="create_universe_2" depends="create_universe_1">
    <antcall target="universe_add_dimension" />
</target>

<target name="create_universe_1" if="universe.location">
    <mkdir dir="${universe.location}/.y/.x" />
</target>
Increasing the grid's first dimension, the y- or row-dimension, of an existing grid is done by adding a new row folder .y.y.y. Adding the second, x- or column-dimension means adding another column .x.x.x to each row folder .y, .y.y and so on. In Ant this can be done using copy and regexpmapper adding another .x or, respectively .y to the matched group of .xs or .ys.
<macrodef name="universe_add_row"
      description="copies the row folders and renames them as additional row.">
    <sequential>
        <copy todir="${universe.location}" includeEmptyDirs="true" overwrite="false">
            <fileset dir="${universe.location}" includes="${universe.struct}" />
            <regexpmapper from="^(.*\.y)(/.*\.x)$$" to="\1.y/\2" handledirsep="yes" />
        </copy>
    </sequential>
</macrodef>

<macrodef name="universe_add_column"
      description="copies the column folders and renames them as additional column.">
    <sequential>
        <copy todir="${universe.location}" includeEmptyDirs="true" overwrite="false">
            <fileset dir="${universe.location}" includes="${universe.struct}" />
            <regexpmapper from="^(.*\.x)$$" to="\1.x" />
        </copy>
    </sequential>
</macrodef>

<target name="universe_add_dimension" if="universe.location"
      description="adds one dimension in column- and row-folders.">
    <universe_add_column />
    <universe_add_row />
</target>
That removed all duplicated mkdir commands in the creation targets. Still I was not happy with that solution because I needed to provide a target <target name="create_universe_N"> and all previous targets for each dimension N I wanted to support. I spent some time trying to resolve this but failed. Ant does not provide any kind of loop construct and does not allow for recursion when calling targets. (Using Ant-Contrib's extensions like For was out of the question because I wanted to write idiomatic Ant which is rather declarative than imperative.) So the current solution only supports grids up to a fixed dimension.

GenerationsGenerations
After creating universes of (almost) arbitrary size and seeding them I had to iterate all cells (folders) to update the whole universe at once. I did not need any new code, just a way to execute the cell-build.xml script inside each cell (folder) of the universe. After creating a (sort of integration) test for the desired functionality, I added a final target to the cell-build.xml that initialised the cell's location (p_cell_location) with the current build script's directory (${basedir}).
<target name="next_gen_for_basedir_cell"
      description="creates a 'next' file if the cell in the
                   basedir will be in the next generation.">

    <antcall target="next_generation">
        <param name="p_cell_location" value="${basedir}" />
    </antcall>
</target>
Then, after some experiments, I was able to use Ant's subant task to execute the logic for each cell inside each cell's folder.
<property name="universe.base_dir" value="universe" />
<property name="universe.struct" value="*/*" />
<property name="cell.build_file" value="cell-build.xml" />

<target name="next_generation" if="p_universe_location"
        description="applies the rules for next generation for each cell of
        the universe folder structure in location 'p_universe_location'.">

    <subant genericantfile="${cell.build_file}">
        <dirset dir="${p_universe_location}/${universe.base_dir}"
                includes="${universe.struct}" />
    </subant>
</target>
Including */* in the dirset selects only cells (the leaf directories) and no intermediate ones. I have never used subant before but I am still amazed by its power. It is a great tool to get rid of duplication or complicated series of targets. Even using an Ant extension with its loop would not produce such a concise way of iterating all cells.

The above code creates empty marker files (next) for all cells that will be alive in the next generation. All that is left is to delete the old generation (${cell.marker_alive}) and rename the new generation (${cell.marker_will_live}) to the current one.
<target name="evolve" depends="next_generation" if="p_universe_location"
      description="evolves the whole universe folder structure in location 'p_universe_location'.">

    <property name="universe.location" location="${p_universe_location}/${universe.base_dir}" />
    <delete dir="${universe.location}" includes="${universe.struct}/${cell.marker_alive}" />
    <copy todir="${universe.location}" includeEmptyDirs="false" overwrite="false">
        <fileset dir="${universe.location}" includes="${universe.struct}/${cell.marker_will_live}" />
        <regexpmapper from="^(.*)${cell.marker_will_live}$$" to="\1${cell.marker_alive}" />
    </copy>
    <delete dir="${universe.location}" includes="${universe.struct}/${cell.marker_will_live}" />
</target>
The final test is more an acceptance test than a unit test because it exercises all rules and functionality by evolving a whole universe which has been seeded a blinker.
<target name="test-evolve-updates-all-cells">
    <make-tmp-dir />

    <antcall target="create_universe">
        <param name="p_universe_location" value="${test.temp_dir}" />
        <param name="p_universe_size" value="3" />
    </antcall>

    <!-- seed blinker -->
    <universe_seed_cell location="${test.temp_dir}" row=".y.y" column=".x" />
    <universe_seed_cell location="${test.temp_dir}" row=".y.y" column=".x.x" />
    <universe_seed_cell location="${test.temp_dir}" row=".y.y" column=".x.x.x" />

    <!-- run GoL -->
    <antcall target="evolve">
        <param name="p_universe_location" value="${test.temp_dir}" />
    </antcall>

    <assert-file-does-not-exist file="${test.temp_dir}/universe/.y.y/.x/cell" />
    <assert-file-does-not-exist file="${test.temp_dir}/universe/.y.y/.x.x.x/cell" />

    <assert-file-exists file="${test.temp_dir}/universe/.y/.x.x/cell" />
    <assert-file-exists file="${test.temp_dir}/universe/.y.y/.x.x/cell" />
    <assert-file-exists file="${test.temp_dir}/universe/.y.y.y/.x.x/cell" />
</target>
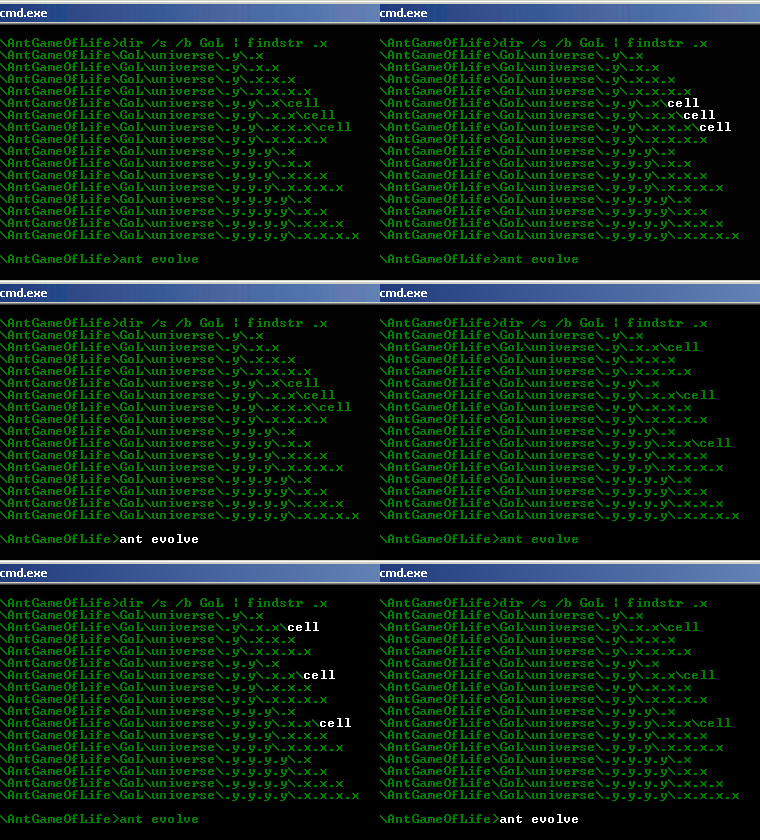
It works! ;-) Here is proof in form of a little animation of the Ant Game of Life in action:Ant Game of Life Dir Listings

3 May 2014

The Life of (an) Ant

I already mentioned that Daniel impressed me by implementing Conway's Game of Life in MSBuild with MSBTest. Being a Java developer for most of my career, Apache Ant was the proper choice to build the cellular automaton using a build tool. I have worked with Ant before, so I was confident I would be able to pull it off.

Bring Out Your DeadIdiomatic Ant
I wanted a challenge and decided to avoid Ant extensions whenever possible. For example there are if and for tasks in Ant-Contrib which enable an imperative, procedural coding style. Obviously embedding any kind of script was also considered cheating.

An Ant's Universe
Wikipedia says that the universe of the Game of Life is an infinite two-dimensional orthogonal grid of square cells. How could I represent such a grid using basic Ant data structures? Which types does Ant support at all? Ant offers immutable properties and property sets, files, directories and paths and supports text file filtering using regular expressions. Which data structure could I use for the universe? How about directories? The universe is a two-dimensional grid, containing rows and columns, which might be defined by the names of nested folders. A single row in the grid is a folder which contains the folders of all its columns, e.g.
universe/
    row_folder_1/
      column_folder_1/
      column_folder_2/
      ...
    row_folder_2/
      column_folder_1/
      column_folder_2/
      ...
    row_folder_3/
    ...
That looks promising. But how to find the previous and following columns given a current column (folder) name? There are no arithmetic functions available in Ant, so there is no way to increase or decrease a number by one. But it is possible to append a character to a property creating a new one, allowing to reach the cells (folders) right and down of the current one, e.g.
universe/
    row_folder_x/
      column_folder_x/
      column_folder_xx/
      ...
    row_folder_xx/
      column_folder_x/
      column_folder_xx/
      ...
    row_folder_xxx/
    ...
To access the left and upper neighbours of a cell the name has to be shortened. Ant is not able to shorten String properties but the basename task is able to strip the extension off a file or directory name. So the row and column folders are called '.y' and '.x'.
universe/
    .y/
      .x/
      .x.x/
      ...
    .y.y/
      .x/
      .x.x/
      ...
    .y.y.y/
    ...
Testing Framework
To do it "right", I needed a testing framework. Although there is Apache AntUnit, I used a simpler solution to test my build files. Inspired by my former colleague Andy Balaam's Test-Driven Ant macros I created the necessary assertion macros on the way. For example the following code asserts that a certain property is set:
<macrodef name="assert-propery-set">
    <attribute name="propertyname" />
    <sequential>
        <fail message="property '@{propertyname}' not set."
              unless="@{propertyname}" />
    </sequential>
</macrodef>
Tell me about your neighbours
Having the data structure and assertions in place, it was time for the first test. I started with tests for counting the neighbours of a given cell, expecting its implementation in target count_neighbours of cell-build.xml.
<import file="lib/asserts.xml" />
<import file="cell-build.xml" />

<target name="test-count-neighbours-in-middle-when-no-neighbours">
    <make-tmp-dir />
    <antcall target="create_3x3_grid" />
    <touch file="${test.temp_dir}/.y.y/.x.x/cell" />

    <antcall target="assert-number-of-neighbours">
        <param name="p_cell_location" value="${test.temp_dir}/.y.y/.x.x" />
        <param name="p_expected_neighbour_count" value="0" />
    </antcall>
</target>

<target name="create_3x3_grid" if="test.temp_dir">
    <mkdir dir="${test.temp_dir}/.y/.x" />
    <mkdir dir="${test.temp_dir}/.y/.x.x" />
    <mkdir dir="${test.temp_dir}/.y/.x.x.x" />
    <mkdir dir="${test.temp_dir}/.y.y/.x" />
    <mkdir dir="${test.temp_dir}/.y.y/.x.x" />
    <mkdir dir="${test.temp_dir}/.y.y/.x.x.x" />
    <mkdir dir="${test.temp_dir}/.y.y.y/.x" />
    <mkdir dir="${test.temp_dir}/.y.y.y/.x.x" />
    <mkdir dir="${test.temp_dir}/.y.y.y/.x.x.x" />
</target>

<target name="assert-number-of-neighbours" depends="count_neighbours">
    <assert-propery-equals propertyname="cell.neighbour_count"
                           expected="${p_expected_neighbour_count}" />
</target>
First I fulfilled the test with a fake solution.
<target name="count_neighbours">
    <property name="cell.neighbour_count" value="0" />
</target>
After eight more tests,
<target name="all-test-targets" description="run all test targets">
    <antcall target="test-count-neighbours-in-middle-when-no-neighbours" />
    <antcall target="test-count-one-neighbour-left" />
    <antcall target="test-count-one-neighbour-right" />
    <antcall target="test-count-one-neighbour-up" />
    <antcall target="test-count-one-neighbour-down" />
    <antcall target="test-count-one-neighbour-up-left" />
    <antcall target="test-count-all-neighbours-around" />
    <antcall target="test-count-neighbours-in-left-up-when-no-neighbours" />
    <antcall target="test-count-neighbours-in-lower-right-when-no-neighbours" />
count_neighbours was finished.
<property name="cell.marker_alive" value="cell" />

<target name="count_neighbours" if="p_cell_location"
      description="sets property 'cell.neighbour_count' to the count of living
                   neighbours of a cell in the given location 'p_cell_location'.">

    <dirname property="cell.base_row" file="${p_cell_location}" />
    <dirname property="cell.base" file="${cell.base_row}" />

    <pref_self_next dim="y" folder="${cell.base_row}" /> <!-- (1) -->
    <pref_self_next dim="x" folder="${p_cell_location}" /> <!-- (2) -->

    <resourcecount property="cell.neighbour_count"> <!-- (3) -->
        <fileset dir="${cell.base}">
            <include name="${cell.prev_y}/${cell.prev_x}/${cell.marker_alive}" />
            <include name="${cell.prev_y}/${cell.self_x}/${cell.marker_alive}" />
            <include name="${cell.prev_y}/${cell.next_x}/${cell.marker_alive}" />

            <include name="${cell.self_y}/${cell.prev_x}/${cell.marker_alive}" />
            <include name="${cell.self_y}/${cell.next_x}/${cell.marker_alive}" />

            <include name="${cell.next_y}/${cell.prev_x}/${cell.marker_alive}" />
            <include name="${cell.next_y}/${cell.self_x}/${cell.marker_alive}" />
            <include name="${cell.next_y}/${cell.next_x}/${cell.marker_alive}" />
        </fileset>
    </resourcecount>
</target>
Line (1) defines the properties for the previous, current and following row, i.e. in the y dimension and line (2) does the same for columns, i.e. in the x dimension. Both sets of properties are similar, so I extracted a macro to remove duplication. (Remember: Red - Green - Refactor)
<macrodef name="pref_self_next"
      description="defines properties 'cell.self_X', 'cell.pref_X' and 'cell.next_X' for
                   given dimension/orientation 'dim' from center of current 'folder'.">

    <attribute name="dim" />
    <attribute name="folder" />

    <sequential>
        <basename property="cell.self_@{dim}" file="@{folder}" />
        <property name="cell.next_@{dim}" value="${cell.self_@{dim}}.@{dim}" />
        <basename property="cell.prev_@{dim}" file="@{folder}" suffix=".@{dim}" />
    </sequential>
</macrodef>
After determining the names of the previous and following neighbouring cells (folders), counting the live ones (files) was be done with Ant's resourcecount. Line (3) counts the number of files called 'cell' in the neighbouring folders.

To Be or Not To Be
With the number of living neighbours I was ready to implement the rules of the game right away. The target apply_rules uses this number to determine if a cell lives on or dies. With four tests,
<target name="all-test-targets" description="run all test targets">
    ...
    <antcall target="test-rules-with-two-neighbours-lives-on" />
    <antcall target="test-rules-with-one-neighbour-dies-on" />
    <antcall target="test-rules-empty-with-two-neighbours-stays-dead" />
    <antcall target="test-rules-empty-with-three-neighbours-comes-alive" />
apply_rules evolved to
<target name="apply_rules" depends="count_neighbours" if="p_cell_location"
      description="sets property 'cell.will_live' only if a cell in the given
                   location 'p_cell_location' will live on for the next generation.">

    <condition property="cell.will_live">
        <or>
          <and>
              <available file="${p_cell_location}/${cell.marker_alive}" />
              <equals arg1="${cell.neighbour_count}" arg2="2" />
          </and>
            <equals arg1="${cell.neighbour_count}" arg2="3" />
        </or>
    </condition>
</target>
Target apply_rules expects the property p_cell_location to point to a given cell (folder) in the universe. It first calls the target count_neighbours via depends and uses the cell.neighbour_count to determine if the given cell will be reborn, live on or die. This implements the rules of the game and ends this post. The next one will use apply_rules to run a full Game of Life on arbitrary universes. Stay tuned!

10 July 2013

Jasmine - Rhino - Ant

Ant on JasmineSome time ago I decided to brush up my poor JavaScript skills. I did not want to use JavaScript to develop web applications but was interested in the language itself. Naturally I started with code katas and little assignments like the ones found at Ruby Quiz. I needed a unit testing framework but during my first steps did not feel like looking for a suitable library and just rolled my own Assert class on top of Rhino which was, at this time, sufficient for me to get things done.

Later when I wanted regular testing during continuous integration, I looked for unit testing frameworks and found Tiest Vilee's RhinoUnit which did the job well. It felt much like JUnit, as implied by its name, and I had no problems using it. After some time I noticed Jasmine being referenced in several presentations and set out to try it. It is a behaviour-driven development framework for testing JavaScript code and does not depend on any other frameworks.

Jasmine and Rhino
Others have successfully ran Jasmine with Rhino using Envjs. (Here is a more detailed description how to do that.) Their intention was to test JavaScript used in web pages without launching a browser by using the simulated browser environment provided by Envjs. As I did not work in a browser environment this approach seemed wrong and I looked for alternatives. David Green used Jasmine on Rhino in his Rescripter, just providing missing global definitions and I worked on top of his code:
(function(global) {

    // timer functions from global for "jasmine.Clock"
    var timer = new java.util.Timer();
    var counter = 1;
    var ids = {};

    global.setTimeout = function(fn, delay) {
        var id = counter;
        counter += 1;
        ids[id] = new JavaAdapter(java.util.TimerTask, { run : fn });
        timer.schedule(ids[id], delay);
        return id;
    };

    ...

})(this);

Standalone Rhino
The version of Rhino shipped with the JDK has been modified by Sun. For example the JavaAdapter has been removed, as written in this document by Oracle. As jasmine-rhino.js (listed above) needs the JavaAdapter to implement a TimerTask, I used the standalone Rhino. To invoke it from javax.script, there must be a ScriptEngineFactory but the standalone Rhino does not provide any. Fortunately I found com.​sun.​phobos.​script.​javascript.​RhinoScriptEngineFactory on java.net.

Jasmine Reporters
Jasmine uses reporters to report test failures in different formats. Larry Myers offers several useful Jasmine Reporters, e.g. jasmine.​console_reporter.js or jasmine.​junit_reporter.js which creates XML files suitable for JUnit report generation. These reporters expect an Envjs console and I found myself turning back to Envjs after all. But in the end I created my own console that delegated to the Ant task logger.
Console = function() {
    var logger = {

        error : function(message) {
            self.log(message, 0);
        },

        warn : function(message) {
            self.log(message, 1);
        },

        ...
    };

    return logger;
};
this.console = new Console();
To finally run Jasmine I created a spec runner (AntSpecRunner.js) derived from Jasmine's original SpecRunner.html which started the tests and waited for all of them to finish.
this.execJasmine = function() {
    var jasmineEnv, apiReporter;

    jasmineEnv = jasmine.getEnv();
    jasmineEnv.updateInterval = 100;

    apiReporter = new jasmine.JsApiReporter();
    jasmineEnv.addReporter(apiReporter);

    jasmineEnv.execute();

    while (!apiReporter.finished) {
        java.lang.Thread.sleep(100);
    }
};

console.log('Jasmine loaded.');

Rhino and Ant
For continuous integration I added Ant support. Now Ant is not the newest nor hottest technology available but I know my way around. Inspired by RhinoUnit I load Jasmine code to execute in Rhino using Ant's Scriptdef task. The script implementation iterates all files of all provided FileSets and calls runTest with each file. Note that self points to Ant's ScriptDefBase task implementation by default.
var testfailed = false;

// helper methods and Ant attributes omitted

var filesets = elements.get("fileset");
for (var j = 0; j < filesets.size(); j += 1) {
    var fileset = filesets.get(j);
    var directoryScanner = fileset.getDirectoryScanner(project);
    var srcFiles = directoryScanner.getIncludedFiles();

    forEachElementOf(srcFiles, function(srcFile) {
        var jsfile = new java.io.File(fileset.getDir(project), srcFile);
        runTest(jsfile);
        if (testfailed && haltOnFirstFailure) {
            self.fail("Jasmine failed.");
        }
    });
}

if (testfailed) {
    self.fail("Jasmine failed.");
}
Each source file, supposed to be a Jasmine spec, is loaded and executed. I created a special Jasmine reporter, jasmine.CountsReporter, to get the number of failed tests back from Jasmine to record failures.
function runTest(file) {
    var failingTests;

    // helper methods omitted

    try {
        Load.file(file);
    } catch (e) {
        erroringTestMessage(file, e);
        testfailed = true;
    }

    failingTests = this.jasmine.getEnv().countsReporter.failingTestNames();
    if (failingTests.length > 0) {
        forEachElementOf(failingTests, function(testName) {
            failingTestMessage(testName);
        });
        testfailed = true;
    }
}
(See the complete integration working here.)

Although I was reusing a lot from rhinoUnitAnt.js and copying from David and others, to integrate Jasmine, Rhino and Ant took me much longer than I had expected. While this might be a general statement about any coding task, I am wondering if I should have went with one of the existing solutions...

8 May 2013

XSLTunit Ant Support

some antsLast year I did the Prime Factors Kata in XSLT. Using XSLTunit I created a test case that applied the template to a number to calculate its prime factors. I focused on the coding problem and ignored the testing infrastructure, calling the XSLT processor from the command line and looking into the generated XML test result to see if any assert had failed. When I felt like playing with XSLT again, I first had to fix the infrastructure and make it ready for Continuous Integration.

Ant Support
CI tools like Jenkins are able to call any script, but my first idea for build automation is always Ant. I have some history with Ant but most likely I use it because I am an old school Java developer ;-). Fortunately Ant has build-in XSLT support which I can use to apply the XSLTunit template.
<property name="test_prefix" value="tst_" />
<property name="test_result_suffix" value=".test_result.xml" />

<!-- apply style to XMLs in suite -->
<xslt basedir="${suite}" destdir="${suite}" style="${suite}/${style}">
  <include name="*.xml" />
  <exclude name="*${test_result_suffix}" />
</xslt>

<!-- apply test -->
<xslt basedir="${suite}" destdir="${suite}" style="${suite}/${test_prefix}${style}"
      extension="${test_result_suffix}">
  <include name="*.xsl" />
  <exclude name="${test_prefix}*.xsl" />
</xslt>

<!-- create readable HTML test report -->
<xslt basedir="${suite}" destdir="${suite}" style="${basedir}/lib/xsltunit_report.xsl">
  <include name="*${test_result_suffix}" />
  <param name="testname" expression="${style}" />
</xslt>
My approach contains a lot of "convention over configuration". For example I assume that each template ${style} is located inside its own folder ${suite}. The given Ant target first transforms sample data with the template under test for manual review, then applies the test case to the template and finally generates a readable report out of the test result. The first and last step is optional but useful during development. In the end the test result is checked for the text "failed" which shows a failed assertion.
<dirname property="suite" file="${testResult}" />
<loadfile property="test_failed" srcFile="${testResult}" />
<fail message="Test ${suite} failed!">
  <condition>
    <contains string="${test_failed}"
              substring="outcome=&quot;failed&quot;" />
  </condition>
</fail>
Testing and checking the result is done for all templates in the source folder ${src} by using <foreach> from Ant-Contrib.
<foreach target="-testFolder" param="foreach">
  <path>
    <fileset dir="${src}">
      <include name="**/*.xsl" />
      <exclude name="**/${test_prefix}*.xsl" />
    </fileset>
  </path>
</foreach>

<foreach target="-verifyResult" param="foreach">
  <path>
    <fileset dir="${src}">
      <include name="**/*${test_result_suffix}" />
    </fileset>
  </path>
</foreach>

FizzBuzz Kata
After the unit tests were executed by Continuous Integration for each commit, I went for some XSLT exercise. Unfortunately adding the Ant support had taken too much of my scheduled learning time and I had to work with the smallest kata available, the FizzBuzz question: Write a program that prints the numbers from 1 to 100. But for multiples of three print "Fizz" instead of the number and for the multiples of five print "Buzz". For numbers which are multiples of both three and five print "FizzBuzz". I wrote the following template by following a few XSLTunit tests.
<xsl:template match="value" mode="fizzbuzz">
  <xsl:choose>
    <xsl:when test="number(current()) mod 15 = 0">FizzBuzz</xsl:when>
    <xsl:when test="number(current()) mod 3 = 0">Fizz</xsl:when>
    <xsl:when test="number(current()) mod 5 = 0">Buzz</xsl:when>
    <xsl:otherwise><xsl:value-of select="." /></xsl:otherwise>
  </xsl:choose>
</xsl:template>
To solve the complete question I applied the template to the values of 1 till 100,
<numbers>
  <number><value>1</value></number>
  <number><value>2</value></number>
  <number><value>3</value></number>
  <number><value>4</value></number>
  ...
  <number><value>100</value></number>
</numbers>
which generated a HTML file with the answer of the FizzBuzz question.
  • for 1 say 1
  • for 2 say 2
  • for 3 say Fizz
  • for 4 say 4
  • ...
  • for 100 say Buzz

4 September 2009

Running JUnit in Parallel

Back in 2008 I had to speed up our daily build. (I should have posted about it since long, but I just didn't make it. Recently when I saw a related post on a similar topic my bad conscience overwhelmed me.) The first thing was to get a faster machine, something with four 3 GHz cores. It worked excellent! All file based operations like compile performed 3 times faster just out of the box, thanks to the included RAID 0+1 disk array. As our automated tests took half of the total build time, I dealt with them first: I applied the usual optimisations as told in my talk about practical JUnit testing, tuning section. So I managed to halve JUnit execution time.

ForkGood, but still not fast enough. The problem was how to utilise all the shiny new cores during one build to speed it up as much as possible. So test execution needed to run in parallel. Some commercial build servers promised to be able to spread build targets over several agents. Unfortunately I had no opportunity to check them out, they cost quite beyond my budget. The only free distributed JUnit runner I found was using ComputeFarm JINI in a research project which did not look mature enough for production usage. Worth mentioning is GridGain’s JunitSuiteAdapter. It's able to distribute JUnit tests across a cluster of nodes. GridGain is a free cloud implementation, it's really hot stuff. But it's not a build solution, so integrating it into the existing build would have been difficult.

As I did not find anything useful had to come up with a minimalist home grown solution. I started with a plain JUnit target junitSequential which ran all tests in sequence:
<target name="junitSequential">

<junit fork="yes" failureproperty="failed"
haltonfailure="false" forkmode="perBatch">

<classpath>
<fileset dir="${lib.dir}" includes="*.jar" />
<pathelement location="${classes.dir}" />
</classpath>

<batchtest>
<fileset dir="${classes.dir}"
includes="**/*Test.class" />
</batchtest>
</junit>

<fail message="JUnit test FAILED" if="failed" />

</target>
I used haltonfailure="false" to execute all tests regardless if some failded or not. Otherwise <batchtest> would stop after the first broken test. With failureproperty="failed" and <fail if="failed" /> the build still failed if necessary. There is nothing special here.

Ant is able to run tasks in parallel using the <parallel> tag. (See my related post about forking several Ant calls in parallel.) A parallel running target would look like
<target name="junitParallelIdea">
<parallel>
<antcall target="testSomeJUnit" />
<antcall target="testOtherJUnit" />
</parallel>
</target>
Good, but how to split the set of tests into Some and Other? My first idea was to separate them by their names, i.e. by the first letter of the test's class name, using the inclusion pattern **/${junit.letter}*Test.class in the <batchtest>'s fileset. So I got 26 groups of tests running in parallel.
<target name="junitParallelNamedGroups">
<parallel>

<antcall target="-junitForLetter">
<param name="junit.letter" value="A" />
</antcall>
<antcall target="-junitForLetter">
<param name="junit.letter" value="B" />
</antcall>
<antcall target="-junitForLetter">
<param name="junit.letter" value="C" />
</antcall>
<!-- continue with D until Z -->

</parallel>
</target>

<target name="-junitForLetter">

<junit fork="yes" forkmode="perBatch">

<!-- classpath as above -->

<batchtest>
<fileset dir="${classes.dir}"
includes="**/${junit.letter}*Test.class" />
</batchtest>
</junit>

</target>
forkmode="perBatch" created a new JVM for each group. Without forking each test class would get it's own class loader, filling up the perm space. Setting reloading="false" made things even worse. All those singletons started clashing even without considering race conditions. So I took the overhead of creating additional Java processes.

Streets of SplitUnfortunately the grouping by letter approach had some problems. First the number of threads needed to be specified with <parallel>'s threadsperprocessor or threadcount attribute, else there would be 26 parallel processes competing for four cores. My experiments showed that two threads per processor performed best for the given set of JUnit tests. (Those JUnit tests were not "strictly unit", some tests called the database or web services, freeing the CPU during blocking. For tests with very little IO it might have looked different.)

Also my haltonfailure approach did not work because <antcall> does not return any properties set inside the called -junitForLetter target. There was no Ant command that supported that. But AntCallBack of the Antelope Ant extensions was able to do the trick: After registering the custom task with name="antcallback" I replaced the plain <antcall>s with <antcallback target="..." return="failed">.

Separating JUnit test cases by their names produced unbalanced and therefore unpredictable results regarding overall execution time. Depending on naming conventions some groups would run much longer than others. Ant's Custom Selectors are a much better way to split a fileset into a given number of parts producing a few balanced filesets with roughly the same number of test classes.
import java.io.File;

import org.apache.tools.ant.BuildException;
import org.apache.tools.ant.types.Parameter;
import org.apache.tools.ant.types.selectors.BaseExtendSelector;

public class DividingSelector extends BaseExtendSelector {

private int counter;
/** Number of total parts to split. */
private int divisor;
/** Current part to accept. */
private int part;

public void setParameters(Parameter[] pParameters) {
super.setParameters(pParameters);
for (int j = 0; j < pParameters.length; j++) {
Parameter p = pParameters[j];
if ("divisor".equalsIgnoreCase(p.getName())) {
divisor = Integer.parseInt(p.getValue());
}
else if ("part".equalsIgnoreCase(p.getName())) {
part = Integer.parseInt(p.getValue());
}
else {
throw new BuildException("unknown " + p.getName());
}
}
}

public void verifySettings() {
super.verifySettings();
if (divisor <= 0 || part <= 0) {
throw new BuildException("part or divisor not set");
}
if (part > divisor) {
throw new BuildException("part must be <= divisor");
}
}

public boolean isSelected(File dir, String name, File path) {
counter = counter % divisor + 1;
return counter == part;
}
}
One of the four available cores was used for static code analysis, which was very CPU intensive and one was used for integration testing. The remaining two cores were dedicated to unit tests. Using 4 balanced groups of tests executing in parallel, the time spent for JUnit tests was halved again: Yippee
<target name="junitParallel4Groups">
<parallel threadcount="4">
<antcallback target="-junitForDivided" return="failed">
<param name="junit.division.total" value="4" />
<param name="junit.division.num" value="1" />
</antcallback>
<antcallback target="-junitForDivided" return="failed">
<param name="junit.division.total" value="4" />
<param name="junit.division.num" value="2" />
</antcallback>
<antcallback target="-junitForDivided" return="failed">
<param name="junit.division.total" value="4" />
<param name="junit.division.num" value="3" />
</antcallback>
<antcallback target="-junitForDivided" return="failed">
<param name="junit.division.total" value="4" />
<param name="junit.division.num" value="4" />
</antcallback>
</parallel>
<fail message="JUnit test FAILED" if="failed" />
</target>

<target name="-junitForDivided">

<junit fork="true" failureproperty="failed"
haltonfailure="false" forkmode="perBatch">

<!-- classpath as above -->

<batchtest>
<fileset dir="${classes.dir}">
<include name="**/*Test.class" />
<custom classname="DividingSelector" classpath="classes">
<param name="divisor" value="${junit.division.total}" />
<param name="part" value="${junit.division.num}" />
</custom>
</fileset>
</batchtest>

</junit>

</target>
(Download source code of DividingSelector.)

Epiloge
Using this approach I kept the option to execute the tests one after another with num=1 of total=1 providing an easy way to switch between normal and parallel execution. This was useful when debugging the build script...
<target name="junitSequential">
<antcallback target="-junitForDivided" return="failed">
<param name="junit.division.total" value="1" />
<param name="junit.division.num" value="1" />
</antcallback>
<fail message="JUnit test FAILED" if="failed" />
</target>

7 November 2008

Forking parallel subants from Ant

Ever wanted to do something in parallel in your Ant build file? Well there is the Parallel-Task, which should do the trick, shouldn't it? Unfortunately the Ant Manual says that

The primary use case for <parallel> is to run external programs such as an application server, and the JUnit or TestNG test suites at the same time.

And that's what all the examples are about - to start Tomcat in a separate thread. In my case I needed to fork several <subant>-calls, i.e. to fork several Java virtual machines with the same properties as the original one and wait till all of them were finished.

To start an independent Ant run, which means to fork a sibling Java process with the same Ant properties, you have to use the <java> task, which allows forking with the fork attribute:
<parallel>
<java classname="org.apache.tools.ant.Main"
fork="true" clonevm="true" dir="${basedir}"
resultproperty="sub_res_1" output="sub_1.log">
<arg value="-buildfile" />
<arg value="${basedir}\sub_1.xml" />
<arg value="target" />
<!-- add jvmarg sysproperty as needed -->
</java>
<java classname="org.apache.tools.ant.Main"
fork="true" clonevm="true" dir="${basedir}"
resultproperty="sub_res_2" output="sub_2.log">
<arg value="-buildfile" />
<arg value="${basedir}\sub_2.xml" />
</java>
<java classname="org.apache.tools.ant.Main"
fork="true" clonevm="true" dir="${basedir}"
resultproperty="sub_res_3" output="sub_3.log">
<arg value="-buildfile" />
<arg value="${basedir}\sub_3.xml" />
</java>
</parallel>
The output of these parallel Ant calls is collected and printed to the screen:
<concat>
<fileset dir="." id="spawn.logs">
<include name="sub_1.log" />
<include name="sub_2.log" />
<include name="sub_3.log" />
</fileset>
</concat>
<delete>
<fileset refid="spawn.logs" />
</delete>
Finally we have to determine if one of the <subant>s failed:
<condition property="spawn.error">
<isfailure code="${sub_res_1}" />
</condition>
<condition property="spawn.error">
<isfailure code="${sub_res_2}" />
</condition>
<condition property="spawn.error">
<isfailure code="${sub_res_3}" />
</condition>
<fail if="spawn.error" message="sub failed" />
That's it. Note that Ant versions below 1.7 do not support the <isfailure/> condition and you have to use
<not>
<equals arg1="0" arg2="${sub_res_1}" />
</not>
(Download Ant scripts.)