Showing posts with label Maven. Show all posts

25 February 2018

Complete Cofoja Setup Example

Design by Contract
Have you heard of Design by Contract (short DbC)? If not, here is a good introduction from Eiffel. (In short, Design by Contract is one of the major mechanisms to ensure the reliability of object-oriented software. It focuses on the communication between components and requires the interactions to be defined precisely. These specifications are called contracts and they contain Preconditions, Postconditions and Invariants. Unlike using assertions to ensure these conditions, DbC considers the contracts important parts of the design process which should be written first. It is a systematic approach to building bug-free object-oriented systems and helps in testing and debugging.)

Cofoja (Contracts for Java)
Cofoja is a Design by Contract library for Java. It uses annotation processing and byte code instrumentation to provide run-time checking. It supports a contract model similar to that of Eiffel, with added support for a few Java-specific things, such as exceptions. In Cofoja, contracts are written as Java code within quoted strings, embedded in annotations. Here is some sample code (derived from lost icontract library): A basic stack with methods to push, pop and to see the top element.
import java.util.LinkedList;
import com.google.java.contract.Ensures;
import com.google.java.contract.Invariant;
import com.google.java.contract.Requires;

@Invariant({ "elements != null",
             "isEmpty() || top() != null" }) // (1)
public class CofojaStack<T> {

  private final LinkedList<T> elements = new LinkedList<T>();

  @Requires("o != null") // (2)
  @Ensures({ "!isEmpty()", "top() == o" }) // (3)
  public void push(T o) {
    elements.add(o);
  }

  @Requires("!isEmpty()")
  @Ensures({ "result == old(top())", "result != null" })
  public T pop() {
    final T popped = top();
    elements.removeLast();
    return popped;
  }

  @Requires("!isEmpty()")
  @Ensures("result != null")
  public T top() {
    return elements.getLast();
  }

  public boolean isEmpty() {
    return elements.isEmpty();
  }

}
The annotations describe method preconditions (2), postconditions (3) and class invariants (1). Cofoja uses a Java 6 annotation processor to create .contract class files for the contracts. As soon as Cofoja's Jar is on the classpath the annotation processor is picked up by the service provider. There is no special work necessary.
javac -cp lib/cofoja.asm-1.3-20160207.jar -d classes src/*.java
To verify that the contracts are executed, here is some code which breaks the precondition of our stack:
import org.junit.Test;
import com.google.java.contract.PreconditionError;

public class CofojaStackTest {

  @Test(expected = PreconditionError.class)
  public void emptyStackFailsPreconditionOnPop() {
    CofojaStack<String> stack = new CofojaStack<String>();
    stack.pop(); // (4)
  }

}
We expect line (4) to throw Cofoja's PreconditionError instead of NoSuchElementException. Just running the code is not enough, Cofoja uses a Java instrumentation agent to weave in the contracts at runtime.
java -javaagent:lib/cofoja.asm-1.3-20160207.jar -cp classes ...
Cofoja is an interesting library and I wanted to use it to tighten my precondition checks. Unfortunately I had a lot of problems with the setup. Also I had never used annotation processors before. I compiled all my research into a complete setup example.

Maven
Someone already created an example setup for Maven. Here are the necessary pom.xml snippets to compile and run CofojaStackTest from above.
<dependencies>
  <dependency> <!-- (5) -->
    <groupId>org.huoc</groupId>
    <artifactId>cofoja</artifactId>
    <version>1.3.1</version>
  </dependency>
  ...
</dependencies>

<build>
  <plugins>
    <plugin> <!-- (6) -->
      <artifactId>maven-surefire-plugin</artifactId>
      <version>2.20</version>
      <configuration>
        <argLine>-ea</argLine>
        <argLine>-javaagent:${org.huoc:cofoja:jar}</argLine>
      </configuration>
    </plugin>
    <plugin> <!-- (7) -->
      <artifactId>maven-dependency-plugin</artifactId>
      <version>2.9</version>
      <executions>
        <execution>
          <id>define-dependencies-as-properties</id>
          <goals>
            <goal>properties</goal>
          </goals>
        </execution>
      </executions>
    </plugin>
  </plugins>
</build>
Obviously we need to declare the dependency (5). All examples I found register the contracts' annotation processor with the maven-compiler-plugin, but that is not necessary if we are using the Maven defaults for source and output directories. To run the tests through the agent we need to enable the agent in the maven-surefire-plugin (6) like we did for plain execution with java. The Jar location is ${org.huoc:cofoja:jar}. To enable its resolution we need to run maven-dependency-plugin's properties goal (7). Cofoja is build using Java 6 and this setup works for Maven 2 and Maven 3.

Gradle
Similar to Maven, but usually shorter, we need to define the dependency to Cofoja (5) and specify the Java agent in the JVM argument during test execution (6). I did not find a standard way to resolve a dependency to its Jar file and several solutions are possible. The cleanest and shortest seems to be from Timur on StackOverflow, defining a dedicated configuration for Cofoja (7), which avoids duplicating the dependency in (5) and which we can use to access its files in (6).
configurations { // (7)
  cofoja
}

dependencies { // (5)
  cofoja group: 'org.huoc', name: 'cofoja', version: '1.3.1'
  compile configurations.cofoja.dependencies
  ...
}

test { // (6)
  jvmArgs '-ea', '-javaagent:' + configurations.cofoja.files[0]
}
Eclipse
Even when importing the Maven project into Eclipse, the annotation processor is not configured and we need to register it manually. Here is the Eclipse help how to do that. Fortunately there are several step by step guides how to set up Cofoja in Eclipse. In the project configuration, enable Annotation Processing under the Java Compiler settings.
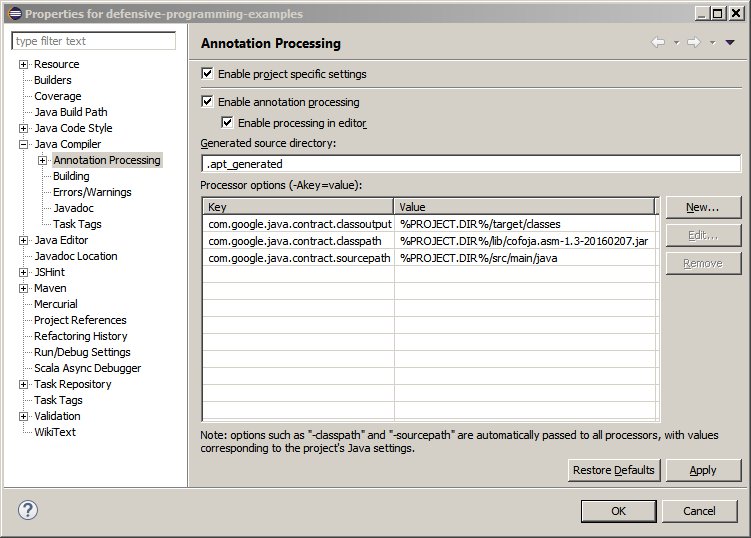
Eclipse Project Annotation Processing
Although Eclipse claims that source and classpath are passed to the processor, we need to configure source path, classpath and output directory.
com.google.java.contract.classoutput=%PROJECT.DIR%/target/classes
com.google.java.contract.classpath=%PROJECT.DIR%/lib/cofoja.asm-1.3-20160207.jar
com.google.java.contract.sourcepath=%PROJECT.DIR%/src/main/java
(These values are stored in .settings/org.eclipse.jdt.apt.core.prefs.) For Maven projects we can use the %M2_REPO% variable instead of %PROJECT.DIR%.
com.google.java.contract.classpath=%M2_REPO%/org/huoc/cofoja/1.3.1/cofoja-1.3.1.jar
Add the Cofoja Jar to the Factory Path as well.
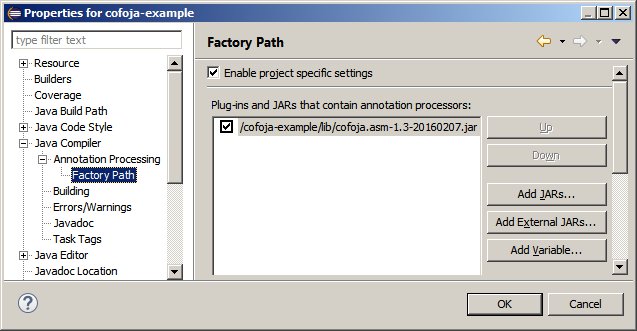
Eclipse_ Project Factory Path
Now Eclipse is able to compile our stack. To run the test we need to enable the agent.
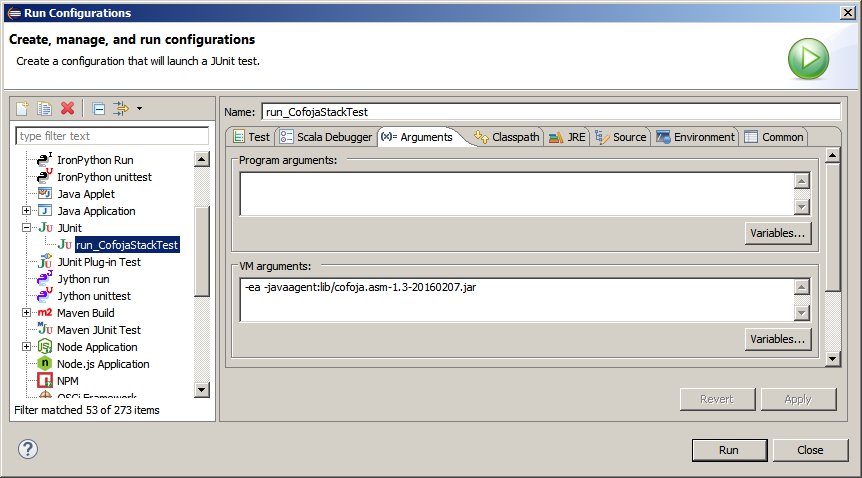
Eclipse Run Configuration JUnit
IntelliJ IDEA
StackOverflow has the answer how to configure Cofoja in IntelliJ. Enable annotation processing in Settings > Build > Compiler > Annotation Processors.
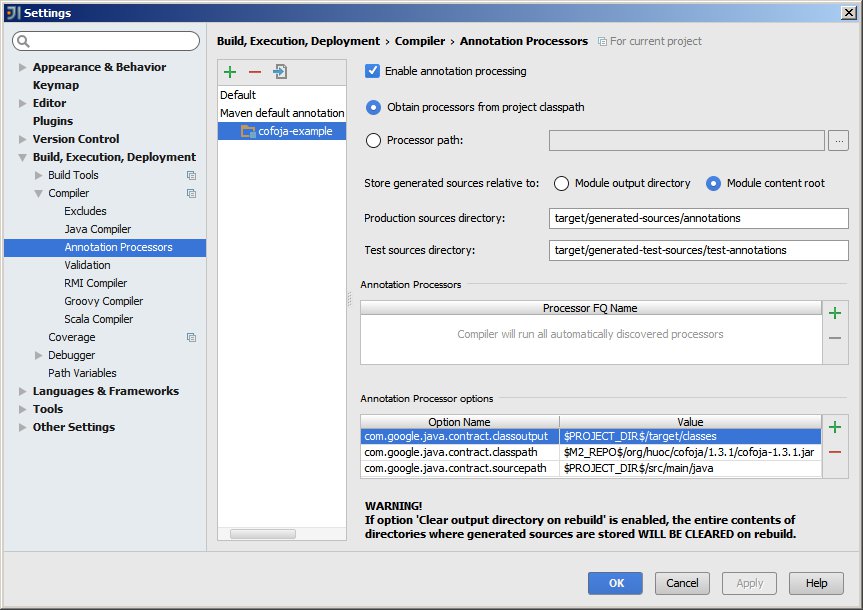
IDEA Settings Annotation Processors
Again we need to pass the arguments to the annotation processor.
com.google.java.contract.classoutput=$PROJECT_DIR$/target/classes
com.google.java.contract.classpath=$M2_REPO$/org/huoc/cofoja/1.3.1/cofoja-1.3.1.jar
com.google.java.contract.sourcepath=$PROJECT_DIR$/src/main/java
(These values are stored in .idea/compiler.xml.) For test runs we enable the agent.
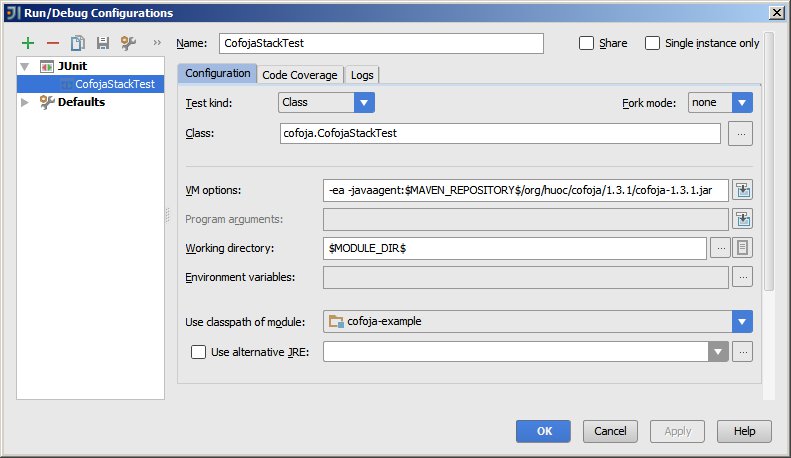
IDEA Run Configuration JUnit
That's it. See the complete example's source (zip) including all configuration files for Maven, Gradle, Eclipse and IntelliJ IDEA.

3 December 2017

PMD Check and Report in same build

lane one, lane twoI am working together with senior developer and (coding) architect Elisabeth Blümelhuber to set up a full featured continuous delivery process for the team. The team's projects use Java and are built with Maven.

Using PMD for Static Code Analysis
After using Jenkins for some time to run the tests, package and deploy the products, it was time to make it even more useful: Add static code analysis. As a first step Elisabeth added a PMD report of a small set of important rules to the Maven parent of all projects. PMD creates a pmd.xml in the target folder which is picked up by Jenkins' PMD Plugin. Jenkins displays the found violations and tracks changes over time, showing a basic trend graph. (While SonarQube would be more powerful, we decided to stay with Jenkins because the team was already "listening" to it.)

Breaking the Build on Critical Violations
I like breaking the build on critical violations to ensure the developers' attention. It is vital, though, to achieve the acceptance of the team members when changing their development process. We thus started with a custom, minimal set of rules (in src/config/pmd_mandatory.xml) that would break the build. The smaller the initial rule set is the better. In the beginning of adding static code analysis to the build process, it is not about the code but getting the team aboard - we can always add more rules later. The first rule set might even contain a single rule, e.g. EmptyCatchBlock. Empty Catch blocks are a well known problem when analysing defects and usually developers agree with the severity of having them in the code and accept breaking the build for that. On the other hand, breaking the build on minor or formatting issues is not recommended in the beginning.

Here is the snippet of our pom.xml that breaks the build:
<build>
  ...
  <plugins>
    <plugin>
      <groupId>org.apache.maven.plugins</groupId>
      <artifactId>maven-pmd-plugin</artifactId>
      <configuration>
        <failOnViolation>true</failOnViolation>
        <printFailingErrors>true</printFailingErrors>
        <rulesets>
          <ruleset>.../pmd_mandatory.xml</ruleset>
        </rulesets>
        ... other settings
      </configuration>
      <executions>
        <execution>
          <id>pmd-break</id>
          <phase>prepare-package</phase>
          <goals>
            <goal>check</goal>
          </goals>
        </execution>
      </executions>
    </plugin>
  </plugins>
</build>
This is more or less taken directly from the PMD Plugin documentation. After running the tests, PMD checks the code.

Keeping a Report of Major Violations
We wanted to keep the report Elisabeth had established previously. We tried to add another <execution> element for that. As executions can have their own <configuration> we thought that this would work, but it did not. PMD just ignored the second configuration. (Maybe this is a general Maven issue. For example the Maven Failsafe Plugin is a copy of the Surefire plugin to allow both plugins to have different configurations.)

The PMD plugin offers a report for the Maven site which is configured independently. As a workaround for the above problem, we used the site report to check the rules listed in src/config/pmd_report.xml. The PMD report invocation created the needed target/pmd.xml as well as a readable target/site/pmd.html.
<reporting>
  <plugins>
    ... other plugins
    <plugin>
      <groupId>org.apache.maven.plugins</groupId>
      <artifactId>maven-pmd-plugin</artifactId>
      <configuration>
        <rulesets>
          <ruleset>.../pmd_report.xml</ruleset>
        </rulesets>
        ... other settings
      </configuration>
    </plugin>
  </plugins>
</reporting>
Skipping Maven Standard Reports
Unfortunately mvn site also created other reports which we did not need and which slowed down the build. Maven standard reports can be selected using the Maven Project Info Reports Plugin. It is possible to set its <reportSet> empty, not creating any reports:
<reporting>
  <plugins>
    ... other plugins
    <plugin>
      <groupId>org.apache.maven.plugins</groupId>
      <artifactId>maven-project-info-reports-plugin</artifactId>
      <version>2.9</version>
      <reportSets>
        <reportSet>
          <reports>
            <!-- empty - no reports -->
          </reports>
        </reportSet>
      </reportSets>
    </plugin>
  </plugins>
</reporting>
Now it did not create the standard reports. It only generated target/site/project-reports.html with a link to the pmd.html and no other HTML reports. Win.

Skipping CPD Report
By default, the PMD plugin invokes PMD and CPD. CPD is checking for duplicate code - and is very useful - but we did not want to use it right now. As I said before, we wanted to start small. All plugins have goals which are explained in the documentation. Obviously the Maven report invokes PMD plugin's goals pmd:pmd and pmd:cpd. How do we tell a report which goals to invoke? That was the hardest problem to solve because we could not find any documentation on that. It turned out that each reporting plugin can be configured with <reportSets> similar to the Maven Project Info Reports Plugin:
<plugin>
  <groupId>org.apache.maven.plugins</groupId>
  <artifactId>maven-pmd-plugin</artifactId>
  <configuration>
    ... same as above
  </configuration>
  <reportSets>
    <reportSet>
      <reports>
        <report>pmd</report>
      </reports>
    </reportSet>
  </reportSets>
</plugin>
Putting Everything Together
We execute the build with
mvn clean verify site
If there is a violation of the mandatory rules, the build breaks and Maven stops. Otherwise site generates the PMD report. If there are no violations at all, Maven does not create a pmd.html. There is always a pmd.xml, so Jenkins is always happy.

(The complete project (compressed as zip) is here.)

20 April 2015

Maven Integration Tests in Extra Source Folder

On one of my current projects we want to separate the fast unit tests from the slow running integration and acceptance tests. Using Maven this is not possible out of the box because Maven only supports two source folders, main and test. How can we add another source and resource folder, e.g. it (for integration test)? Let's assume a project layout like that:
project
|-- pom.xml
`-- src
    |-- main
        `-- java
    |-- test
        `-- java
            `-- UnitTest.java
    `-- it
        `-- java
            `-- IntegrationIT.java
We use the regular Maven Surefire to execute our unit tests, i.e. all the tests in the src/test/java folder. The plugin definition in the pom.xml is as expected.
        <plugin>
            <!-- run the regular tests -->
            <groupId>org.apache.maven.plugins</groupId>
            <artifactId>maven-surefire-plugin</artifactId>
            <version>2.18</version>
        </plugin>
And we use Maven Failsafe to execute the integration tests. If you do not know Failsafe, it is much like the Surefire plugin, but with different defaults and usually runs during the integration test phase.
        <plugin>
            <!-- run the integration tests -->
            <groupId>org.apache.maven.plugins</groupId>
            <artifactId>maven-failsafe-plugin</artifactId>
            <version>2.18.1</version>
            <executions>
                <execution>
                    <goals>
                        <goal>integration-test</goal>
                        <goal>verify</goal>
                    </goals>
                </execution>
            </executions>
        </plugin>
By default the Failsafe plugin does not look for class names ending with Test but ending with IT, making it possible to mix both kind of tests in the same src/test/java folder, but we do not want that. The "trick" to have another source folder for integration tests is to use the Build Helper Maven Plugin and add it as test source.
        <plugin>
            <groupId>org.codehaus.mojo</groupId>
            <artifactId>build-helper-maven-plugin</artifactId>
            <version>1.9.1</version>
            <executions>
                <execution>
                    <id>add-integration-test-source-as-test-sources</id>
                    <phase>generate-test-sources</phase>
                    <goals>
                        <goal>add-test-source</goal>
                    </goals>
                    <configuration>
                        <sources>
                            <source>src/it/java</source>
                        </sources>
                    </configuration>
                </execution>
            </executions>
        </plugin>
Now src/it/java is added as test source as well, as seen during Maven execution. After the compile phase Maven logs
[INFO] [build-helper:add-test-source {execution: add-integration-test-source-as-test-sources}]
[INFO] Test Source directory: .\src\it\java added.
There is still only one test source for Maven but at least we have two folders in the file system. All test sources get merged and during the test compile phase we see
[INFO] [compiler:testCompile {execution: default-testCompile}]
[INFO] Compiling 2 source files to .\target\test-classes
showing that all classes in both src/test/java and src/it/java are compiled at the same time. This is important to know because class names must not clash and tests still need different naming conventions like *Test and *IT. Now mvn test will only execute fast unit tests and can be rerun many times during development.
[INFO] [surefire:test {execution: default-test}]
[INFO] Surefire report directory: .\target\surefire-reports

-------------------------------------------------------
 T E S T S
-------------------------------------------------------
Running UnitTest
Tests run: 1, Failures: 0, Errors: 0, Skipped: 0, Time elapsed: 0.01 sec - in UnitTest

Results :

Tests run: 1, Failures: 0, Errors: 0, Skipped: 0
Only if we want, using mvn verify, the integration tests are executed.
[INFO] [failsafe:integration-test {execution: default}]
[INFO] Failsafe report directory: .\target\failsafe-reports

-------------------------------------------------------
 T E S T S
-------------------------------------------------------
Running IntegrationIT
Tests run: 1, Failures: 0, Errors: 0, Skipped: 0, Time elapsed: 0 sec - in IntegrationIT

Results :

Tests run: 1, Failures: 0, Errors: 0, Skipped: 0

[INFO] [failsafe:verify {execution: default}]
[INFO] Failsafe report directory: .\target\failsafe-reports
Now we can run the slow tests before we check in the code or after major changes a few times during the day.

2 October 2014

Visualising Architecture: Maven Dependency Graph

Last year, during my CodeCopTour, I pair programmed with Alexander Dinauer. During a break he mentioned that he just created a Maven Module Dependency Graph Creator. How awesome is that. The Graph Creator is a Gradle project that allows you to visually analyse the dependencies of a multi-module Maven project. First it sounds a bit weird - a Gradle project to analyse Maven modules. It generates a graph in Graphviz DOT language and an html report using Viz.js. You can use the dot tool which comes with Graphviz to transform the resulting graph file into JPG, SVG etc.

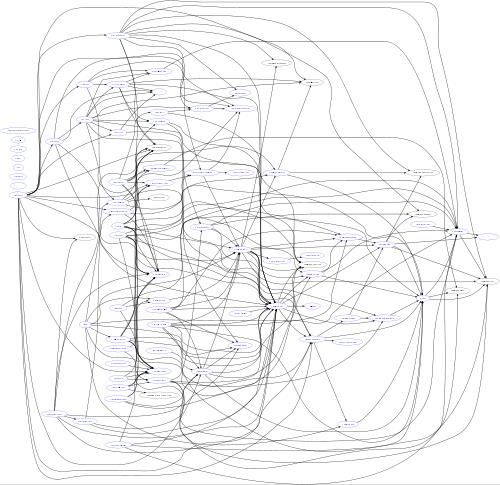
In a regular project there is not much use for the graph creator tool, but in super large projects there definitely is. I like to use it when I run code reviews for my clients, which involve codebases around 1 million lines of code or more. Such projects can contain up to two hundred Maven modules. Maven prohibits cyclic dependencies, still projects of such size often show crazy internal structure. Here is a (down scaled) example from one of my clients:

Maven dependencies in large project
Looks pretty wild, doesn't it? The graph is the first step in my analysis. I need to load it into a graph editor and cluster modules into their architectural components. Then outliers and architectural anomalies are more explicit.

25 March 2014

Maven Site using Markdown

I like Markdown. It is a popular lightweight markup language, easy to read and easy to write. It is supported by many websites and text editors (and recently got standardised). I use it since many years and whenever I take notes, even in Notepad or on my mobile phone, I structure my text using at least I use * to list items and --- to separate paragraphs. Recently when I had to publish some documentation for a project, I was not surprised to find my existing notes in Markdown. So why not generate the final document from them?

Newley Marked Down Misspelled Sale Sign FailApache Maven can be used to build a project site. If you are a Java developer you probably have seen some of these sites already. But the auto generated Maven reports are not much use if you want to add real documentation. The recommended formats to create content are APT or Xdoc. While the APT format is similar to Markdown, I did not want to convert my documents and went off tweaking Doxia for Markdown. This took me extra two hours, but hey - work is supposed to be fun sometimes too, right?

Maven Doxia is the content generation framework used by the site plugin. It supports Markdown since Doxia 1.3. The site content is separated by format and Markdown files need to be inside a markdown folder and named *.md.
project
|-- pom.xml
`-- src
    |-- main
    |-- test
    `-- site
        |-- markdown
        |   `-- Readme.md
        `-- site.xml
To enable markdown processing in Maven site the doxia-module-markdown has to be added to your pom.xml.
<build>
  <plugins>
    <plugin>
      <groupId>org.apache.maven.plugins</groupId>
      <artifactId>maven-site-plugin</artifactId>
      <version>3.2</version>
      <dependencies>
        <!-- add optional Markdown processor -->
        <dependency>
            <groupId>org.apache.maven.doxia</groupId>
            <artifactId>doxia-module-markdown</artifactId>
            <version>1.4</version>
        </dependency>
      </dependencies>
    </plugin>
  </plugins>
</build>
During mvn site all Markdown files are translated to HTML and put into the target/site folder. To add them to the menu of the generated site, you have to add links to the decoration descriptor of Doxia, also known as site.xml.
<?xml version="1.0" encoding="UTF-8"?>
<project xmlns="http://maven.apache.org/DECORATION/1.4.0"
    xmlns:xsi="http://www.w3.org/2001/XMLSchema-instance"
    xsi:schemaLocation="http://maven.apache.org/DECORATION/1.4.0
                        http://maven.apache.org/xsd/decoration-1.4.0.xsd">

    <body>
        <menu name="Documents">
            <item name="Readme" href="Readme.html" />
        </menu>

        <menu ref="reports" />
    </body>

</project>
Done. Success. Profit. ;-)

8 August 2011

Maven Plugin Harness Woes

Last year I figured out how to use the Maven Plugin Harness and started using it. I added it to my Maven plugin projects. Recently I started using DEV@cloud. DEV@cloud is a new service which contains Jenkins and Maven source repositories. CloudBees, the company behind DEV@cloud, offers a free subscription with reduced capabilities which are more than enough for small projects. I set up all my projects there in no time, but had serious problems with the integration tests.

Using a local Maven repository other than ~/.m2/repository
Repository (unnamed)You don't have to use the default repository location. It's possible to define your own in the user's settings.xml or even in the global settings. But I guess most people just use the default. On the other hand in an environment like DEV@cloud, all the different builds from different users must be separated. So CloudBees decided that each Jenkins job has its own Maven repository inside the job's workspace. That is good because the repository is deleted together with the project.

Problem
The Testing Harness embeds Maven, i.e. forks a new Maven instance. It fails to relay the modified settings to this new process. During the execution of the integration test a new local repository is created and the original local one is used as a remote one (called "local-as-remote"). But without any hints, Maven uses ~/.m2/repository. So the true local repository is not found and all needed artefacts are downloaded again. This takes a lot of time (and wastes bandwidth). Dependencies that exist only in the local repository, e.g. snapshots of dependent projects, are not found and the integration test fails.

Solution
RepositoryTool.findLocalRepositoryDirectoy() uses an instance of MavenSettingsBuilder to get the settings. Its only implementing class is DefaultMavenSettingsBuilder and it tries to determine the repository location from the value of the system property maven.repo.local. Then it reads the user settings and in the end it uses ~/.m2/repository. The solution is to set the maven.repo.local system property whenever the local repository is not under ~/.m2/repository. Add -Dmaven.repo.local=.repository into the field for Goals and Options of the Jenkins job configuration.

Using additional dependencies while building integration test projects
indirectionAfter the plugin under test is built and installed into the new local repository the Maven Plugin Harness runs Maven against the integration test projects inside the src/test/resources/it folder. The approach which I described last year forks a Maven with pom, properties and goals defined by the JUnit test method.

Problem
The integration tests know the location of the new local repository (because it is set explicitly) and are able to access the plugin under test. But they know nothing about the local-as-remote repository. They can only access all artefacts which have been "downloaded" from the local-as-remote repository during the build of the plugin under test. So the problem is similar to the previous problem but occurs only when an integration test project needs additional artefacts. For example a global ruleset Maven module might consists of XML ruleset configuration files. The test module depends on the Checkstyle plugin and executes it using the newly build rulesets. So the object under test (the rules XML) is tested indirectly through the invocation of Checkstyle but the ruleset module itself does not depend on Checkstyle.

Solution
All POMs used during integration test have to be "mangled", not just the POM of the plugin under test. The method manglePomForTestModule(pom) is defined in the ProjectTool but it's protected and not accessible. So I copied it to AbstractPluginITCase and applied it to the integration test POMs.

Using settings other than ~/.m2/repository/settings.xml
Cluster ConfigurationIf you need artefacts from repositories other than Maven Central you usually add them to your settings.xml. Then you refer to them in the Jenkins job configuration. Behind the scenes Jenkins calls Maven with the parameter -s custom_settings.xml.

Problem
Similar to the repository location, the custom settings' path is not propagated to the embedded Maven and it uses the default settings. This causes no problems if all needed artefacts are either in the local-as-remote repository or can be downloaded from Maven Central. For example a Global Ruleset might contain some Macker Architecture Rules. The snapshot of the Macker Maven Plugin is deployed by another build job into the CloudBees snapshot repository. The test module depends on this Macker plugin and runs it using the newly built rulesets.

Solution
AbstractPluginITCase calls BuildTool's createBasicInvocationRequest() to get an InvocationRequest and subsequently executes this request. Using any system property the InvocationRequest can be customised:
if (System.getProperty(ALT_USER_SETTINGS_XML_LOCATION) != null) {
   File settings =
      new File(System.getProperty(ALT_USER_SETTINGS_XML_LOCATION));
   if (settings.exists()) {
      request.setUserSettingsFile(settings);
   }
}
Then the value of the used system property is added into the field for Jenkins' Goals and Options: -s custom_settings.xml -Dorg.apache.maven.user-settings=custom_settings.xml.

Alas I'm not a Maven expert and it took me quite some time to solve these problems. They are not specific to CloudBees but they result from using non default settings. Other plugins that fork Maven have similar problems.

5 September 2010

Maven Plugin Testing Tools

Obviously your MOJOs (read Maven Plugins) need to be tested as detailed as all your other classes. Here are some details on using the Maven Plugin Testing Tools and how I used them for the Macker Maven Plugin.

Dog in harnessUnit Testing
To unit test a MOJO create a JUnit test case and extend AbstractMojoTestCase. It comes with the maven-plugin-testing-harness:
<dependency>
  <groupId>org.apache.maven.plugin-testing</groupId>
  <artifactId>maven-plugin-testing-harness</artifactId>
  <version>1.2</version>
  <scope>test</scope>
</dependency>
Note that version 1.2 of the maven-plugin-testing-harness is still Maven 2.0 compatible, as will be version 1.3. The alpha release of version 2.0 is already based on Maven 3. In the test case the MOJO is initialised with a pom fragment and executed. The basic usage is well documented in the Maven Plugin Harness documentation. The usual folder structure for plugin unit tests is
.
 |-- pom.xml
 \-- src
     |-- main
     \-- test
         |-- java
         |   \-- MojoTest.java
         \-- resources
             \-- unit
                 |-- test-configuration1
                 |   \-- resources for this test if any
                 |-- test-configuration1-plugin-config.xml
                 \-- test-configuration2-plugin-config.xml
The class MojoTest contains methods testConfiguration1() and testConfiguration2(). There are several Maven projects using this approach, just do a code search.

Stubs
If your MOJO needs more complex parameters, e.g. a MavenProject or an ArtifactRepository, these have to be provided as stubs. Stubs are simple implementations of real Maven objects, e.g.
public class org.apache.maven.plugin.testing.stubs.ArtifactStub
  implements org.apache.maven.artifact.Artifact
and have to be configured in the pom fragment (test-configuration1-plugin-config.xml) as described in the Maven Plugin Testing Harness Cookbook. See also MackerMojoTest in the Macker Maven Plugin for an extensive example. There are several stubs to simulate Maven objects such as ArtifactHandler or ArtifactResolver. Creating stubs gets cumbersome when you need more of Maven's internals. Every object and every method has to be stubbed out.

Integration Testing
Integration testing is done with the maven-plugin-testing-tools:
<dependency>
  <groupId>org.apache.maven.plugin-testing</groupId>
  <artifactId>maven-plugin-testing-harness</artifactId>
  <version>1.2</version>
  <scope>test</scope>
</dependency>
<dependency>
  <groupId>org.apache.maven.plugin-testing</groupId>
  <artifactId>maven-plugin-testing-tools</artifactId>
  <version>1.2</version>
  <scope>test</scope>
</dependency>
<dependency>
  <groupId>org.codehaus.plexus</groupId>
  <artifactId>plexus-utils</artifactId>
  <version>1.5.6</version>
  <scope>test</scope>
</dependency>
Note that the testing tools 1.2 specifically need plexus-utils version 1.5.6. The usual folder structure for plugin integration tests is
.
 |-- pom.xml
 \-- src
     |-- main
     \-- test
         |-- java
         |   \-- MojoIT.java
         \-- resources
             \-- it
                 |-- test-case1
                 |   |-- pom.xml
                 |   \-- main
                 |       \-- classes and data for this test
                 \-- test-case2
The class MojoIT contains the test methods testCase1() and testCase2(). Folder test-case1 contains a full Maven module that uses the MOJO under test in some way.

safety netThe test uses PluginTestTool, BuildTool and the other tools from maven-plugin-testing-tools to create a local repository, install the Maven module under test into it and execute the Maven build of test-case1/pom.xml. The Plugin Testing Tools site provides more detail about this process and the various tools.

Setup
The Plugin Testing Tools do not provide an abstract test case. Each test has to create it's own AbstractPluginITCase. A good example is the AbstractEclipsePluginIT of the Eclipse Plugin. It contains methods to build the module, execute poms against it and verify created artefacts. As far as I know this is the only example available. AbstractOuncePluginITCase is a modified copy as well as AbstractMackerPluginITCase.

Execution
Integration tests should be executed in the integration-test phase.
<build>
  <plugins>
    <plugin>
      <artifactId>maven-surefire-plugin</artifactId>
      <executions>
        <execution>
          <phase>integration-test</phase>
          <goals>
            <goal>test</goal>
          </goals>
          <configuration>
            <includes>
              <include>**/*IT.java</include>
            </includes>
            <excludes>
              <exclude>specified only to override config
                       from default execution</exclude>
            </excludes>
          </configuration>
        </execution>
      </executions>
    </plugin>
  </plugins>
</build>
alternative routeThe PluginTestTool modifies the pom.xml to skip all tests, so the tests are not invoked again when the module is build by the integration test.

Help Mojo Workaround
Unfortunately there is a problem with the above approach. It works fine for modules which do not contain Maven Plugins. But it fails during integration test preparation when the help-mojo of maven-plugin-plugin is executed. Fortunately the guys from the Eclipse Plugin found a workaround:
<plugin>
  <groupId>org.apache.maven.plugins</groupId>
  <artifactId>maven-plugin-plugin</artifactId>
  <!-- lock down to old version as newer version aborts
       build upon no mojos as required during ITs -->
  <version>2.4.3</version>
  <executions>
    <!-- disable execution, makes IT preparation using
         maven-plugin-testing-tools fail (see
         target/test-build-logs/setup.build.log) -->
    <execution>
      <id>help-mojo</id>
      <configuration>
        <extractors>
          <extractor />
        </extractors>
      </configuration>
    </execution>
  </executions>
</plugin>
But now the plugin can't be built from scratch any more. So they used a profile to run the integration tests and disable help-mojo execution.
<profiles>
  <profile>
    <id>run-its</id>
    <build>
      <plugins>
        <plugin>
          <artifactId>maven-surefire-plugin</artifactId>
          ...
        </plugin>
        <plugin>
          <artifactId>maven-plugin-plugin</artifactId>
          ...
        </plugin>
      </plugins>
    </build>
  </profile>
</profiles>
Wrap-up
So far so good. The BuildTool has to activate the profile run-its (as it has to skip help-mojo execution). This could be done by setting a certain property, let's call it ProjectTool:packageProjectArtifact. Then the profile would only be activated during integration test preparation.
<profiles>
  <profile>
    <id>run-its</id>
    ...
    <activation>
      <property>
        <name>ProjectTool:packageProjectArtifact</name>
      </property>
    </activation>
  </profile>
</profiles>
I've submitted a patch for that, but in the meantime I had to copy the BuildTool into my own plugin, ugh. (I was working towards a clean solution throughout this post but in the end all gets messed up.) The whole plugin testing can be seen in action in the Macker Maven Plugin.

Acknowledgement
Experimenting with the Maven Plugin Testing Tools was part of a System One Research Day. Thank you System One for supporting Open Source :-)