Showing posts with label tool. Show all posts

1 September 2022

Tips for Remote Work

newly setup outdoor home office (licensed CC BY by Blake Patterson)During COVID lockdown, I worked remotely. I did all my Code Cop things, e.g. pair programming, code reviews, coding workshops, just in a remote way. All these tasks involved other people and I was severely affected by my "remoteness". After one year of remote work, one of my clients ran an in-house knowledge sharing on how to do that successfully. They invited me and I thought about the advice I would give. What would be my top three tips for remote work?

1. Check-in
When working remotely, the first and foremost thing I use are check-ins. During a check-in everybody says a few words how he or she is here - as a human being. The check-in is not about your role, your expectations or current work. It is about how you feel. When we work separately, I miss your face and body language and we need to be explicit how we are. In a face to face situation I might be able to recognise if you are tired or distracted or upset. I am unable to identify the little hints when you are just a small image on my screen. Now I place more emphasis on the human and emotional side of my peers because it is missing in a remote setting. Some people always reply with "I am OK" and I am fine with that. Nobody has to share. Some people keep talking and I have to remind them what the check-in is about and stop them from taking all the space. Conversation, arguing or discussion break the check-in. And at the end of the meeting I ask everybody to check-out, which is the opposite, asking how they are leaving as human beings.

2. Be Professional
I preach being professional. After all "I help development teams with Professionalism" (as written on the second introduction slide of all of my decks). Professionalism is an attitude, it is how you do your job. This includes also your appearance. In a remote setting, your appearance is the image of your face, the sound of your voice and the background behind your head. There are several implications: Your camera is always on. You are in the centre of your camera's focus and the camera is ideally placed on top of your screen where you are looking at from time to time. On the other hand, when only half of your face is visible, or your face is distorted in some way, it is hard to see and to connect. In communication theory, as the initiator if the exchange, the sender is responsible for the message to be received. Much of your message is conveyed by your voice. For the best audio, use a headset with a microphone so your team mates have a change of hearing you. Next I recommend a professional background. Best is a uniform wall or board. In the beginning of remote work, I hung a blanket between two window handles to provide a uniform, non distracting background during my video calls. Non uniform backgrounds are distracting and make it harder to focus on the face of the person speaking. A Green Screen background helps if you have no option to work in front of a wall or door. Please choose a neutral image with soft colours. Most Green Screen backgrounds are unsuitable.

2VHvy07 (licensed CC BY-NC-ND by Princeton University Rowing)3. Strive for the same Level of Collaboration
It is harder to collaborate under remote working conditions. For example pair programming is more complicated. Now I do not accept less collaboration than before remote work. There are options and tools to overcome the barrier. Ten years ago, in 2012, I already used tools as TeamViewer or AnyDesk to control the machine of my remote pairing partner. I spent many hours working like that and it worked well. Modern tools I have used include Code With Me, which works with the JetBrains family of IDEs, Visual Studio Live Share, which you can even join with a browser, Floobits, CodeTogether and mob.sh. If you are blocked by remote work, push for some solution to keep in touch and do what you used to do. Do not accept less collaboration than in face to face situations.

We need to keep in touch
After I had put together my three tips, I was surprised. I had expected some technology or tool but all three tips are about connecting. Then it is not a surprise after all, because remote work first and foremost affects collaboration. Most advice of the other presenters was aligned with that. Here are some examples: When working closely with a team you need to keep in touch. You should speak with your team members often, probably talk daily. You should also meet outside work, e.g. remote game events like online escape room. Meeting in person is even better, e.g. visiting each other or visiting the office once in a while.

Video Conference All Day
A team lead shared his story how they had managed transition to remote work. The team used to talk a lot during the day. When remote work started, they kept a video call running. Whenever people would work, they would be in the call, unless they were in a meeting with someone. Many team members used a second device, e.g. a tablet, for this ongoing call. They felt like being in the office and whenever someone wanted to talk, she could talk to the people in the room. Using the video conference open all day, the team kept up the good vibe while fully working remotely.

I am curious about your tips to improve remote collaboration. If you have any, I invite you to comment.

26 February 2022

Porting RLE8

I am going back in time (again) and playing with some of my old source code: In the days of MS-DOS, 16 bit operating systems and 640 kB of RAM, I created a whole bunch of MS-DOS utilities and tools, mostly written in Turbo Pascal. In the last 20 years I have only ported a few of them. From time to time I miss one of these old tools - but never miss it enough to invest the time to write it from scratch. Last year I came across p2c, a Pascal to C translator by Dave Gillespie. Oh such joy - and I used it to port my old tools. One tool I used - which I had not created myself - was RLE8 by Shaun Case, Public Domain 1991.

art Moderne (licensed CC BY-NC-ND by Nadine)RLE8
RLE stands for run-length encoding compression. It is a form of data compression in which repeated values are represented by a count and a single instance of the value. It is a very simple form of compression and in the nineties it sometimes reduced disk and memory space significantly. It was used in early versions of Windows BMP for bitmap compression named BI_RLE8: An RGB format that used run-length encoding (RLE) compression for bitmaps with 8 bits per pixel. The compression used a 2-byte format consisting of a count byte followed by a byte containing a colour index. There were versions for 4 and 8 bit image data, RLE4 and RLE8 respectively. "RLE compression was used in the stone-age" as one forum comment reads and today there not much interest in it. The only reference I found was for benchmarking highly optimised code.

Finding the Original Source
Finding the original source code was difficult. It is in the nature of the modern WWW that new pages appear and old ones disappear. Fortunately the RLE8.EXE printed the name of its author and its license: Shaun Case 1991 Public Domain. After some googling I found an article about it, which later turned out to be the contents of the Readme someone had reposted almost ten years later on GameDev. Eventually I found the Retro Computing Archive with its collection of CD-ROMs containing shareware and Public Domain software from the late 80's and 90's. RLE8_SC. Win! (The Retro Computing Archive is great, many of its ZIP files are unpacked and therefore crawled by Google which helped me find it.)

Porting from Turbo C
The code compiled without issues, but included a header I did not have, dir.h, a header from Borland's Turbo C. I guess this is the biggest issue when porting old code - calls to non-standard library functions. I missed fnsplit, a function which split file specifications into component parts. While I could have created the function myself - an excellent opportunity to practice my C - I searched more and luckily someone had created it already. Thank you Robert B. Stout. Robert granted license to use his source files to create royalty-free programs, which RLE8 is. After adding some more of Robert's code, and removing code which was not needed, RLE8 compiled and linked, even with my pedantic settings of gcc -std=c99 -pedantic -pedantic-errors -Wall -Wextra. I loved it. Witness the power of C, a 50 years old programming language, still moving forward.

Download original and modified sources together with binaries for DOS and Windows x86.

23 January 2019

Scheme Runtime and Editor Choices

Last month I wrote about my journey into the Scheme programming language, its standards and complete list of its special forms and functions. Today I want to describe some Scheme implementations I used as well as lightweight tooling to get started.

Scheme Runtimes
A nice thing about Scheme is its availability. There are many Scheme implementations and often many are available on different platforms. I started out using Gambit Scheme. I do not remember why I chose Gambit. It is certainly not the most popular one, which - according to questions on StackOverflow - is Racket. (On the other hand, Racked is much more than Scheme.) I guess I took what came up in one of my early Google searches.

if muybridge could bark (maybe a long shot but hey this dog is running)Gambit Scheme
Gambit is an R5RS compliant Scheme written in C. It is easy to install, mature, stable and under active development on GitHub. It is available for MacOS and Windows. Download it here. Besides the standard functions, it offers some SRFI- and many non standard ones for IO, threading and synchronisation, additional data types like signed and unsigned integer vectors (SRFI 160) and much more. Gambit comes with both a Scheme interpreter (gsi) and a compiler (gsc). The compiler transpiles Scheme into C which is in turn compiled using the GCC infrastructure (which must be in your PATH). The pre-compiled binary interpreters can be deployed as single EXE files. Yes, now I am able to write low level C code without knowing C. Win!

Gambit works well and I had no problems getting started. I recommend it to get started. While playing around with it I followed the same approach as last time and scraped the documentation for all available functions. Only later I found these lists provided by Gambit itself: R4RS and R5RS as well as all forms and functions provided by Gambit. There is a lot of documentation, which I still plan to read.

IronScheme
Then I found IronScheme. Like IronPython and IronRuby, IronScheme is a Scheme implementation based on the Microsoft DLR (i.e. the Dynamic Language Runtime). Most of its code just delegates into the CLR (i.e. the .NET Common Language Runtime). For example string-contains? is defined as
(define/contract (string-contains? str:string sub:string)
  (clr-call String Contains str sub))
IronScheme supports compilation, too. Now I can write native Windows applications without knowing anything about .NET. IronScheme is (by its own definition almost) R6RS compliant. Because of the added complexity of R6RS modularity I have not used it as all my Scheme work consists of toy projects. For real world application modularity would be the way to go.

I could not find any pre-build releases of IronScheme. To get the latest build go to its AppVeyor page, select the first build job (probably Environment: FX_VERSION=v2.0) and open the Artifacts tab. After downloading and unpacking the ZIP, the Scheme library code has to be compiled with ngen-all.cmd and echo (compile-system-libraries) ^| IronScheme.Console32-v2, yielding 10MB of DLLs.

Kawa Scheme
There are several Schemes available for the JVM (i.e. the Java Virtual Machine). One of them is The Kawa Scheme language which supports R5RS, R6RS and R7RS. I have not used Kawa. And of course there is Clojure which is a dialect of Lisp and somehow similar to Scheme. But Clojure lacks tail-call optimisation, which is required for Scheme implementations.

Mobile Devices
There are Schemes for mobile devices, too. Gambit builds a version for iPad and Android has several Schemes, e.g. Simple Scheme. So if you ever have been away from your computer and thought, "Boy, I wish I could be writing Scheme code right now" - well, now you can!

A lightweight process supports learning
I still have not read much documentation on Scheme besides SICP which uses basic language concepts so far. I am just playing. The lightweight process I am following is keeping up the fun and supports my learning:
  • Scheme has this minimalist design philosophy. I really like its simplicity. I am never stuck on syntax, reserved words or edge cases. And there are no semicolons. ;-)
  • R5RS is the Scheme to start. It is the most widely implemented standard and most documentation and StackOverflow answers apply.
  • The Scheme runtime must be easy to install and should not mess up my system.
  • I favour runtimes that are available for different architectures and operation systems so I can use the same runtime on different machines, e.g. on my main x64 workstation, my legacy x86 netbook and even my tablet. Especially when having fun with learning, the device should not be limiting me.
  • An interpreter usually starts faster than a compiler which is important for my trial and error approach. The Gambit interpreter starts fast and I use its REPL to explore the language often.
  • A lightweight editor. Emacs would be the traditional editor operating system to work with Lisp languages and I know at least one Clojure developer who uses it. I have never used it and while getting into Emacs would be a cool and fun thing to do - long overdue according to my learning list - I do not want to post phone my Scheme experience. Any text editor should do. I will talk more on editors later.
Colour Out of FocusUltraEdit Syntax Highlighting and Tool Integration
I met UltraEdit 15 years ago and still use it as my main text editor. I guess I am old-fashioned as my version is 8 years old. Before going full scale with Emacs, I wanted at least some syntax highlighting in UltraEdit. Adding a configuration for syntax highlighting is simple (and I have done it before.) With the complete list of forms and functions I created a UltraEdit wordfile for R5RS/Gambit Scheme and one for R6RS Scheme. As soon as UltraEdit knows about the structure of Scheme, it provides code completion and shows all functions defined in the current file.

In the tool configuration I declared a tool to run the current Scheme file (command line gsi "%f" with working directory %p). UltraEdit has a shortcut to select groups of parenthesis (CTRL-B) which is very handy when working with lots of parens.

The next thing I missed was auto format. Formatting is important to keep code readable. Automatic formatting is important, because it saves work and it is easy to overlook a missing blank or newline. So I created my own Scheme-Formatter.

What about a real IDE?
Eventually UltraEdit became too "small" for my Scheme project. It works well for single file scripts but I the navigation between files is limited. So I switched to Visual Studio Code with the vscode-scheme extension. Code is nice because the navigator enables fast navigation and version control is integrated. I can commit and diff without switching windows. I mostly use search and replace across all files as it is my main refactoring tool. In the end, Code is just another editor. It is not an IDE like Eclipse or IntelliJ is for Java. The Scheme extension provides syntax highlighting but the editor's auto indentation always screws up the formatting.

Conclusion
Restarting development with a new language in a new environment was amazing. As the project grew I (obviously) had to learn more and more things. For example - because of the size of the code - the next thing I wanted was to navigate to the definition of a function. Enter Ctags. Ctags supports Scheme out of the box and both UltraEdit and Code are able to use the generated tags file. Of course Emacs does as well. Maybe I need to go for Emacs after all.

11 November 2018

Widespread Architectural Changes using IDEs

This is the second part of my list of tools to automate Widespread Architectural Changes. Now Widespread Architectural Change is a category of architectural refactoring which do not change the overall structure but need to be applied in many places consistently across a whole code base. For example, consider changing or unifying coding conventions or fixing violations. The main challenge of these changes is the high number of occurrences.

The goal of this article is to introduce you to ways to automate such changes. I have been using some of these techniques because as Code Cop I value code consistency, still this is a raw list. I have only used a few of the mentioned tools and need to explore many in more detail.

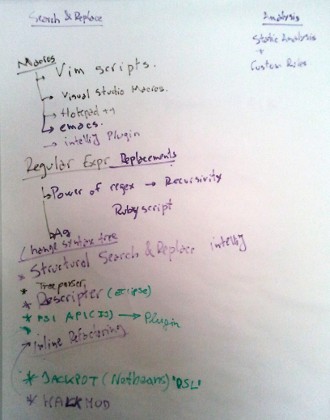
In the first part I listed some basic options, e.g. how to support manual changes with fast navigation, search and replace across the whole file system, use scripted search and replace using regular expressions, Macros and finally JetBrains' Structural Search and Replace. This time I focus on options available for modern IDEs. Tools like Eclipse or IntelliJ use an internal representation of the code, the Abstract Syntax Tree (AST). Structural Search and Replace works the AST and therefore belongs into this group as well.

Rescripter (Eclipse)
Modern IDEs support many Refactoring steps - why not use the existing tools to make our job easier? One of such tools is Rescripter, built for making large-scale changes that you can describe easily but are laborious to do by hand. Rescripter is an Eclipse plugin which runs JavaScript in the context of the Eclipse JDT. David Green added some helper objects to make searching, parsing and modifying Java code easier and wrapped a thin JavaScript layer around it. Rescripter scripts are working the AST.

Here are two examples from Rescripter's documentation: Finding a method named getName inside the class Person:
var type = Find.typeByName("Person");
var method = Find.methodByName(type, "getName").getElementName();
and adding a method getJobTitle to that type:
var edit = new SourceChange(type.getCompilationUnit());
edit.addEdit(ChangeType.addMethod(type, "\n\tpublic String getJobTitle() {\n" +
                                        "\t\treturn this.jobTitle;\n" +
                                        "\t}"));
edit.apply();
Rescripter is an old project and has not been updated since 2011. While it has some demo code and documentation, it is a bit raw. I guess it is not compatible with newer versions of Eclipse. Still - like Structural Search and Replace - it is very powerful. If you have a large code base and a repetitive change that can be expressed in terms of the AST, the high effort to get into the tool and create a script will pay off. (A useful plugin to help you working the AST is the AST View. The AST View is part of the JDT but not installed out of the box. It is visualising the AST of a Java file open in the editor.)

JackpotJackpot (NetBeans)
Another, very interesting tool in this area is the Jackpot DSL for NetBeans used in the IDE actions Inspect and Transform aka Inspect and Refactor. Jackpot is a NetBeans IDE module for modelling, querying and transforming Java source files. In the Jackpot context, a program transformation is a script or Java class which queries sources in Java projects for patterns, changes them, and then writes these changes back to the original source files. [...] Jackpot transformations tend to be applied globally, such as at a project level or across several projects. Win! Unfortunately there is very little information about it. It took me hours just to find a little bit of information about it:

Dustin Marx describes how to create NetBeans 7.1 custom hints. He agrees that the most difficult aspect of using NetBeans's custom hints is finding documentation on how to use them. The best sources currently available appear to be the NetBeans 7.1 Release Notes, several Wielenga posts (Custom Declarative Hints in NetBeans IDE 7.1, Oh No Vector!, Oh No @Override!), and Jan Lahoda's jackpot30 Rules Language (covers the rules language syntax used by the custom inspections/hints). The Refactoring with Inspect and Transform in the NetBeans IDE Java Editor tutorial also includes a section on managing custom hints. All listed documentation is from 2011/2012. The most recent one I found is a short Jackpot demo from JavaOne Brazil 2016.

NetBeans hints are warnings that have a quick fix. For example the hint "Can Use Diamond" finds places where the diamond operator of Java 7 can be used instead of explicit type parameters. When the offered action is taken, the code is migrated. In the Inspect and Transform dialogue, the inspections can be managed. Custom hints are stored in .hint files. For example, Dustin Marx' hint to remove extraneous calls to System.currentTimeMillis() from new java.util.Date constructor is written as
<!description="Unnecessary use of System.currentTimeMillis on new Date">

new java.util.Date(java.lang.System.currentTimeMillis())
=> new java.util.Date()
;;
The Java Declarative Hints Format allows matching on variables, modifiers and statements. Fixes can be applied conditionally too.

I do not know if Jackpot hints can be applied across a whole code base at once. As they are inspections, I expect them to be displayed for the whole project - making them fast navigation markers at least. Anyway this is very exciting. It is so exciting that some people wanted to port it to Eclipse (but they never did).

Using Specific Refactoring Plugins
There are a few specific plugins that combine various Refactoring. Eclipse's Source Clean Up Action deserves a honorary mention: It fixes basic warnings on a whole code base, but is very limited. An interesting plugin for Eclipse is Autorefactor which aims to fix language/API usage to deliver smaller, more maintainable and more expressive code bases. Spartan Refactoring is another Eclipse plugin that performs automatic refactoring of Java source code, making it shorter, more idiomatic and more readable.

All these plugins change a predefined, limited set of code patterns, mainly focusing on technical debt. Maybe someone implemented a refactoring plugin for part of the widespread change you need to perform. Search the market places first.

Using Refactoring APIs of IDEs
A possible way is to write your own refactoring plugin. Maybe start with code of a refactoring plugin listed above. Both Eclipse and IntelliJ IDEA offer APIs to manipulating Java code, i.e. the JDT and PSI APIs. I have not done that because it seems too much effort for one time migrations and widespread changes. And reusing the available refactoring tools might raise some problems like waiting for user input which is problematic.

Using (APIs of) Refactoring Browsers
The Refactoring Browser was the first tool that automated Refactoring for Smalltalk. It set the standard for all modern Refactoring tools. Today we have Refactoring Browsers for many languages, e.g. CScout - the C Refactoring Browser, Ruby Refactoring Browser for Emacs or PHP Refactoring Browser which is controlled via the command-line and has plugins for Vim and Emacs. Stand-alone Refactoring tools should be easier to use and script than full blown IDEs, especially if they were designed for different plugins. The idea would be to create code which controls Refactoring Browsers to apply certain changes - again and again.

RopePython Refactoring Libraries
While searching for Refactoring Browsers I just learnt that there are at least three stand-alone Python Refactoring libraries: Rope comes with Vim and Emacs plugins and is also used in VS Code. The second is Bicycle Repair Man. Further there is Bowler which supposedly is better suited for use from the command-line and encourages scripting. All these libraries are rich in features and used by Vim users. (Yeah, Vim is still going strong.)

Rope (Python)
For example, Rope can be used as a library, which allows custom refactoring steps. Even more, it offers something similar to Jackpot's hints, Restructurings. For example, we split a method f(self, p1, p2) of a class mod.A into f1(self, p1) and f2(self, p2). The following Restructuring updates all call sites:
pattern: ${inst}.f(${p1}, ${p2})
goal:
 ${inst}.f1(${p1})
 ${inst}.f2(${p2})

args:
 inst: type=mod.A
The code to perform the Restructuring using Rope as a library is
from rope.base.project import Project
from rope.refactor import restructure

project = Project('.')

pattern = '${inst}.f(${p1}, ${p2})'
goal = '...'
args = '...'

restructuring = restructure.Restructure(project, pattern, goal, args)

project.do(restructuring.get_changes())
I never used that but it looks cool. The promise of scripted refactoring makes me excited. Another item to add to my to-research list. ;-) And there are more tools on my list, which will have to wait for part 3.

29 August 2018

Widespread Architectural Change Part 1

Last month I introduced Four Categories of Architectural Refactoring:
  • Substitute Architectural Decision
  • Refactor Architectural Structure
  • Widespread Architectural Change
  • Other Architectural Changes
Today I want to start discussing options to perform Widespread Architectural Changes. This category contains all kind of small changes repeated throughout the whole code base. The number of these changes is high, being hundreds or sometimes even thousands of occurrences that have to be changed in a similar way. Examples of such modifications are:
  • Migrating or upgrading (similar) APIs, frameworks or libraries
  • Changing or unifying coding conventions
  • Fixing compiler warnings and removing technical debt
  • Consistently applying or changing aspects like logging or security
  • Applying internationalization
  • Migrate between languages, e.g. SQL vs. HQL
Ways to do Widespread Architectural Changes (C) by SoftDevGang 2016All of them do not change the overall structure, they just work on the implementation. Often substituting architectural decisions or altering architectural structure contain similar changes.

Options
I have been using some techniques since 2004 because as Code Cop I value code consistency. Two years ago I had the opportunity to discuss the topic with Alexandru Bolboaca and other experienced developers during a small unconference and we came up with even more options, as shown in the picture on the right. The goal of this and the next articles is to introduce you to these options, the power of each one and the cost of using it. A word of warning: This is a raw list. I have used some but not all of them and I have yet to explore many options in more detail.

Supporting Manual Changes With Fast Navigation
The main challenge of widespread changes is the high number of occurrences. If the change itself is small, finding all occurrences and navigating to them is a major effort. Support for fast navigation would make things easier. The most basic form of this is to modify or delete something and see all resulting compile errors. Of course this only works with static languages. In Eclipse this works very well because Eclipse is compiling the code all the time and you get red markers just in time. Often it is possible to create a list of all lines that need to be changed. In the past have created custom rules of static analysis tools like PMD to find all places I needed to change. Such a list can be used to open the file and jump to the proper line, one source file after another.

As example, here is a Ruby script that converts pmd.xml which is contains the PMD violations from the Apache Maven PMD Plugin to Java stack traces suitable for Eclipse.
#! ruby
require 'rexml/document'

xml_doc = REXML::Document.new(File.new('./target/site/pmd.xml'))
xml_doc.elements.each('pmd/file/violation') do |violation|
  if violation.attributes['class']
    class_name = violation.attributes['package'] + '.' +
                 violation.attributes['class']
    short_name = violation.attributes['class'].sub(/\$.*$/, '')
    line_number = violation.attributes['beginline']
    rule = violation.attributes['rule']

    puts "#{class_name}.m(#{short_name}.java:#{line_number}) #{rule}"
  end
end
The script uses an XML parser to extract class names and line numbers from the violation report. After pasting the output into Eclipse's Stacktrace Console, you can click each line one by one and Eclipse opens each file in the editor with the cursor in the proper line. This is pretty neat. Another way is to script Vim to open each file and navigate to the proper line using vi +<line number> <file name>. Many editors support similar navigation with the pattern <file name>:<line number>.

Enabling fast navigation is a big help. The power this option is high (that is 4 out of 5 on my personal, totally subjective scale) and the effort to find the needed lines and script them might be medium.

Search and Replace (Across File System)
The most straight forward way to change similar code is by Search and Replace. Many tools offer to search and replace across the whole project, allowing to change many files at once. Even converting basic scenarios, which sometimes cover up to 80%, helps a lot. Unfortunately basic search is very limited. I rate its power low and the effort to use it is also low.

Scripted Search and Replace using Regular Expressions
Now Regular Expressions are much more powerful than basic search. Many editors allow Regular Expressions in Search and Replace. I recommend creating a little script. The traditional approach would be Bash with sed and awk but I have used Ruby and Python (or even Perl) to automate lots of different changes. While the script adds extra work to traverse all the source directories and files, the extra flexibility is needed for conditional logic, e.g. adding an import to a new class if it was not imported before. Also in a script Regular Expressions can be nested, i.e. analysing the match of an expression further in a second step. This helps to keep the expressions simple.

For example I used a script to migrate Java's clone() methods from version 1.4 to 5. Java 5 offers covariant return types which can be used for clone(), removing the cast from client code. The following Ruby snippet is called with the name of the class and the full Java source as string:
shortName = shortClassNameFromClassName(className)
if source =~ / Object clone\(\)/
  # use covariant return type for method signature
  source = $` + " #{shortName} clone()" + $'
end
if source =~ /return super\.clone\(\);/
  # add cast to make code compile again
  source = $` + "return (#{shortName}) super.clone();" + $'
end
In the code base where I applied this widespread change, it fixed 90% of all occurrences as clone methods did not do anything else. It also created some broken code which I reverted. I always review automated changes, even large numbers, as jumping from diff to diff is pretty fast with modern tooling. Scripts using Regular Expressions helped me a lot in the past and I rate their power to high. Creating them is some effort, e.g. a medium amount of work.

Macros and Scripts
Many tools like Vim, Emacs, Visual Studio, Notepad++ and IntelliJ IDEA allow creation or recording Keyboard and or mouse macros or Application scripts. With them, frequently used or repetitive sequences of keystrokes and mouse movements can be automated, and that is exactly what we want to do. When using Macros the approach is the opposite as for navigation markers: We find the place of the needed change manually and let the Macro do its magic.

Most people I have talked to know Macros and used them earlier (e.g. 20 years ago) but not recently in modern IDEs. Alex has used Vim Scripts to automate repetitive coding tasks. I have not used it and relating to his experience. Here is a Vim script function which extracts a variable, taken from Gary Bernhardt's dotfiles:
function! ExtractVariable()
  let name = input("Variable name: ")
  if name == ''
    return
  endif

  " Enter visual mode
  normal! gv
  " Replace selected text with the variable name
  exec "normal c" . name
  " Define the variable on the line above
  exec "normal! O" . name . " = "
  " Paste the original selected text to be the variable value
  normal! $p
endfunction
I guess large macros will not be very readable and hard to change but they will be able to do everything what Vim can do, which is everything. ;-) They are powerful and easy to create - as soon as you know Vim script of course.

Structural Search and Replace
IntelliJ IDEA offers Structural Search and Replace which performs search and replace across the whole project, taking advantage of IntelliJ IDEA's awareness of the syntax and code structure of the supported languages.. In other words it is Search and Replace on the Abstract Syntax Tree (AST). Additionally it is possible to apply semantic conditions to the search, for example locate the symbols that are read or written to. It is available for Java and C# (Resharper) and probably in other JetBrains products as well. I have not used it. People who use it tell me that it is useful and easy to use - or maybe not that easy to use. Some people say it is too complicated and they can not make it work.

Online help says that you can apply constraints described as Groovy scripts and make use of IntelliJ IDEA PSI (Program Structure Interface) API for the used programming language. As PSI is the IntelliJ version of the AST, this approach is very powerful but you need to work the PSI/AST which is (by its nature) complicated. This requires a higher effort.

To be continued
And there are many more options to be explored, e.g. scripting code changes inside IDEs or using Refactoring APIs as well as advanced tools outside of IDEs. I will continue my list in the next part. Stay tuned.

31 August 2015

Empowering Testers

Developers need to be able to test
I strongly believe that we (software developers) have to be able to test our work. How else can we make sure that "it works". At the minimum we write unit tests for the code we just created. The whole idea of Test Driven Development is based on finding, prioritising and running unit (and sometimes acceptance) tests against our code. Even people that do not like TDD, put a strong focus on automated tests. Paul Gerrard recently put it nicely as "if they can't test they aren't developers". Unfortunately not all developers are able to do so. I often meet young developers who have no experience in deriving test cases from requirements or finding more than the most obvious test scenarios at all. They write tests because they want to make sure their program work, but their tests are not focused, testing too much or nothing at all. More skill and experience is needed.

We can code it! (for Mother Jones magazine)Need testers be able to code?
When developers need to be able to test, do testers need to be able to code? This is an old debate. As hard-core coder I believe that testers need to be able to code. Period. For example at one my of previous employers, the testers were asked to automate their tests using Rational Function Tester. They had to write Java code to drive the test engine. And the code they wrote was abysmal. I do not blame them, nobody had taught them how to do it. But the code they wrote was important for the project's success, so it better had some quality at least. What was needed were Test Automation Engineers. As the test automation code is much simpler than the regular code, there is no need for explicit conditionals or loops in test cases, I concede that these testers (the engineers) do not have to know as much about coding as developers do. They do not have to know Design Patterns or SOLID principles, but they need at least to know naming, duplication and to a certain extend, abstraction.

Manual testing is immoral
Uncle Bob has explained years ago why manual testing is a bad thing. Probably he meant that manual checking is immoral, because the testing community likes to distinguish between aspects of the testing process that machines can do (checking) versus those that only skilled humans can do (testing). As there are more than 130 types of software testing, many of them can only be done by a skilled human, e.g. exploratory testing. I do not know how many testers do these kind of interesting things, but most of what I see is either (immoral) manual checking or test automation engineering, which is kind of coding.

Austrian Testing Board
Earlier this year I was invited to the Austrian Testing Board to give a presentation about Deliberate Practice. While Deliberate Practice is popular with developers, e.g. Coding Dojos or Code Retreats, it can be applied to all kind of learning. For example there are Testing Dojos and Testautomation (Code) Retreats. My presentation was received well and I enjoyed a heated discussions afterwards because - of course - I had provoked the "testers" a bit ;-) One of the attendees, Gerd Weishaar, was surprised to hear about my approach: Doing TDD, automating all tests (because "immorality") and running only a few integrated tests (because Test Pyramid and Scam). I also told him about my hate for UI test automation tools because of their brittleness. As the VP Product Management at Tricentis, a company focusing on software (end-to-end) test automation, he had a very different view than mine: Almost no developers writing unit tests, groups of testers who work offshore, doing manual testing. We immediately became friends. ;-)

Empowering Testers
Gerd's vision was to enable the testers who are not able to code, empowering them to do their job - to get something tested - without any technical knowledge. Despite our contradicting views I got curious: Would it be possible to test for example a web application without any technical knowledge? How much technical background is necessary to understand the application at all? How much automation can be achieved without being able to write a script? And most interestingly, how much support can be put into a testing tool, just by making it usable for the testers. How far can we go?

Magnif-eyedTricentis Tosca Testsuite
The tool Gerd was talking about was Tosca, a functional end-to-end testing tool. I had heard about it but never used it myself. Gerd encouraged me to have a look at it and provided me with online material, but I failed to allocate time for that. In the end he invited me to one of their monthly instructor-led training, free of charge. Although I had never planned to dedicate three full days (!) to checking out Tosca, I accepted his invitation, because I find well prepared instructor-led training an efficient way to get started with a new topic. The training was tough, three full days working the tool on various exercises. The trainer and the other participants knew a lot about testing and we had great discussions. (If you need to work with Tosca on your job I strongly encourage you to take their instructor-led training. Afterwards you will be productive using the Tosca Testsuite.)

Small Disclaimer
I attended the three day training free of charge. Gerd asked for feedback and a blog post about it in return. This is this blog post. I liked the trainer and in the end I liked Tosca, so I am positively biassed. Still all the open questions from the beginning of the article remain.

Training
I had two goals for the training: First I wanted to learn more about the mind-set of "classic testers" and second I wanted to check Gerd's idea of empowering non-technical/non-coder testers. Tosca is very powerful. It includes tools for project planning, risk management, test case design as well as manual and automated testing. It took me three days to get an idea what the tool is capable of. I do not know how much more time one would need without the development background that I have. I am used to such kind of tools, after all Eclipse or IDEA are not easy to use either. So training is necessary to use Tosca. Maybe three days are enough to explain it to someone who has no idea about coding, maybe five days are needed. Anything less than ten years will do. As the tool only offers a fixed limit of combinations, it is possible to get familiar with it fast.

Context Sensitivity
Tosca is a professional tool. The user interface is well done and it supports power users by providing tab ordering and consistent keyboard short-cuts. Unfortunately some of its many options and functions are really hidden deep in dialogues or require you to type in certain text combinations. This is not usable in the general sense. I guess developers are used to writing text, after all that is the code we write day after day. Still we expect context sensitive help and code completion, something that non-coders need even more. So I guess there needs some work to be done in a few places, but that can be fixed easily, and Gerd told me they are planning to improve this.

Tosca Test Case Design
The coolest things of Tosca is its Test Case Design functionality. It enables the formulation of abstract test cases, working with happy path, boundary values and negative cases, to create a conceptual model of all tests necessary to cover the given functionality. While this modelling does not involve any kind of coding related skills, it definitely requires skilled test professionals with analytical thinking and a high level of abstraction. As I consider these skills important coding skills, the test case design requires at least someone "like a coder".

Tosca Test Automation
While it is possible to make test case organisation or execution easy to use, the real problem is always the automation. I cannot imagine a non-coder being able to create reasonable test case automation. To hide complexity, Tosca's automated test cases are constructed from building blocks which hide the real automation code, e.g. pressing a button on a web page. It might be possible to create an automated test case just by arranging and configuring the existing automation steps in the right order, but usually that is not the case, because new automation steps have to be created on the fly. Also the test automation allows for conditionals, repetitions (loops) and templates (macros), which are typical coding constructs. If someone has to work with assignments, conditionals and repetitions, she is already a programmer.

Where to nextHow far can we go?
The underlying question is if it is possible to lower the requirements for technical work by providing smarter user interfaces that support the way we work? I hope so. Enabling people to get some tests automated without knowledge in coding is a good example for this. Even if we can make the tools just a bit more usable our users will feel the difference. Tosca contains some interesting approaches regarding this. Reducing complexity lets users work on a higher level of abstraction. Unfortunately abstractions are sometimes leaky and suddenly we are back in the low level world and have to type "magic" text into plain text fields. For now there are still areas in Tosca where you need to be a coder and you have to stick to software development principles to get good results. But I like Gerd's vision and I am curious how far they will go to empower non technical testers.

5 June 2015

Choose Your Development Services Wisely

URIs Should Not Change
Modern software development relies a great deal on the web. Our source code is hosted on GitHub, we download necessary libraries from Maven Central, Ruby Gems or NPM. We communicate and discuss using issue trackers and forums and our software is built on hosted Continuous Integration servers. We rely a lot on SaaS infrastructure. But the Internet is constantly in motion. Pages appear and vanish. New services get created, moved around and shut down again. When Tim Berners-Lee created the web, he wished for URIs that would not change, but unfortunately the reality is different.

Dead EndI hate dead links. While usually dead links are not a big deal, you just use Internet search to find their new homes, I still find them annoying. It is impossible to update all dead links on my blog and in my notes, but at least I want the cross references of my own stuff to be correct. This means that I have to migrate and update something at least once a year. The recent shutdown of Google Code concerned me and I had a lot of extra work. This made me think.

Learning: Host as much of your content under your own control, e.g. your personal web space.

To deny the usage of today's powerful and often free services like GitHub would be foolish, but still I believe we (developers) should consider them dependencies and as dependencies they are also liabilities. We should try to reduce coupling and be aware of potential migration costs.

Learning: When choosing a SaaS service, think about its benefits versus the impact of it not being available any more.
Learning: When you pay for it, it is more stable.

Personal Development Process
The impact can be internal, which means it affects only you and your work, or it can be external, which means it affects others, your users or people using your code or documentation. For example let us consider CloudBees. I started using it in the early beta and it was great. Given time I moved all my private, kata and open source projects there and had them build on each commit. It was awesome. But last year they removed their free plan and I did not want to pay, so I stopped using it. (This is no criticism. CloudBees is a company and needs to make money and reduce cost.) The external impact was zero as the Jenkins instance was private. The internal impact seemed huge. I had lost my CI. I looked for alternatives like Travis, but was too lazy to configure it for all my projects. Then I used the Jenkins Job Import Plugin to copy my jobs to a local instance and got it sort of running. (I had to patch the plugin, wasting hours...) Still I needed to touch every project configuration and in the end I abandoned CI. In reality the private impact was also low as I am not actively developing any Open Source right now and I am not working on real commercial software where CI is a must. Now I just run my local builds more often. It was cool to use CloudBees, but I can live without it.

Learning: Feel free to use third party SaaS for convenience, i.e. for anything that you can live without easily.

Service Station 07Information Sharing
Another example is about written information, the Hackergarten wiki. When I started Hackergarten Vienna in 2011, I collected material how to run it and put it into the stub wiki someone had created for Hackergarten. I did not think about it and just used the existing wiki at Wikispaces. It seemed the right place. There were a few changes by other users, but not many changes at all. Two years later Wikispaces removed their free plan. Do you see a pattern? The internal impact was zero, the but external impact was high, as I wanted to keep the information about running a Hackergarten available to other hackers. Still I did not want to spend 50$ to keep my three pages alive. Fortunately Wikispaces offered a raw download of your wiki pages. I used this accessible copy of my work and converted the wiki pages into blog pages in no time. As I changed the pages rarely the extra overhead of working in HTML versus Creole was acceptable. Of course I had to update several links, a few blog posts and two slide-decks, sigh. (And it increased my dependency to Google Blogger.)

Learning: When choosing a SaaS service, check its ways of migrating. Avoid lock-in.
Learning: Use static pages for data that rarely changes.

Code Repositories
Moving code repositories is always a pain. My JavaClass Ruby Gem started out on Rubyforge, later I moved it to Google Code. With Google Code shutting down I had to migrate it again, together with seven other projects. The raw code and history were no problem, hg convert dealt with that. But there were a lot of small things to take care of. For example, different version control system used a different ignore syntax. The Google Code project description was proprietary and needed to be copied manually. The same was true for wiki pages, issues and downloads.

I had to change many incoming links. First URL to change was the source repository location in all migrated projects' descriptors, e.g. Maven's pom.xml, Ruby's gemspec, Node's package.json and so on. Next were the links to and from project wiki pages and finally I updated many blog posts and several slide-decks. And all the project documentation, e.g. Maven sites or RDoc API pages needed to be re-generated to reflect the new locations. While this would be no big deal for a single project, it was a lot of work for all of them. I full-text-searched my hard-disc for obsolete URLs and kept finding them again and again.

Maybe I should not cross link my stuff that much, and I am not even sure I do link that much at all. But instead of putting the GitHub URL of the code kata we will be working on in a Coding Dojo directly into the slides, I could just write down the URL on a flip-chart at the beginning of the dojo. The information about the kata seems to be more stable than the location of the source code. Also I might use the same slides working on code in different languages, which might be stored in different repositories. But on the other hand, if I bother to write documentation and I reference something related, I expect it to be linked for fast navigation. That is the essence of hyper-text, isn't it?

Learning: (maybe) Do not cross link too much.
Learning: (maybe) Do not link from stable resources to less stable ones.

Moving Day!Generated Artefacts
Next to source code I had to migrate generated artefacts like my Maven repository. I had used a Google Code feature that a repository was accessible in raw mode. I would just push to my Maven repository repository (recursion yeah ;-) and the newly released artefacts would show up. That was very convenient. Unfortunately Bitbucket could not do that. I had a look into Bitbucket pages, but really did not feel like changing the layout of the repository. I was getting tired of all this. In the end I just uploaded the whole thing to my public web space. Static web pages and binary files, e.g. compressed archives, can be hosted on any web server and I should have put them there in the very beginning. Again I had to update site locations, repository URLs and incoming links in several projects and blog posts. As I updated my parent Pom I had to release new versions of several projects. I started to hate hyper-links.

Learning: Host static data on regular (personal) web spaces.

You might argue that Maven Central would be a better place for Maven artefacts and I totally agree. I consider Maven Central much more stable than my personal web space, but I did not bother to go through the process of getting access to a service that would mirror my releases to Central. Anyway, this mirroring service, like Sonatype's, feels less stable than Central itself.

Learning: Host your stuff on the most stable option available.

Now all my repositories are hosted on Bitbucket. If its services stop working some day, and they surely will stop somewhere in the future, I will stop using hosted repositories for my projects. I will not migrate everything again. I am done. Update January 2020: Bitbucket stops supporting Mercurial this year. I am done. :-(

Learning: (maybe) Do not bother with dead links or losing your stuff. Who cares?

CNAMEs
For some time Bitbucket offered a CNAME feature that allowed you to associate a domain or sub-domain with an account. That was really nice, instead of bitbucket.org/pkofler/project-x I used hg.code-cop.org/project-x. I liked it, or so I thought. Of course Bitbucket decided to disable this feature this July and I ended - again - updating URLs everywhere. While the change was minimal, path and parameters of URLs stayed the same, I had to touch almost every source repository to change its public repository location, fix 20+ blog posts and update several Coding Dojo slide-decks, which in turn needed to be uploaded to SlideShare again.

Learning: Only use the minimal, strictly necessary features of a SaaS.
Learning: Even when offered, turn off all features you do not need, e.g. wiki, issues, etc.
Learning: Do not use anything just because it is handy or "cool". It increases your coupling.

change machineURLs Change All The Time
Maybe I should not link too much in this post as eventually I will have to change all the links again, grrrr. I consider using a URL service like bitly. Maybe not exactly like bitly because its purpose is the shortening and marketing aspect of links and I do not see a way to change the actual link once it was created. And I would depend on another service, which eventually would go away. So I need to host the service myself, like J. B. Rainsberger does. I like the idea of updating all my links with a single update statement in the link database. I wished I had used such a thing. It would increase work when creating links, but would reduce work when changing them. Like with code, it seems that my links are far more often changed than created, at least some of them.

I could not find any free or otherwise service providing this functionality. So I would have to create my own. Also I do not know the impact of the extra redirect on search engines and other automatic consumers of my content. And still some manual changes are inevitable. If the repository location moves, the SCM settings need to be changed. So I will just wait until the next feature or whole service is discontinued and I have to start over.

Thanks to Thomas Sundberg for proof-reading this article.

2 October 2014

Visualising Architecture: Maven Dependency Graph

Last year, during my CodeCopTour, I pair programmed with Alexander Dinauer. During a break he mentioned that he just created a Maven Module Dependency Graph Creator. How awesome is that. The Graph Creator is a Gradle project that allows you to visually analyse the dependencies of a multi-module Maven project. First it sounds a bit weird - a Gradle project to analyse Maven modules. It generates a graph in Graphviz DOT language and an html report using Viz.js. You can use the dot tool which comes with Graphviz to transform the resulting graph file into JPG, SVG etc.

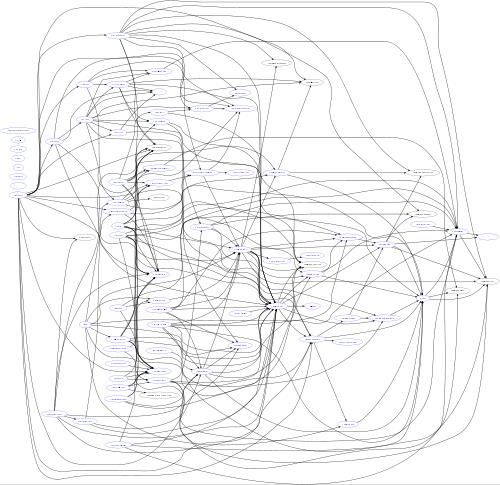
In a regular project there is not much use for the graph creator tool, but in super large projects there definitely is. I like to use it when I run code reviews for my clients, which involve codebases around 1 million lines of code or more. Such projects can contain up to two hundred Maven modules. Maven prohibits cyclic dependencies, still projects of such size often show crazy internal structure. Here is a (down scaled) example from one of my clients:

Maven dependencies in large project
Looks pretty wild, doesn't it? The graph is the first step in my analysis. I need to load it into a graph editor and cluster modules into their architectural components. Then outliers and architectural anomalies are more explicit.

22 March 2013

Twitter Command Line Backup

I used to be a low volume Twitter user. I would not connect with people having more than 1000 tweets because they seemed to "high-volume" for me. But given time the number of my tweets rose as well and I managed to create a decent tweet now and then.

U.S.-Bundeswehr medical trainingSaving My Tweets
As soon as I noticed that my tweets were "piling up", I thought about backing them up. This would have to work incrementally as older tweets might vanish from my time line. I searched for an online tool, but did not find anything useful. While searching for offline tools, I found TwitterBackup by Johann Burkard. It is a great tool and does exactly what I need, incremental backup of tweets. It has a small user interface and works out of the box. I recommend it if you like using UIs. (Note that the password input field in the main window is not used, you do not have to provide your password there.)

GUIs are for wimps ;-)
I prefer to start my tools from the command line, especially if I plan to run them periodically. Fortunately Johann Burkard provided his TwitterBackup under a MIT license, so I forked the source and "mavenized" the project. Johann had kept his logic separated from the UI which made it easy to remove the user interface and add command line parameters instead. A few days later I added support to backup favorites and retweets as well. The current version supports the following commands:
E:\>java -jar twitter-backup-cli-3.1.8.2-jar-with-dependencies.jar -h
usage: twitter-backup-cli [-u <twitter handle>] [-f <backup file>]
Backup Twitter Tweets with TwitterBackup (command line).
 -f,--file <arg>         File to save tweets to (saved to system)
 -fv,--favorites         Load favorites instead of tweets (default=tweets)
 -h,--help               Print this usage information
 -o,--port <arg>         HTTP proxy port for web access
 -p,--proxy <arg>        HTTP proxy URL for web access (saved to system)
 -r,--reset-preferences  Do not load preferences from system
 -rt,--retweets          Also load retweets in timeline (default=false)
 -si,--sinceId <arg>     Load tweets/favorites since the given id (default=all)
 -t,--timeout <arg>      Timeout in ms between calls to Twitter (default=10500)
 -u,--username <arg>     Twitter username to load tweets from (saved to system)
For general instructions, see Johann's website at: http://is.gd/4ete
Note that both the original and the new version save some of their parameters to the java.util.prefs.Preferences, so you need to provide your credentials only once.

Usage Patterns
Download the binary Jar from my Maven repository and provide your twitter handle, e.g. -u codecopkofler. Use -f tweets.xml -rt to backup all tweets and retweets and use -f favorites.xml -fv to save all your favorites. Finally decide where the backup should start, e.g. -si 286077755567779841. The value 286077755567779841 is Twitter's id of my first tweet in the year 2013, whereas 152504278093795328 was my first in 2012 and so on. With -si I separate my tweets into yearly backup chunks.
Loading Tweets
read 27 tweets from tweets.xml
loading http://api.twitter.com/1/statuses/user_timeline.xml?...
9 new tweets downloaded, 36 total
waiting 10500ms
loading http://api.twitter.com/1/statuses/user_timeline.xml?...
no new tweets found
saving backup to tweets.xml
Loading Favorites
read 0 tweets from favorites.xml
loading http://api.twitter.com/1/favorites.xml?...
1 new tweets downloaded, 1 total
waiting 10500ms
loading http://api.twitter.com/1/favorites.xml?...
no new tweets found
saving backup to favorites.xml

27 December 2012

KDiff3 Merge Tool for RTC

"3-way merges still remain one of the more taxing tasks of any software development team." (Wikipedia)

Rational Team Concert
For my current work I use Rational Team Concert, an Eclipse based IDE. RTC has a built-in compare tool that works well for comparing files or reviewing changes and furthermore Jazz Version Control offers various ways to resolve conflicts. But recently I had to merge a branch with more than a year worth of changes (more than 1000 commits) and the RTC merge tool showed certain deficiencies which had a negative impact on my productivity. So I looked for alternatives.

Surgery Merge Stitches Staples3-way Merge Tools
An ideal merge tool would be free and should support all platforms. Based on my experience and googling for 3-way merge, the following tools showed up in that particular order: KDiff3, P4Merge and DiffMerge.

KDiff3
KDiff3 is a free diff and merge program. It works on single files and whole directories. It runs on MS-Windows, Mac OSX and any Un*x that is supported by QT. It is GNU licensed which is ok for me but troubles our legal department ;-) Its installation is straight forward and it has direct Explorer integration on Windows systems. I have been using it to compare files for years. It is really cool, go check it out!

Integration with RTC
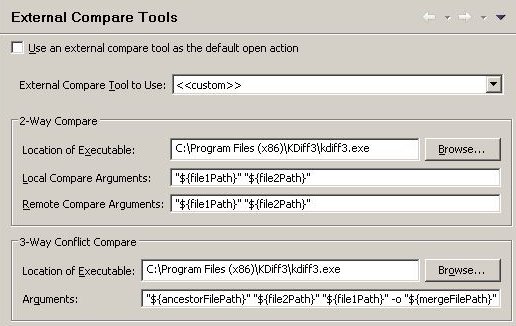
RTC allows a standalone merging tool to be used as a replacement of the internal one. To configure KDiff3 in RTC perform the following steps:
  • Open the menu for Window -> Preferences.
  • Select Team -> Jazz Source Control -> External Compare Tools.
  • Choose <<custom>> in the drop down.
  • Check off to use the external compare tool as the default open action.
  • Browse to your KDiff3 install location for the executables.
  • Use "${file1Path}" "${file2Path}" for the 2-Way Compare.
  • Use "${ancestorFilePath}" "${file2Path}" "${file1Path}" -o "${mergeFilePath}" for the for the 3-Way Conflict Compare.
Configure Kdiff3 as External Compare Tool in  RTCUsage
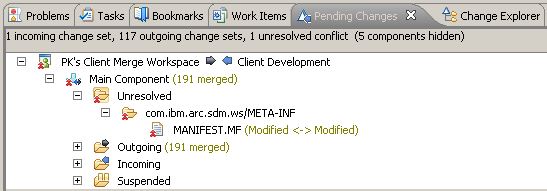
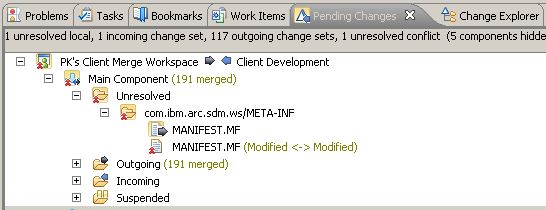
An external merge tool starts much slower than the integrated one. I do not recommend using it as the default open action. I use the internal one to see differences and only when I have to merge conflicts I choose Open in External Compare Tool from the context menu of the unresolved change:Unresolved Conflicts in Jazz Version Control
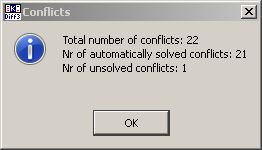
Then KDiff3 starts and (hopefully) greets you with the message that all conflicts have been merged ;-) Often this is the case because the merge capabilities of KDiff3 are much stronger than of RTC, its Auto-Merge rarely works for me.KDiff3 shows Number of Conflicts on Start-up
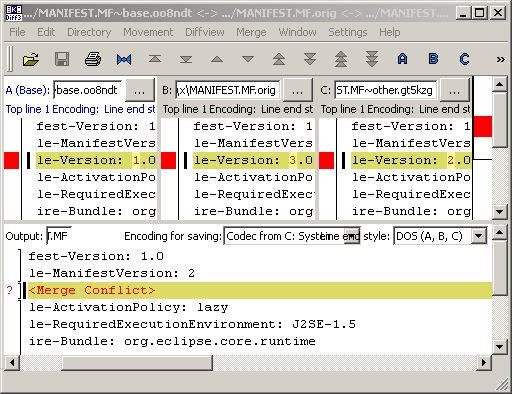
The user interface of KDiff3 is a bit crowded with windows. The top left diff-window (A) shows the base version, i.e. the common ancestor of both changed files. The middle window (B) shows the proposed changes and the right window (C) contains the current version of the file. The bottom panel is editable and allows you to solve conflicts, while showing the final output. KDiff3 immediately positions the cursor at the first unresolved conflict where you can use ctrl-1, 2 or 3 to do the merging. You can also use the ctrl-arrows to navigate the diffs.KDiff3 Diff-Windows
Usually manual merging is a matter of a few key strokes. After saving and exiting KDiff3, RTC shows the changed file. Now select Resolve as Merged from the context menu of the unresolved change and the merge is finished.Resolved Conflicts in Jazz Version Control
If no changed file appears after saving the merge in KDiff3, that means that the merged version is the same as the current version. In this case select Resolve with Mine from the context menu of the unresolved change.

Other Tools
As mentioned in the beginning, there are two similar tools available: P4Merge and DiffMerge. P4Merge, the Perforce Visual Merge Tool, is part of the version control system Perforce. To only install P4Merge, deselect everything except Visual Merge Tool during install. P4Merge compares files, folders and images. It is much like KDiff3, shows three diff windows and the bottom pane is editable. DiffMerge is from SourceGear, another vendor of version control systems. It compares files and folders and has Windows Explorer menu integration like KDiff3. Both tools can be found in the drop-down list of supported RTC external compare tools and the arguments should not require any changes.

16 December 2010

ASUS Eee PC and TRIM

Last year, after commuting for more than ten years I got tired of reading on the train. I wanted to make better use of the time and got myself one of these small sub-notebooks. I chose an ASUS Eee PC S101. Although it's not very powerful it is able to handle small Eclipse projects. It's a slick device and I love it.

The Problem with SSDs
It contains a ridiculously small SSD hard drive, an "ASUS-JM S41 SSD". Recently after the drive was full for the first time, disc performance degraded catastrophic. Whenever the disc was accessed the computer would freeze one or two seconds. The whole device got totally unusable. I was already fearing the worst.

Backing Up MusumeTRIM to the Rescue?
When searching the web I learned that all SSD share the same problem of free space management which is fixed by the TRIM command. TRIM is a standard command defined by the (S)ATA specification. Unfortunately Windows 7 is the first version to make use of TRIM and there are no plans to port it back to earlier versions. (I also found references to WIPE but I don't know if it's a command some drives implement or just another name for the process of trimming.)

Vendor Tools
Some SSD vendors have noticed the need for SSD TRIM and provide tools of their own. Some vendors provide firmware upgrades like OCZ. Others offer special tools. For example there is a tool called wiper.exe provided for the G.SKILL Falcon drives and maybe some other drives by G.SKILL. Unfortunately wiper crashes when run on the Eee PC. Intel offers its own Intel SSD Toolbox but the TRIM option is not available when run on the Eee PC. These two were the only tools supporting TRIM that I could find. Bad luck here too.

I could not believe it. I didn't own the first SSD on this planet. How was I going to fix it? Format the SSD and install the OS all over? Not if I could help it. Probably I had not searched the web long enough...

Trim CastleFrom 0x00 to 0xFF
One entry in a forum suggested that Piriform CCleaner's Secure Wipe trims the disc. Well it doesn't but it seems that some SSDs reclaim a block when it's filled with some data and that's what Secure Wipe is doing. It overwrites all empty blocks. Someone has written a little program to do exactly that: "AS FreeSpaceCleaner with FF" (aka "AS Cleaner 0.5") is meant to work around not having TRIM and is like a generic wiper that works on any drive. It creates a big file and uses it to write zeros in all empty blocks. It has one option, to use 0xFF instead of 0x00 to fill these blocks. Some forum entries suggested that people have successfully used the 0xFF option to trim their SSDs.

Finally Whole Again
The short story is that I managed to restore performance of the SSD in my Eee PC using FreeSpaceCleaner.exe. The long story is as follows:
  • First I did a BIOS upgrade. Disc access might benefit from a newer BIOS. I'm not sure if it's part of the solution but now that it's done it's done.

  • Then I reduced disc writes as much as possible. I turned off the index service, removed the swap file and disabled the recording of the last file access. This is not related to restoring SSD performance, but it's supposed to keep it performing a bit longer.

  • After that I uninstalled all programs which I didn't need and used CCleaner to remove all temporary crap. I think it's vital to have as much free space as possible so the SSD doesn't run out of "clean" blocks too soon. Some forum entries suggested that it's beneficial to have at least 50% of the disc free.

  • In the end I used FreeSpaceCleaner with the FF option to wipe the SSD and it worked! At least it did something as SSD performance definitely improved after using it but I doubt it was able to do a full TRIM on the disc because I have to use it quite often.
So thanks to FreeSpaceCleaner the problem was solved. (Download FreeSpaceCleaner with FF)

21 March 2009

Slimming VMware Player Installation

Going Virtual @ Fiddler's Green Recently I had to play around with some VMware images. After installing the VMware Player (current version = 2.5.1) I had problems with connecting my image to the network. Finally I managed, but I learned it the hard way. IMHO the best way to run a virtual network is bridged using a static IP address for each image. (Just make sure the addresses are all in the same sub-net.) This description applies to Windows operation systems.

Network Connections
VMware Player installs two additional network adapters on the host computer.
  • Virtual switch VNNet1 is the default for Host Only networking. Using this network adapter virtual machines can't access the outside network. - Disable it, we don't need it!
  • Virtual switch VNNet8 is the NAT switch. Here virtual machines can access the outside network using the host’s IP address. - Disable it, we don't need it!
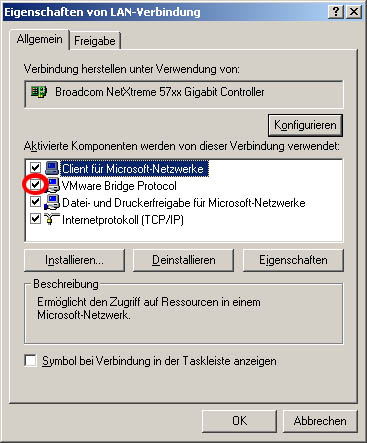
  • Just make sure the VMware Bridge Protocol is enabled for your main network adapter. So virtual machines can access the outside network using their own IP addresses.

VMware Bridge Protocol is enabled

Services
I noticed that VMware Player also installs several services which I don't like. Especially when the purpose of some VMware services is unclear.
  • vmnat.exe is the NAT service. It is needed for VNNet8. Deactivate it, we don't need it!
  • vmnetdhcp.exe is a virtual DHCP service. It's only needed if you use DHCP in your images and do not have a real DHCP server set up and running. Deactivate it, we don't need it for static IP addresses.
  • vmware-authd.exe is the authorisation service and controls authentication and authorisation for access to virtual machines for non admin users. Probably you don't need it, so deactivate it.
  • vmware-ufad.exe is the host process for Ufa Services. It's not active by default, so leave it deactivated.
  • vmware-tray.exe is probably the same as hqtray.exe, but it was not installed on my computer.
  • hqtray.exe is the host network access status tray. Unless you want to see network traffic in the taskbar, deactivate it. (This is not a regular service, it is started at system start-up. You have to delete it from the registry, it's key is below HKEY_LOCAL_MACHINE\ SOFTWARE\ Microsoft\ Windows\ CurrentVersion\ Run.
If you have to use Host Only or NAT, leave the corresponding network and service settings alone.

WTF
And watch your back, you can't connect from the virtual image anywhere when your local firewall is dropping all unknown traffic ;-)

23 July 2008

DOS Commandline Tools

A Bit of History
I always liked coding, right from my very first line of Basic back in 1986. Later I did some 65xx-Assembler work and in 1991 I finally went for Turbo Pascal. During the nineties I created a lot of stuff for MS-DOS based systems either during university projects or just for fun. Being a lazy programmer, I produced a lot of tools to perform repetitive tasks more easily. DOS and Windows never shipped with many utilities, unlike other operation systems. (Today there are Windows ports of more powerful tools available.)

Recently, when reorganising all my historic code I recovered these command-liners. Well, good old Turbo Pascal is definitely out-dated and most executables wouldn't even run any more. The reason is that the CRT unit as supplied by Borland has a few defects causing RTE200 on fast computers or at least inconsistent delay problems. Fortunately there are CRT Replacement Units for Turbo & Borland Pascal Compilers which fix all these problems. So I spent some time recompiling all my 280k lines of Pascal code. Now they work on newer computers as well. The tools are divided into several groups: Data-File-Hacking, File-Utilities, Image-, Sound/Music- and Text-Manipulation.

Rusty Ring Most of the tools provided here were created in 1994 to 1998. They were developed for 16 bit MS-DOS based systems and do not support long file names or recently introduced file formats. Most likely some of them are superseded. Use them at your own risk! Almost all tools show their usage when called with parameter "-?" or "/?". Unfortunately the help messages are in German... Some of them are highly experimental. and some are probably totally useless. I say it again, use them at your own risk!

The Data-File-Hacking package contains programs for disassembling, extracting data from files and memory, extracting files from special data files of some games, hex- and eor/xor-representation of binary data and extensive search and compare procedures. (Download hacking tools).
  • ????HACK contains code to "hack" i.e. unpack or uncompress data files of certain games.
  • BIN2HEX converts binary data into hex table text file.
  • BIT2BYTE expands every bit of binary data to a full byte.
  • BUB2ASM converts Bubble-Asm format into TASM-Asm (prefix hex numbers with 0).
  • BYTE2BIT compress every byte with value != 0 to a set bit, else not set bit.
  • CHANGBYT changes a single byte in a file.
  • CUTBIN removes the first bytes of a binary file.
  • CUTBYTES removes bytes of a binary file starting at a certain offset.
  • CUTNOP removes all lines from a text file that start with 90<space> (NOP command).
  • CV2ASMDB converts CodeView output into ASM "DB" format.
  • CV2INLIN converts CodeView output into Turbo Pascal inline assembler format.
  • EOV exclusive-or viewer to find byte sequences of 'protected' files.
  • EXTRACT extracts parts of files from larger files.
  • HEX converts hex, decimal, octal and binary numbers into each other.
  • HEX2BIN converts a sequence of hex number into a binary file.
  • HEXTSR (TSR) shows hex conversion window on key stroke ALT-S.
  • MEMLOAD loads binary data into memory without executing it.
  • MEMSAVE saves memory contents to a file.
  • MEMSVCNV saves contents of conventional memory to a file.
  • MEMSVXMS saves contents of free XMS memory to a file.
  • MEMTSR (TSR) saves memory contents to a file on key stroke ALT-S.
  • RECH calculates arithmetic expressions.
  • SAVESCRN saves current contents of video text memory to a file.
  • SCRNTSR (TSR) saves current contents of video text memory to a file on key stroke ALT-S.
  • VOCEXTR finds and extracts Creative Labs Voice (VOC), Wave (WAV) and XMidi (XMI) from larger files.
  • WADIT edits and displays contents of ID software's WAD files (DOOM data files).
  • WAVEXTR finds and extracts RIFF Wave and IFF files from larger files.
  • XADD adds/xors all bytes of a file to a checksum.
  • XCHGBYTE replaces or swaps specific values in binary files.
  • XCOMP extended version of DOS COMP.
  • XSEARCH searches several files simultaneously.
  • XSEQUENZ searches results of XCOMP runs for ascending/descending sequences.
  • XWHAT prints the value of a certain position in files.
  • XWHAT2 prints all the value of a certain position in files.

File-Manipulation features tools for comparing, renaming, setting time and date, wildcard operations and hardware detection. (Download file tools.)
  • BRAKE! slows down CPU using busy waits in interrupt 8 (INT08).
  • CHKFILES reads files from disk to check their integrity.
  • DETECT ultimate hardware detection and benchmark tool.
  • DFOR executes a DOS command for all file names in a list.
  • DUPLICAT calls COPY to duplicate directory trees, copies only new files.
  • FILLDISK calculates somehow optimal distribution of files when saved to floppy disks.
  • GETTIME measures the time another DOS command needs to execute.
  • ISWIN checks for currently running Windows 3.1 or 95.
  • LENCOMP compares files similar to COMP but based on length, ignoring path and name.
  • NOTHING Do Nothing Loop.
  • RENALL renames a wildcard file set according to a name list.
  • SCOMP compares files similar to COMP and deletes identical ones.
  • SFOR executes a DOS command for a wildcard file set.
  • TDIR lists files similar to DIR with their date time to be used for TTDAT.
  • TIMETOUC (or short TT) changes the date and time of a file.
  • TO searches for a directory and changes current working directory to there.
  • TTDAT executes TIMETOUC for a list file produced with TDIR.

Field Working Tools
The Image-Manipulation collection provides help for viewing header information of images, viewing special picture formats, viewing special animation formats, palette manipulation, Windows BMP generation and font designing and using. (Download image tools.) Some of the tools need a VESA compatible driver to display images in SVGA graphics mode.
  • ANIM creates an rotating animation from a Bitmap (BMP).
  • ANM plays 320x200x256 sized ANM animations (with LPF ANIM magic bytes).
  • APAL2BIN converts ASCII RGB-palette into binary.
  • BGI2DOOM converts Turbo Pascal's BGI images into Doom 1.2 textures.
  • BMP2ASC converts 640x400x256 sized BMP into an ASCII image.
  • BMP2BGI converts uncompressed BMP into Turbo Pascal's BGI format.
  • BMP2DRW converts 80x50x16 sized BMP into my own DRW format for display in text mode.
  • BMP2PAL saves colour palette of a BMP.
  • BMP2PLAN converts 640x480x16 sized BMP into 4 colour planes.
  • BMP2RAW converts 320x200x256 sized BMP into raw-format.
  • BMP2TXT converts BMP into ASCII image depending on brightness values.
  • BPAL2ASC converts binary RGB-palette (768 bytes) into decimal text format as needed for RAW2GIF.
  • COLTABL displays table of DOS colours.
  • DRAWPIC editor for drawing 80x25 DRW image files.
  • DRAWTXT editor for drawing ASCII images.
  • FNTMAGIC editor for drawing 16x8/8x8 fonts.
  • FONTHACK displays binary data as 16x8/8x8 fonts.
  • FONTVIEW displays an F16 font.
  • GIF2BGI converts a GIF into one or more BGI images.
  • GIF2SPR converts 160x160 sized GIF into 64 BGI images useable as sprites in games.
  • GIFHEAD displays header information of GIF images.
  • HLS2RGB converts ASCII HLS-palette into ASCII RGB-palette.
  • KPACK compresses in my own R9 format, similar to RLE8 with slightly better compression.
  • LINESET set number of lines text mode (25, 28, 33 or 50).
  • PACK compresses files with RLE algorithm.
  • PACKFL4 compress 4-bit animations with distinct frames, my own FL4 format.
  • PAL2BMPP converts binary palette into BMP palette with empty padding.
  • PLAY plays 320x200x256 sized Autodesk FLI and 640x480x256 sized FLC.
  • PLAYFL4 plays 640x480x16 sized FL4 animation.
  • PLAYFLI plays 320x200 sized Autodesk FLI and FLC animation.
  • RAW2BMP converts RAW images into BMP.
  • RGB2HLS converts ASCII RGB-palette into ASCII HLS-palette.
  • SETBORD sets border colour in console.
  • SETFONT sets an F16 font in console.
  • SHOWBMP displays unpacked 1024x768x256 sized BMP.
  • SHOWC64 displays Commodore 64 Koala Painter and other image formats.
  • SHOWGIF loads a few GIFs into XMS memory, displays and cycles them (mini slide show).
  • SHOWIT displays GIFs and slide shows of GIFs using external VPIC.EXE.
  • SHOWPAL displays colours of a palette.
  • SHOWPIC displays arbitrary data as colour values of an image.
  • SHOWRAW displays arbitrary data as 16 or 256 colour values of an image up to 1024x768x256.
  • SHOWSVGA (or short EV) displays arbitrary data as colour values of an image up to 1280x1024x256.
  • SHOWVGA displays arbitrary data as VGA image (320x200x256), part of EOV.
  • TXT2BMP converts text into 80 times lines sized BMP.
  • TXT2RAW converts text into 80 times lines sized raw image data.
  • UNPCKFL4 unpacks and displays 4-bit animations (FL4 files).
  • UNRLE8 unpacks RLE8 compressed files.
  • XCOLOR changes specific colour values of a BMP in image data, not in palette.
  • XTRC_BMP extracts sub-image out of an uncompressed BMP into a new BMP.

The Sound/Music-Manipulation tools support conversion of special sound formats into common formats and between different types of formats, playing of VOCs, WAVs and XMidis via Soundblaster and PC-Speaker and getting header information of audio files. (Download sound tools.) To use your audio hardware you need a DOS styled driver emulator like VDMSound.
  • AMIG2SND converts Amiga signed raw sound data (SND) into PC format.
  • DWD2SND converts DiamondWare digitised data into SND format.
  • MAC2SND converts Apple Mac sound data (SND) into SND format.
  • MANYINST lists instruments of an XMidi found in the *.ad file.
  • MIDHEAD displays header information and event list of Midi files (MID).
  • PAWE plays XMidi (XMI) using AWE32 hardware.
  • PCM2VOC converts Space Hulk PCM into VOC.
  • PCM2WAV converts AquaNox's PCM into WAV.
  • PCMF plays Creative Music File (CMF), needs SBFM to be started before.
  • PCMF17 plays CMF.
  • PMID plays XMidi using Midi hardware.
  • PMPU plays XMidi using MT32MPU hardware.
  • PSOUND plays sound files like VOC and WAV using PC speaker hardware.
  • PVOC plays VOC.
  • PWAV plays WAV.
  • PXMI plays XMidi using Soundblaster hardware.
  • RAW16TO8 converts raw 16 bit samples into 8 bit by ignoring every second byte.
  • RAW2SGN converts signed into unsigned samples by adding 080h.
  • RAW2SND converts raw samples into SND format.
  • SAM2WAV converts Modplayer Sample data (SAM) into WAV.
  • SND2WAV converts SND into WAV.
  • SYN2WAV split SYN data files into separate WAVs.
  • VAC2WAV converts VAC, RAC and MAC (ST-TNG CD, 11025Hz) into WAV.
  • VCMF plays all CMFs in the current directory, needs SBFM to be started before.
  • VCMF17 plays all CMFs in the current directory.
  • VMF2WAV converts Creatix sound 4800Hz (VMF) into WAV.
  • VMPU plays all XMidis in the current directory using MT32MPU hardware.
  • VOCHEAD displays header information of VOC files.
  • VVOC plays all VOCs in the current directory.
  • VWAV plays all WAVs in the current directory.
  • VXMI plays all XMidis in the current directory.
  • WAV16TO8 converts 16 bit WAVs into 8 bit.
  • WAV2SAM converts WAV into Modplayer Sample data (SAM).
  • WAV2SYN combines several WAVs into a SYN.
  • WAV2VMF converts WAV into Creatix VMF.
  • WAV2VOC converts WAV into VOC.
  • WAVHEAD displays header information of WAV files.
  • WAVMIX mixes WAVs using different algorithms.
  • WAVMORPH morphs a WAV into another (very experimental).
  • WAVST2MO converts 8 bit stereo WAV into mono format.
  • XMIHEAD displays header information of XMidi files.
  • XMITRACK extracts single tracks from a multi-track XMidi.

Abandoned to nature
Text-Manipulation (ASCII) offers methods for converting, replacing, sorting and different kinds of removing of pieces of text in text files. (Download text tools.)
  • ASCTABL displays table of ASCII characters.
  • ASCTABL2 displays table of ASCII characters together with their decimal values.
  • BIN2ASC removes all bytes 0-31 from a file to edit it as text.
  • C64TOASC converts Commodore 64 text into ASCII format.
  • COPYLINE copies all lines of a text file which contain a search term.
  • CUT10 removes the first 10 columns in each line (for DIS86).
  • CUTLAST removes the last given characters in each line.
  • CUTLEAD removes the first given characters in each line.
  • CUTLINES removes every some lines some more lines, e.g. remove two lines every ten lines.
  • CUTPOS removes all text after a given column position.
  • CUTSPACE removes trailing spaces.
  • D2E replaces all 'D' with 'E', used to convert FORTRAN output into gnuplot data.
  • DELNEWS removes all lines of a text file which start with search term.
  • DELSPACE removes all double blanks.
  • DIR2HTML creates an HTML index file containing the current folder entries.
  • DIR2TEX creates a TeX index file containing the current folder entries.
  • DOC2TXT converts WinWord umlauts back into DOS characters.
  • DOWN converts all letters into lowercase.
  • EXP2DEZ converts scientific numbers (e.g. 1.3E-1) into decimal numbers (e.g. 0.13).
  • FIT2PIX reduces data points to one value per pixel, used for gnuplot and TeX.
  • FORM2TXT converts HTML form data into plain text.
  • GERADEN solves a linear equation.
  • GNUSUB subtracts values from the second column, used for translation of gnuplot data.
  • INSP2TEX converts INSPEC search results to LaTeX bibitems.
  • LINECNT counts the lines of a text file.
  • LINESORT sorts like SORT but blocks of lines instead of single lines.
  • LINESUB replaces whole lines of a text file, configured by line number.
  • MERGLINE merges two text files line wise (today's editors know this as 'column mode').
  • MOVE_TEX moves TeX elements inside EmTeX pictures.
  • NOSPACE removes all single blanks.
  • ROUND rounds all decimal numbers.
  • SEQ2TXT converts Commodore 64 sequential file data (SEQ) into PC char-set.
  • SKALIER scales numbers by a factor, used for gnuplot data.
  • SLIM_TEX removes all unnecessary horizontal \put(lineto), used for gnuplot and TeX.
  • STRIP_% removes all comments (%) from TeX source.
  • STRIP_C removes all comments from FORTRAN 77 source.
  • TASTCODE prints the key code of the pressed key.
  • TEST7BIT checks if a text only contains ASCII characters > 127
  • TEXTDEL removes every some lines some more lines, e.g. remove two lines every ten lines.
  • TEXTINS inserts a text file into another at a certain position.
  • TEXTSUB replaces characters in a text file.
  • TURNBACK save a file in reverse order, i.e. last byte first.
  • TURNLINE turn all lines backwards, i.e. from right to left.
  • UMBRUCH joins all lines and adds new line breaks at given position.
  • UP converts all letters into uppercase.
  • UP11 converts all letters and umlauts into uppercase.