Showing posts with label kata. Show all posts

25 August 2022

Practice Speed

Several years ago I co-facilitated the Global Day of Coderetreat with Houssam Fakih. It was a nice Coderetreat. During the introduction Houssam presented the concept of practice and three levels of competence. The first level is that you are able to do a certain thing from time to time. The second level is that you are able to do it all the time. The third level is, and that was new to me, that you perform the thing consistently well and fast at the same time. In this short video there are three guys throwing balls at a boot at a fair. The guy on the right is on level one. He is able to throw the ball into the basket most of the time. The guy in the middle is competent and always hits the target. But the guy on the left is on another level. Besides hitting the basket consistently, he is using both hands alternating and is two to three times faster.

The Walk to Save Great Danes (licensed CC BY-NC-ND by Warchild)Deliberate Practice
In Coding Dojos and Coderetreats we practice all kind of coding techniques like Test Driven Development, software design and pair programming, but we rarely practice speed. The Coding Dojo mindset is explicit about going slow. There are a few exercises which have a timing aspect, e.g. Elephant Carpaccio or Baby Steps. Some people try to master the Baby Steps constraint by typing faster and using more shortcuts. While these are good things to practice by themselves, they bypass the exercise. Both exercises focus on taking smaller steps. The speed of typing is not the bottleneck.

Side Note: Speed of Typing
If the speed of typing is not the bottleneck in writing software, why do we focus on shortcuts and touch typing? The idea is, while coding, to stay in the flow and work on a higher level of abstraction. For example, when I want to move a method, and I can do it with a few keystrokes, I keep the current thoughts in my mind. But if I have to navigate, modify blocks of text, change method invocations, and so on, I think in more low level concepts like text editing or file navigation, and this breaks my focus.

Hackathon
One of my recent Coding Dojos became a Hackathon. A misunderstanding with the sponsor, who cared for food during the event, caused this. The sponsor wanted to run some challenge to make people think outside of the box, and make them try something new and innovative. They had prepared an assignment in Hackathon style. A Hackathon is an event that brings together experts and creates a collaborative environment for solving a certain problem. I avoid Hackathon because the format is competitive and people try to go as fast as possible to create some prototype or try to prove some idea or deliver some working code. Going fast above all else, e.g. skipping preliminary design or tests due time pressure is the startup trap. Obviously I dislike this way of working. (I see value in Hackathon as a tool for innovation and maybe team building.)

First I was unsure how to proceed. On one hand I wanted to please the sponsor, paying real money for the crafters community is a real contribution and separates the "talking" from the "doing" companies. On the other hand I wanted to stay true to the Coding Dojo experience. I thought of Houssam and remembered that going fast is a skill, one we need and rarely practice. In fact it is a skill we developers are often asked to apply, e.g. when the deadline is coming up or marketing has some new urgent idea. Like the guy on the left in Houssam's video, working fast and clean at the same time is hard. I made it a mix: I ran a Coding Dojo where the challenge was to finish some basic code in a given time frame. All Coding Dojo rules applied, the goal of the evening was to learn, to collaborate and to be nice. Even under pressure I reminded the participants to write tests because "your best code does not help you if it is broken". I encouraged them to work in small batches as "the most clever algorithm loses if it is unfinished". As facilitator I focused on helping people to create small, working increments. It worked well and after 90 minutes most teams had a working solution and three of them won a price.

Speed (licensed CC BY by Gabriel)How to Practice Speed
Considering my own, personal practice, I go in the same direction. I am practising a lot on old and new exercises, in various programming languages, some I have much experience and some I just learned. Working these exercises, adding hard or even brutal constraints is boring. I even tried contradicting constraints like Tell Don't Ask and Immutability. To try something new I started working against the clock. Maybe I can be the guy on the left.

Roman Numerals
My colleagues tell me that I am very fast in perceiving, reading and understanding code, as well as typing with shortcuts. When working against the clock my first exercise was Roman Numerals. I chose a small exercise because I expected to retry it a lot. I set a timer to five minutes and worked on the kata. When the timer rang I stopped and analysed my progress. Of course I failed to finish but I kept trying. Some rarely used editing shortcuts would have helped, and I learned some more of them. I did use TDD and three to four tests were the most I was able to get, which was enough. The test for Roman I created the method arabicToRoman, II added a recursive call, VI introduced a lookup for the literal by its value and 388 introduced all the remaining literals. When using Ruby for the same exercise I thought I would be able to beat my Java time, because Ruby is more expressive and there is less code to write. Unfortunately I am not as familiar with Ruby as I am with Java and the missing code completion slowed me down. Currently I need five minutes for a fully working Arabic to Roman Numerals conversion including subtractive forms. I am able to create good names and small methods in the given time, but I am unable to create more elaborate structures for holding the Roman literals and their values. Java is just too clunky. In short: the code is good, but the design is bad.

What Next
Then I tried the Coin Changer kata and after several tries I was able to beat four minutes. Coin Changer and Roman Numerals are much alike and Coin Changer is simpler as it has no literals, the coin value is also the returned value. I knew both katas well, and the exercise was in fact only about my typing supported by tests to avoid mistakes. Maybe I should try a larger assignment. Running through many repetitions would be tedious. Maybe I should try unknown exercises. At least they would be unknown for the first run. I need a large number of little TDD exercises of similar size and complexity. Time to do some searching.

29 April 2021

My Code Katas

Ascending the StairsI run various trainings for software developers, at least one every week. I have used many different exercises - called code katas - most of them curtesy of my fellow coaches, especially Emily Bache who maintains a huge collection of excellent exercises on her GitHub. And I created some exercises myself. I have collected all of them on a page, each with a short description how to use it. Enjoy!

Check out My Code Katas (permanent link).

20 March 2021

11 Years of Prime Factors Kata

In this post I want to celebrate the Prime Factors Code Kata. Prime Factors is a small coding exercise first used by Robert C. Martin in 2005. It is my favourite code kata and it has been almost nine years since I last wrote about it - time to change that. Weird enough, the first code kata I ever worked on - outside of university assignments that turned out to be katas later - was Roman Numerals in 2007. The first time I did the Prime Factors was during Christmas holidays 2009 in Java and Ruby:
import java.util.ArrayList;
import java.util.List;

public class PrimeFactors {
  public static List<Integer> generate(int n) {
    List<Integer> primes = new ArrayList<Integer>();

    for (int candidate = 2; candidate <= n; candidate++) {
      for (; n % candidate == 0; n /= candidate) {
        primes.add(candidate);
      }
    }

    return primes;
  }
}
Now the Java code is exactly the code Robert Martin showed, I was following his example. The Ruby version from back then looks pretty similar, just using while instead of for.
module PrimeFactors
  def generate(n)
    prime_factors = []

    candidate = 2
    while n > 1 do
      while n % candidate == 0 do
        prime_factors << candidate
        n /= candidate
      end
      candidate += 1
      candidate = n if candidate > Math.sqrt(n) # performance fix
    end

    prime_factors
  end
end
If you are wondering how I am still able to find the code, I organise my code katas to allow lookup and comparison. Since then I did the kata 141 times and it has many uses.

Learn a language
Prime Factors is one of the first pieces of code I write - Test Driven of course - when revisiting old languages, like Commodore BASIC or looking at a new language, like Forth, using Gforth 0.7:
: prime_factors ( n -- n1 n2 n3 n4 )
  DUP 1 > IF           \ test for ?DO
    DUP 2 ?DO
      BEGIN
        DUP I MOD 0 =  \ test candidate I
      WHILE
        I SWAP I /     \ add candidate, reduce number
      REPEAT
    LOOP
  THEN
  DUP 1 = IF DROP THEN ;

T{ 1 prime_factors -> }T
T{ 2 prime_factors -> 2 }T
T{ 3 prime_factors -> 3 }T
T{ 4 prime_factors -> 2 2 }T
T{ 6 prime_factors -> 2 3 }T
T{ 8 prime_factors -> 2 2 2 }T
T{ 9 prime_factors -> 3 3 }T
Gforth came with a modified testing framework based on John Hayes S1I's tester.fs, defining the functions T{, -> and }T for testing. Note that the given function prime_factors is not realistic as the number of returned arguments is not known by the caller.

When I had a look at Scala, of course I did Prime Factors:
import java.lang.Math.sqrt

object PrimeFactors {
  def generate(number: Int): List[Int] = {

    def fold(current: Pair[Int, List[Int]], candidate: Int): Pair[Int, List[Int]] = {
      if (current._1 % candidate == 0)
        fold((current._1 / candidate, candidate :: current._2), candidate)
      else
        current
    }

    val (remainder, factors) =
      (2 to sqrt(number).intValue).foldLeft((number, List[Int]()))(fold)

    if (remainder > 1)
      (remainder :: factors).reverse
    else
      factors.reverse
  }
}
This is crazy. The code creates a sequence of all candidate primes and folds it starting from left by dividing by the candidate recursively, appending to the begin of the list, which is cheap. Because of that the list is reversed at the end. I have no idea why I created this, probably I was playing around with foldLeft. This is not a good example, please do not copy it. After all these years, the Forth solution seems easier to grasp. ;-)

So which languages are missing? PowerShell looks much like my PHP (shown below) and my Python Prime Factors looks similar too, just with Python specific range(2, number + 1) and //= inside. And of course JavaScript is missing:
PrimeFactors = function() {
  this.factors = [];
};

PrimeFactors.prototype.generate = function(num) {
  var candidate;
  for (candidate = 2; candidate <= num; candidate += 1) {
    num = this.tryCandidate(num, candidate);
  }
  return this.factors;
};

PrimeFactors.prototype.tryCandidate = function(num, candidate) {
  while (num % candidate === 0) {
    num = this.reduceByFactor(num, candidate);
  }
  return num;
};

PrimeFactors.prototype.reduceByFactor = function(num, factor) {
  this.factors.push(factor);
  return num / factor;
};
Isn't that lovely? Again this is not good code, please do not copy it. At least I showed some creativity using prototype functions.

Learn a testing framework
Using TDD to write some known code is a perfect way to learn more about a testing framework. So I explored XSLTunit using Prime Factors in XSLT or NUnit in C#:
using NUnit.Framework;

[TestFixture]
public class PrimeFactorsTest
{
  [TestCase(new int[0], 1)]
  [TestCase(new int[] { 2 }, 2)]
  [TestCase(new int[] { 3 }, 3)]
  [TestCase(new int[] { 2, 2 }, 4)]
  [TestCase(new int[] { 2, 2, 2 }, 8)]
  [TestCase(new int[] { 3, 3 }, 9)]
  public void TestFactors(int[] expected, int number)
  {
    CollectionAssert.AreEqual(expected, PrimeFactors.Generate(number));
  }

  [Test]
  [Timeout(100)]
  public void TestLarge()
  {
    CollectionAssert.AreEqual(new int[] { int.MaxValue },
                              PrimeFactors.Generate(int.MaxValue));
  }
}
Test your own testing framework
Sometimes, when I need to create my own unit testing framework, e.g. TPUnit for old Turbo Pascal, assert-scm (Scheme R5RS) or ASM Unit for Windows Assembly, I use Prime Factors as test cases:
_prime_factors:
  mov     esi, 0          ; esi = number of factors
  mov     edi, ebx        ; edi = address of factors
  mov     ecx, eax        ; ecx = current number
  mov     ebx, 1          ; ebx = candidate

  jmp .not_diviseable

.loop_over_candidates:
  inc     ebx             ; next candidate

.break_if_candidate_is_larger_than_square:
; if candidate * candidate <= number then try candidate
  mov     eax, ebx
  mul     ebx
  cmp     eax, ecx
  jbe     .try_candidate

; else number is a (large) prime and we are done
  mov     [edi + esi * register_size], ecx
  add     esi, 1
  jmp     .done

.try_candidate:
; if number % candidate == 0 then add candidate
  mov     eax, ecx
  xor     edx, edx
  div     ebx
  cmp     edx, 0          ; remainder is 0
  jne     .not_diviseable

.is_diviseable:
  mov     [edi + esi * register_size], ebx
                          ; store candidate in factors
  add     esi, 1          ; we found a factor
  mov     ecx, eax        ; number is remainder of division
  jmp     .try_candidate  ; try current candidate again

.not_diviseable:
; if number > 1 then try next candidate
  cmp     ecx, 1
  jne     .loop_over_candidates

.done:
; return number of factors
  mov     eax, esi
  ret
This piece of assembly calcultes the prime factors of the number passed in EAX into in the dword array address EBX.

TDD Demo
In 2012 I started practising Prime Factors as kata performance, minimising the number of keys I pressed. I ran it around 50 times. In the end I used the practice to calm down when I was anxious - it was like mediation. I still have to perform it somewhere, adding music and all... I have used it demoing TDD in uncounted presentations - actually around 40: during my university guest lectures, user group meetings and at my clients. Most demos were in Java and some in PHP,
<?php
class PrimeFactors {
  static function generate($n) {
    $factors = [];
    for ($candidate = 2; $candidate <= $n; $candidate += 1) {
      while ($n % $candidate == 0) {
        $factors[]= $candidate;
        $n /= $candidate;
      }
    }
    return $factors;
  }
}
and a single demo of test driving R code,
primeFactors <- function(number) {
  factors <- vector(mode="integer")

  candidate <- 2
  while (candidate <= sqrt(number)) {
    while (number %% candidate == 0) {
      factors <- c(factors, candidate)
      number <- number / candidate
    }
    candidate = candidate + 1
  }

  if (number > 1) {
    factors <- c(factors, number)
  }

  factors
}
It seems, most programming languages look the same. The last sentence is not true for NATURAL, Cobol's cousin, which is ugly. I will not show it here as it would destroy this lovely post.

Conclusion
By writing this post, I learned that I still need to create Prime Factors in the programming languages Go, Kotlin, OpenOffice Basic, Oracle PL/SQL and of course TypeScript - I could - and I will, it is just a matter of time. So Prime Factors - in fact any small enough code kata - is a great tool for exploring, studying and practising programming languages, testing frameworks, IDE tools and Test Driven Development in general. I will leave you with my latest addition to my collection of Prime Factors, using C99. Have fun!
#include <math.h>

typedef struct {
  unsigned char count;
  unsigned int values[31];
} PrimeFactors;

void PrimeFactors_init(PrimeFactors* factors)
{
  (*factors).count = 0;
}

void PrimeFactors_add(PrimeFactors* factors, const unsigned int factor)
{
  int count = (*factors).count;
  (*factors).values[count] = factor;
  (*factors).count = count + 1;
}

void generate(const unsigned int number, PrimeFactors* factors)
{
  PrimeFactors_init(factors);

  unsigned int remaining = number;
  for (unsigned int candidate = 2; candidate <= sqrtl(remaining); candidate += 1) {
    while (remaining % candidate == 0) {
      PrimeFactors_add(factors, candidate);
      remaining /= candidate;
    }
  }

  if (remaining > 1) {
    PrimeFactors_add(factors, remaining);
  }
}

6 May 2020

Learning yet another Programming Language

In 2000 Andrew Hunt and David Thomas wrote their influential book The Pragmatic Programmer, which is listed as second single most influential book every programmer should read. (I listed it in my book recommendations both 2012 and 2006.) Chapter one, tip eight Invest Regularly in Your Knowledge Portfolio says: Learn at least one new language every year. Different languages solve the same problems in different ways. By learning several different approaches, you can help broaden your thinking and avoid getting stuck in a rut.

Filled Tool Box (licensed CC BY-NC by hmboo Electrician and Adventurer)I started out as Java developer. Since than I have studied XSLT, Ruby, Scala, Forth, JavaScript, Scheme, Python, TypeScript, Go, C# and C. Out of these I even ran trainings for developers teaching them Python and TypeScript. In addition I had a glimpse of Visual Basic, Dart, Clojure, R, PHP, NATURAL, PowerShell, Kotlin and have relearned Assembly. I still need to learn Smalltalk, F#, maybe Haskell, J and of course Prolog.

I like programming languages and my learning approach is driven by curiosity and fun. Today I will describe my "standard", step by step way to get into a new language. I will assume you are an experienced developer, able to code in Java or C# who understands basic programming principles. I believe this approach is not suitable for programming newbies. I never use all these steps and sometimes change their order - like starting with the last one. Feel free to reorder or skip any steps not adding knowledge or fun.

1) Get an overview of core language features.
I start reading Wikipedia about the programming language I want to dive into. I am looking for the core features, used concepts and paradigms in the language. Code examples of these features provide a first idea of the language's syntax. The idea is not to know everything, just to be able to write some code. Writing code is the fun part, not reading. The more languages you know the easier and faster this step is. When learning Go one hour on Wikipedia during commute was enough. On the other hand for TypeScript I spent several hours reading the language reference (Handbook). For C# I skipped this step as I had seen most of the language features while facilitating Mob Programming sessions. You are done with this step when you have some idea what the language can do.

2) Figure out the usual setup and get it working.
Most programming languages come with their own ecosystem of runtimes, documentation, dependency and packaging mechanisms, testing frameworks, editors and other tools. When starting with a new language I try to use its typical tooling. Or at least I look for a decent IDE plugin to keep some level of comfort and productivity. Often this is painful and full of compromise. E.g. when working with Scheme I should have used Emacs but started with a basic editor and used VS Code in the end. For Go I needed 2 to 3 hours to set up the command line tools and VS Code integration. For C it took me 2 hours to compile and run a sample test alone - due to incompatible architecture binaries, sigh. I am still staying away from make tools due to the additional complexity. Eventually I will have to work through them if I want to use high level IDEs like Eclipse or CLion. If your interest in the language is purely educational, a simple editor might be enough to get started, like I used for Forth. You are done when you are able to edit, compile, test and run a Hello World application, e.g. in Windows Assembly.

3) Port small pieces of code (from a similar language if possible).
This helped me when learning C. I knew its basic features and had figured out how to compile and run a single file. And then I ported some small (refactoring) code katas. Porting code katas was easier than coding them because the solution and its code were already there and all I needed to deal with was syntax. If there is a similar language to start from, e.g. Java to C#, Java to PHP, C++ to C, even Java to C, then some of the syntax is proper right from the start. There was a lot of Google and StackOverflow involved and I managed to convert a small kata in around one hour. In the end I had ported several code katas to C. Emily Bache keeps inventing fun and interesting refactoring katas, which always need ports to other languages. For example I have ported her Parrot-Refactoring-Kata to TypeScript, Go and recently C. I have also contributed a Scheme version, but that was after I had learnt the language. You are done when you have contributed at least two ports of small refactoring katas.

4) Work through koans of the language.
Koans are an effective way to learn new programming languages. Programming language koans are a progressive sequence of little exercises, starting with basic things and building on each other to move to more advanced topics. The goal is to learn the language and core libraries. Usually the exercises contain failing test cases, where tiny pieces of code have to be filled in to make them pass. (I have used this idea to teach unit testing in Java and PHP as well as Python and C#. Porting the koans from JUnit to xUnit also helped me to get into C# - see the paragraph on porting small pieces of code.) Koans are awesome and I use them regularly. I worked through some Python koans, two third of Kotlin koans and all C Koans. The koans vary in size. While Kotlin contained 6 lessons, Python had 39 and JavaScript even 78. Working all these 78 exercises took me more than three full work days in total. You are done when you have completed (almost) all of the koans for the new language.

Ninety-Nine Problems
In case there are no koans for your language, look for "Ninety-Nine Problems". The idea is based on Werner Hett's P-99: Ninety-Nine Prolog Problems. These are little problems with different levels of difficulty. Sample solutions are available in Java, Scala, Haskell, Kotlin, F#, OCaml and probably others.

scratches - What is the connection between this image and item 6? (licensed CC BY-NC-ND by Sue)5) Watch some recorded talks and online presentations.
This is the most obvious step. I like to watch recorded presentations, during my commute. Sometimes some extra (passive) information helps me understand a language, or even this specific weird feature. Depending on time and interest this can be a few talks, or whole months of commute.

6) TDD some code katas from scratch.
Now is the time to write some code from scratch. I recommend starting with simple exercises. There is no point in getting frustrated right at the start. Manage the difficulty of your exercises: Use simple katas like FizzBuzz, Prime Factors, Roman Numerals or Word Wrap to get started. For example I used FizzBuzz to practice some XSLT and Prime Factors when revisiting old languages I used to know many years ago - like BASIC. I reuse these katas - and know their solutions - I just want to try them in a new language. Later I move to more complicated assignments like Bowling, Minesweeper (when I revisited Assembly after 20 years), Bank OCR (when I studied Scheme) or Conway's Game of Life. You are done when you have implemented a few code katas from scratch including tests.

7) Write more code, e.g. tackle a larger code base.
There is no other way of getting deeper into a programming language than using it. This calls for a larger side project. It can be a complex code kata, a little video game like Pong or Tron (Nibbles) - including graphics of course - or whatever comes to your mind. As I am fond of Scheme, I have build several Scheme interpreters in new languages. You could even implement your own unit testing framework, which is also recommended by Kent Beck as an exercise to get into a new language. (And I did that for Pascal, Assembly and Scheme.) Depending on the time invested into the previous steps, a side project includes more or less trial and error. If there is too much hassle, I stop and go back to previous steps to learn more about the basics. There is no point in being stuck. For example when studying Go, I went for the side project after 3 hours of researching the language, which was too early. So I spent some more time on theory and then continued working on my idea. My usual learning side projects take around 15 to 20 hours - or that is the time when I lose interest. You are done when you have worked on a larger code base for at least 15 to 20 hours.

8) At last get *all* the details.
Now that I am familiar with the basics of the language and its ecosystem, it is time to dive deeper. After some month of experimenting and hands-on practice - steps 2, 3, 4, 6 and 7 all involve writing code - I am drawn back to theory. I like to balance my learning between theory, experiments and practice. To conclude learning a new language I might study a classic book about that language. It should cover the language and its features completely and I read it from cover to cover. At that time I am already familiar with many parts of the language, reading progress is fast. I am interested in the all the details, the bits and pieces I did not encounter during my experiments. Language specifications are usually dry and perfectly suited for this step as well as classic titles like the "Pickaxe book", K&R and SICP (although SICP is so much more than a Scheme book...) You are done when you read a classic book on the new language from cover to cover.

Conclusion
I like programming languages and learning new ones is adventurous and fun. I try to learn a new language every year. Not all learning goes deep. Not all languages stick. Unless you are working on real projects in all of these languages at the same time, it is natural to forget some details. And that is perfectly fine. It is all about incorporating new paradigms and widening your perspective. So keep learning!

20 January 2020

Login Form TDD a UI Kata

User interfaces are usually considered hard to test, and people rarely develop their user interfaces using Test Driven Development. So it is considered hard. I like hard and I like challenges. I started to research the topic last year. Actually I went crazy. Besides my own experiments and practice, I hijacked most Coding Dojo and Coderetreat sessions and tried to TDD user interfaces with my pairing partners. I discussed the topic at unconferences and spent dedicated time with people in learning workshops. Besides its use I just wanted to see how far I could go.

This is the first article in a series describing what I learned. I spent more than half a year of my learning time on this topic and tried different approaches. In the past I found myself a different topic to research each year. Previous topics included Scheme and Architectural Refactoring. Currently I am investigating Splitting the Monolith. This makes me leave my research kind of unfinished - probably it is impossible to "finish" learning at all. I want to collect what I have learned during last half year before diving into something else.

The Exercise
To experiment with Test Driven Development of user interfaces, we need some UI to build. What would be a small UI that most people know? A login dialogue. I created a repository to drive the UI of a Login Form using TDD, the Login Form TDD UI kata. Your task is to create a Login window or form or web page. Here are the requirements:

Existing Code Back End
The exercise is focused on the front end part. Let's just assume an Authentication service, facade or end point which will be simulated in the tests. It has a method authenticate() to authenticate a user based on her phone, email or user name and her password. The call returns an AuthenticationResult which indicates success and an optional message for error situations. From now on the combination of a user's phone, email or user name is called the user's lookup. Under certain conditions, the UI logic will invoke this service or back end. Calls to the back end might take some time and/or block, so these calls must done asynchronously to keep the user interface responsive.

Requirements for the Minimum Functionality
  • There is a user name input field, which is limited to 20 characters.
  • The label "Phone, email or username" is left, next to the input field.
  • There is a password field, which is limited to 20 characters.
  • The password is either visible as asterisk or bullet signs.
  • The label "Password" is left, next to the input field.
  • There is a "Log in" button in the bottom right corner of the window.
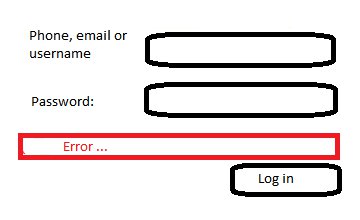
  • There is a label in a red box above the button. It is only visible if there was an error.
These requirements are just describing the UI. The more interesting part is the logic. The logic uses the Authentication back end described above.
  • When user name and password are given, button "Log in" is clicked and the back end reports success, then the form is closed.
  • When user name and password given, button "Log in" is clicked but the back end reports an error, a message in the error line is shown and the form stays open.
  • While the back end is working, the "Log in" button is disabled.
My friend Thomas said that UI requirements need wireframes. So here is a sketch. Pretty, isn't it? ;-)

Bare Login Form Sketch
More Requirements
The goal of the kata is to experiment with driving the UI using tests. Maybe you want to ignore the styling (most people do) or ignore the visual elements completely. Or maybe you want to focus specifically on styling. Clearly we need more requirements like
  • More functionality while the back end is working
  • More logic in the view itself when username or password is not given
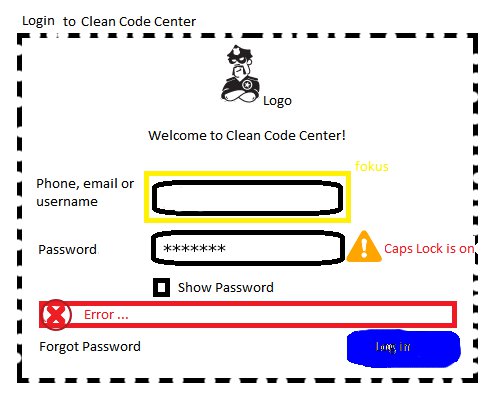
  • More UI elements like titles and logos
  • Detailed styling of all elements
  • Focus and tab order
  • Checkbox to show password
  • Caps Lock Warning
All these requirements and even more are listed in detail in LoginDialogRequirements.md inside the kata repository. The task is progressive: If you want more logic then go for more logic, for more styling add more styling. Thanks to Nick Babich, Software Testing Help and Anton Angelov this will be the most complete login you will ever build. Here is the styled sketch of the final Login:

Login Form Sketch of Everything Styled
Drive the UI of a Login Form using TDD
I created this kata to explore test driving UIs: login-form-tdd-ui-kata. Currently it contains code to get started in the following languages and UI frameworks:
  • Java/Swing
  • Java/Vaadin
  • Kotlin/Android
  • Go/raylib-go
  • JavaScript/plain browser DOM
  • JavaScript/React
Give it a try! If you do, please commit after each TDD step and share your repository so I can analyse it. Have fun!

21 December 2019

Coderetreat Facilitation Podcast

tl;dr: I am podcasting about Coderetreat facilitation.

Impression Global Day of Coderetreat 2013 (C) Michael LeberI regularly facilitate Coderetreats - as part of my work as Code Cop and for the local Software Crafters community. To support people organising events in other cities, I run Coderetreat facilitation trainings each year, especially in the months before the Global Day (of Coderetreat). Based on the feedback I get, e.g. Thanks for the training today! Very helpful! I see that these trainings are helpful for people who want to run Coderetreats. Often people ask the same questions, so I decided to record the most common questions. I will publish the recordings as I create them, so it is a podcast. (A podcast is an episodic series of digital audio files that a user can download in order to listen.)

Get it here: coderetreat-facilitation.code-cop.org

About
In the podcast I am answering questions about Coderetreat hosting, facilitation and participation. It will help you run Coderetreats, Coding Dojos, hands on meetups and even classic training. Each episode covers two to three questions and takes up to 10 minutes. From time to time I will invite guest facilitators to discuss with me. In the first few episodes I will also cover basic questions about the Coderetreat itself, e.g. What is a Coderetreat?

Frequency
As each episode is short, I plan to release at least two each month. While I am too late for #GDCR19, there should be around 30 questions and answers ready for people who want to help organising the next #GDCR20. That would be like three hours facilitation training. That would be great. Let's see how far I get.

Questions
If you have any questions regarding your Coderetreat, Coding Dojo or hands-on workshop, please send me an email or leave a comment. I will answer the question in one of the next episodes.

Get it here: coderetreat-facilitation.code-cop.org

21 November 2019

Promotion Service Kata

In September I attended a small, club-like unconference. The umbrella topic of the event was katas and their use in teaching and technical coaching. A kata, or code kata, is defined as an exercise in programming which helps hone your skills through practice and repetition. We spent two days creating, practising and reviewing different exercises. I came home with a load of new challenges for my clients.

Kata Factory
One session, run by Bastien David, a software crafter from Grenoble, was named Kata Factory. Bastien guided us to create a short exercise with a very small code base, focused on a single topic. In the first part of the session we created small tasks working in pairs. Then we solved a task from another pair in the second part. A total of four new coding exercises was created, tried and refined. It was awesome.

Promotion Service Kata
I worked with Dmitry Kandalov and we created the Promotion Service Kata. It is a small refactoring exercise, based on Feature Envy, a code smell listed in Martin Fowler's book. (Did you know that there is a second edition of this great book? No, so get it quickly.) The code base contains a single service, the promotion service, which calculates discounts for promoted items. It is a bit crazy because it also reduces the tax. The data is stored in a classic DTO and its fields are not encapsulated. The task is to make it a rich object and encapsulate its fields. There are existing unit tests to make sure things are still working.

After the Kata Factory, I spent some time on porting the kata to different languages. Currently the code is available in C#, Java, Kotlin, PHP and Python. Pull requests porting the code to other languages are very welcome. Check out the code here.

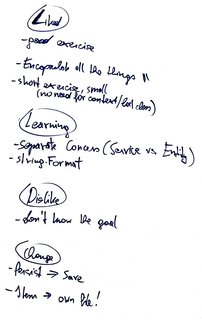
Promotion Service RetrospectiveNotes from first run
I already facilitated the exercise with a small team of C# developers. Here is what they said about the kata:
  • It is a good exercise.
  • It is a short exercise. It is small, so there is no need for context.
  • Encapsulate all the things!
  • I learned to separate concerns.
  • I learned about string.Format (a C# specific function).
  • I did not know the goal of the exercise.
  • Maybe rename the Persist() method to Save().
  • The Item class should be in its own file.
Conclusion
Bastien's approach shows that it is possible to create a brand new and highly focused coding exercise in a short time. As with most development related things, pair work is superior and it is easy to come up with new code katas when working in pairs. Small exercises - I call them micro exercises - are easy to get started because there is little context to know. Context is part of what makes coding assignments difficult. I am very happy with this new exercise.

Give it a try!

30 October 2017

Managing the Difficulty of Coding Exercises

There are different scenarios when we might want to change the difficulty of coding exercises. This depends on our skill and the topic we want to practise. If an exercise is too easy we get bored. There is still value in repeating the very same exercise, e.g. internalising certain patterns or improving keyboard navigation, but boredom does not help learning. Here is an unsorted list of options to increase (and decrease) the difficulty of coding exercises:

Most DifficultMaking it Harder: Constraints
A constraint, or activity, is an artificial challenge during an exercise. I have discussed some of them in the past. Some constraints like No If, Cyclomatic Complexity One or Only Void Methods are easy to follow but make it hard to write your usual code. To have more challenge chose constraints that work against the assignment, e.g. use an algorithmic challenge together with Only Void Methods. Algorithms are often functional in nature but void methods are no functions. Win!

To make things more interesting, constraints can be combined. For example, Object and Functional Calisthenics are constraints that combine several rules. When creating combined constraints, it is important to make sure the constraints work together. There is no point in forcing a functional style with No Void Methods and an object oriented style with Only Void Methods at the same time. When Martin Klose and I combined the Brutal Coding Constraints we spent around 20 hours experimenting and fine tuning them. By the way, these Brutal Coding Constraints are probably one of the most challenging.

When the list of constraints gets long, it is easy to make a mistake and forget to follow one or another. In these situations you need a reviewer, e.g. Coding Dojo facilitator, pair programming partner or static code analysis tool, who checks for violations of constraints.

Harder: Changing Requirements
Another way to spice up an exercise is to introduce requirement changes. This is particularly useful for groups, e.g. Coding Dojos, when participants do not know which requirement is going to change. For the usual Coderetreat exercise Game of Life, several interesting changes have been proposed, e.g. Hex Life, Vampire Cells and the toughest constraint (Wormholes) by Adrian Bolboaca.

I witnessed Martin Klose taking this to the next level: In his exercise Wind of Change, he puts on a tie (because he is the product owner now) and keeps changing the requirements every few minutes. This is a lot of fun and adds some time pressure as well.

Requirement changes is useful to verify a design, usually used in double sessions on software design during Coderetreats. When you are on your own, as soon as you finished the exercise, you think of changes to the requirements and how they would affect your current design.

Harder: Algorithmic Challenges
Algorithmic challenges vary from easy to impossible. Project Euler even has a difficulty rating on each exercise. Often algorithmic challenges are based on mathematics, which makes them not useful for people with less academic background. Also, as soon as you found a solution, the exercises get boring. Using additional constraints can make them fun again, but that would be different exercises then.

I have seen senior developers being more interested in algorithms than XP practises like Pair Programming or TDD. Algorithms are a perfect way to "lure" them into attending Coding Dojos. After a few dojos, people understand the value of practise and will agree to do basic katas with focus on TDD.

If you need a challenge, go for an algorithmic kata and chose a difficult exercise like Potter, Searching or one from Project Euler above number 20.

Harder: Try to be Faster
I do not like to apply time pressure during exercises, because people get sloppy when under pressure. On the other hand, this is what needs to be trained to not get sloppy. Houssam Fakih explains this with a short video (where three people throw basket balls. One is a beginner and fails from time to time, one is experienced and wins repeatedly and one, a "master", is doing the same, but much faster.) Houssam's suggestion is to do the same, but try to be faster. I did that once because I wanted to squeeze an one hour life refactoring demo into a 45 minutes presentation slot. It was hard work, exactly what I wanted.

BalanceWarning
When using constraints and other techniques I describe above, it is easy to go over the top. The exercises become too difficult and working on it is frustrating and eventually we stop doing it. While this might be OK for yourself, it must not happen when working with a group. Exercises like Brutal Coding Constraints are very difficult and not - I repeat - not suitable for a general audience. People tend to overestimate their skill and get frustrated easily.

When facilitating a Coding Dojo, I want to stay in control of the difficulty of the exercise for all participants. I aim for easier, simpler exercises and keep the difficult ones for myself. In rare cases, when I meet very skilled people, I assign them individual constraints, because I know them and I am confident that they will handle. I also make sure everyone understands that it is difficult what they want to do.

Making it Easier: Simpler Assignments
Start with a simple problem. There is always a smaller assignment, The smallest kata I know is FizzBuzz, it is just a single function. There is nothing wrong with FizzBuzz and its friends. I do it from time to time when I explore a new language or try different constraints (or when it is very late and I feel tired). Some function katas like Prime Factors are small too, but algorithmic in nature, so stay away from them. These katas are called FizzBuzz or Function Katas.

Easier: Use Well Known Problems
Solving a programming assignment includes many steps: e.g. understanding the problem, finding a solution, implementing the solution, testing it, etc. The assignment is easier if we get rid of some of these steps. If we use a well known problem, e.g. a ticket machine or a game everyone knows, we already know what is expected.

Easier: Clarify/Understand the Problem
Often the problem with an exercise is that people do not understand the problem. We are eager to get into the code, but we need to understand the assignment first: Take time to analyse the problem you want to solve. Google it. If it is a game like Tic-Tac-Toe, Minesweeper or Pac-Man, find an online version and play for a while. Draw some sketches or diagrams of what needs to be done. Create an list of initial acceptance criteria. To find them, you have to think about the problem. In Coding Dojos I ask people to spend the first ten minutes on creating a test list. This forces them into thinking about the problem.

If you practise with a partner, which I highly recommend, try Adi's pair programming game Solution Seeker. Solution Seeker makes you find at least three different solutions to your problem before you are allowed to implement one of them. This forces you to think hard about the problem and different options to solve it.

As a facilitator, make sure you fully understand the problem so you can answer any question about it. Give more explanations and discuss the problem from different angles. Provide posters or handouts of the problem for participants for later reference.

EasierEasier: Repeat the Same Exercise
Repeating the exactly same exercise is considered boring, but it helps. You will understand the assignment better after working on it once. After implementing it several times, maybe even in different programming languages, more and more aspects of the implementation are known and you can go deeper. (This why we run Game of Life in a Coderetreat six times. We do not want to fight with a new problem each session.) This is especially true for hard problems or if you are not satisfied with your process or final solution.

Easier: Focus on One Thing
After repeating the same exercise one or more times, the problem is sufficiently known and you can shift your focus to something else. Using a well known problem is also a way to focus on one thing, in this case you do not focus on solving the problem. There are exercises that isolate different aspects of development: For example, if I want to focus on finding test cases and designing unit tests, I go for the Gilded Rose. If I want to practice refactoring, I do Tennis or Yatzy. Both code bases contain ugly code which is more or less fully covered with tests, making it safe to refactor. There are exercises isolating other things, like incremental development, emergent design, SOLID principles, etc.

Koans belong into this category. Koans are series of little exercises, starting with basic things and building on each other to move to more advanced topics. They are useful to learn programming languages. They contain a list of failing test cases, where tiny pieces of code have to be filled in to make them pass. The idea is not only applicable to programming language constructs. For example I have created Unit Testing Koans to teach xUnit assertions and life cycle to junior developers.

All these exercises require prepared code. For example Gilded Rose is available in 26 languages, including lesser common ones like ABAP and PL/SQL. Trivia even contains COBOL and VB6 - which is very suitable for a legacy code exercise. Obviously prepared code limits the number of languages which can be used. If you want to practice in a new language like Elixir, Elm or Swift, you might need to port the code base first. Although, if the new language is trending, chances are high that someone already ported it.

Easier: Prepared (Helper) Code
Prepared code is useful in many situations, especially outside the core of the practise. Even code snippets or cheat sheets help. For example when I run the Data Munging exercise with focus on functional programming in Java, I show participants code snippets how to read the text file. File IO is not related to the exercise and I want them to spend time working with Lambda expressions and Stream.

Prepared code allows us to focus on one thing, but we need to understand the code first. Unfortunately this adds extra complexity. Unless you want to practice working with unreadable code, prepared code must be simple and super clean. Try to make it more expressive, maybe even verbose, than your usual code and use very descriptive names. Describe the code in the assignment. If there are more methods or classes, visualise their relations. For example in my Test Double exercise, I added a simple diagram of the prepared classes and their collaborators.

Easier: Guide Step by Step
Alex Bolboaca once told me that as facilitator of an exercise it is most important to manage participants' frustration. When I notice that most of the participants are unable to move forward, I take control of the group and guide them step by step. I am not giving them answers, but moderate the necessary process. Maybe we need to discuss the problem before hand on a white board. Or we discuss potential solutions up front. To get an initial test list, I keep asking how we will verify our product until we have a reasonable number of test cases. Sometimes I switch to Mob Programming where the whole group works on the assignment together and I am able to support them best (a.k.a. micro manage).

Conclusion
There are many options to make coding exercises easier or more difficult. I recommend starting easy. There is no point in hurting yourself or others. ;-)

Thanks to Kacper Kuczek and Damian Lukasik for discussing this with me.

6 November 2015

Bank-OCR Kata in Scheme

Why is it when I wanted to do something completely different from work to relax - I end doing code katas in Scheme? (Last week on Twitter.)

SoCraTes Belgium
Two weeks ago I attended SoCraTes Belgium, the Belgian branch of the Software Craftsmanship and Testing family of (un-)conferences. Being an un-conference the complete agenda of both days was created by the participants. Early during the first day, a participant proposed a session to work through the exercises of the well known SICP book using the Scheme programming language. We worked through the exercises as a mob and it was a lot of fun so another session was scheduled for afternoon. Time and again Scheme sessions were scheduled outside the official agenda. In the end I had spent several hours playing with Scheme and I really enjoyed it.

Why Scheme?
Later I started doing code katas in Scheme, which surprised me, see my initial quote. I do not know why I chose Scheme. There were other programming languages I had planned to learn. Maybe, as my friend Thomas remarked, I chose Scheme because it is seldom used in commercial projects, at least in my surroundings. As it is far away from anything I might touch during my regular work, it is easier to have fun with.

Unit Testing
Nevertheless I wanted to follow my typical development process, using TDD and looked for recommended unit testing frameworks. As minimalism is in the spirit of Scheme, I went with the Scheme Unit outlined on Cunningham's Wiki,
(define (report-error msg)
    (error (string-append "AssertionError: " msg)))

(define (assert msg b)
    (if (not b)
        (report-error msg)))
and added assertions whenever I needed them.

Banking the LightBank OCR
Today I want to share my take on the Bank OCR Kata using Scheme. The Bank OCR assignment is to parse files containing lists of numbers written in LCD style using only pipes and underscores. Each number has nine digits, all of which are in the range one to nine. I knew the Bank OCR kata and had done it before using different languages like Java or C#. I was familiar with the domain which allowed me to focus on functional programming in Scheme.

Outside-In
In the past I used the Bank OCR kata especially to practise the outside-in way of development. Using this approach you build the system from the "outside-in", following the user interaction through all the parts of the system. You start with the interactions and collaborators up-front, especially those at the top level and create fake implementations or mock necessary dependencies. With every finished component, you move to the previously mocked collaborators and implement them. See Emily Bache's article on Outside-In development for a discussion of Outside-In both with London school and classic TDD.

Outside-In vs. Functional?
So whenever I did the Bank OCR kata I tried to follow strict outside-in. But this time I wondered if the outside-in approach was feasible when using a functional language? As far as I knew the typical way of functional programming was to compose small functions to more powerful ones, which naturally lent itself to the bottom-up or classic approach. I was curious how these two would match, if at all.

The Guiding Test
Following Double Loop TDD I started with failing guiding test to parse a single number containing all possible digits,
(define all-digits (list "    _  _     _  _  _  _  _ "
                         "  | _| _||_||_ |_   ||_||_|"
                         "  ||_  _|  | _||_|  ||_| _|"
                         "                           "))

(assert-list= string=?
              "should parse a single number"
              (list "123456789")
              (bank-ocr all-digits))
which expected that bank-ocr(all-digits) yielded ["123456789"].

How to solve the problem?
Then I started to TDD the top level function bank-ocr.
(assert-list= string=?
              "should return empty list on empty input"
              (list)
              (bank-ocr (list)))
which created the initial function. Then I tested for a non-trivial case
(assert-list= string=?
              "not sure about the name of the test yet"
              (list "123456789")
              (bank-ocr all-digits))
Big Ben (London School TDD is Outside-In but Classic TDD can be as well.)But how would I solve the problem? I had no idea. Nevertheless, the first step of the algorithm was to split the input into groups of four lines each and another function, e.g. parse-line, would parse the line then. Following outside-in I defined a stub for parse-line and changed bank-ocr to call it.
;; stub
(define (parse-line ocr-line)
    "123456789")

(define (bank-ocr ocr-lines)
    (if (null? ocr-lines)
        '()
        (list (parse-line ocr-lines))))
The next test forced me to implement the recursion to call parse-line for each group of four lines.
(assert-list= string=?
              "should parse each group of lines"
              (list "123456789" "123456789")
              (bank-ocr (append all-digits all-digits)))

(define (bank-ocr ocr-lines)
    (if (null? ocr-lines)
        '()
        (append (list (parse-line (take ocr-lines 3)))
                (bank-ocr (drop ocr-lines 4)))))
Moving "in"
bank-ocr was complete but the guiding test told me that there was no parse-line function in the production code and I knew where to go next.
(define ocr-digit-one (list "   "
                            "  |"
                            "  |"))

;; should split and parse first digit
(assert-string= "1" (parse-line ocr-digit-one))
Parsing a line would need to split the line into digits and then parse each digit. I added another two stubbed functions and built parse-line to get the test green.
;; stub
(define (split-digits ocr-line)
    ocr-digit-one)

;; stub
(define (parse-digits ocr-digits)
    ;; use assert-list= to check that ocr-digits is ocr-digit-one
    "1")

(define (parse-line ocr-line)
    (parse-digits (split-digits ocr-line)))
Parenthesis(Actually I was cheating here: I should have checked that the output of split-digits was fed into parse-digits. Nobody is perfect and I will atone for that later, but let's move on for now.) Again a function was finished but I had invented two new collaborating functions to do so.

Another step "outside-in"
Next came testing split-digits to split the three lines into nine digits containing three lines of three characters each.
(define two-ocr-digit-one (list "      "
                                "  |  |"
                                "  |  |"))

;; missing test "should split empty line into no digits"

(assert-list= (list-equals-for string=?)
              "should split single digit"
              (list ocr-digit-one)
              (split-digits ocr-digit-one))

(assert-list= (list-equals-for string=?)
              "should split two digits"
              (list ocr-digit-one ocr-digit-one)
              (split-digits two-ocr-digit-one))

(define (split-digits ocr-line)
    (define (take-3-chars s)
        (substring s 0 3))
    (define (drop-3-chars s)
        (substring s 3 (string-length s)))
    (if (zero? (string-length(car ocr-line)))
        '()
        (append (list (map take-3-chars ocr-line))
                (split-digits (map drop-3-chars ocr-line)))))
I did not start with the degenerate test-case that an empty line, a list of three empty strings, should be split into an empty list of digits. I did not add this test because it did not feel right from the solution's perspective. split-digits would always be called with a full line, i.e. three strings of 27 characters each. But as soon as I tried to get the recursion for the second digit right (as forced by the second test), I struggled because I had to figure out the recursion and termination condition at the same time.

ParenthesisA Functional TDD "Pattern"
There is some obvious pattern here. Consider we need a function that operates on a list of inputs and processing of a single input is either simple or can be delegated to another function. Then we need three tests to drive the implementation of that function:
  1. An empty input should produce an empty output, where empty is defined differently for input and output. This drives the creation of the function header and the body of the (future) termination condition.
  2. A single input should produce a single output. This drives the conditional for the termination condition and the processing of a single input. The processing must be simple otherwise the step is too large.
  3. A list of inputs should produce a list of outputs. This test drives the splitting of the first input from the remaining ones for the recursion.

Coming to an end
The second missing function was parse-digits. It was supposed to work on a list of digits, to parse each of them and return the list of parsed digits so I used my three steps from above.
;; should parse empty digits as empty string
(assert-string= "" (parse-digits (list)))

;; stub
(define (parse-digit ocr-digit)
    "1")

;; test for parsing a single digit omitted

;; should parse digits into numbers for each digit
(assert-string= "111"
                (parse-digits (list ocr-digit-one ocr-digit-one ocr-digit-one)))

(define (parse-digits ocr-digits)
    (if (null? ocr-digits)
        ""
        (string-append (parse-digit (car ocr-digits))
                       (parse-digits (cdr ocr-digits)))))
I skipped step two of my list above and omitted the test for parsing a single digit because I felt confident and delegated the actual parsing of a single digit to another function. parse-digit was the final function and compared a given digit against stored digits to determine the number.
(assert-string= "should parse one"
                (parse-digit ocr-digit-one))

(assert-string= "should parse two"
                (parse-digit ocr-digit-two))

;; etc.

(define (parse-digit ocr-digit)
    (let ((digit (apply string-append ocr-digit)))
        (cond ((string=? digit (string-append "   "
                                              "  |"
                                              "  |")) "1")
        ;; etc.
    )
  )
)
I did not push the final solution of parse-digit. Probably I could remove the duplication using some functional magic, but I had spent some hours already on coding, it was late and I was tired. The full source is available here.

Conclusion
Using Scheme was fun. I had to look up library functions a lot and spent some time on Stackoverflow, but I felt progress all the time. I committed on red, green and refactor, on average each ten minutes, and I was never stuck. The minimalist unit testing function gave me enough feedback to move forward quickly. I did not bother for expressive assertion messages because my steps were small and I never looked at the failures anyway - I knew which test would fail or pass next. Solving Bank OCR was straight forward, probably due to the nature of the assignment. Also knowing the solution - which is not the implementation - helped me a lot and I focused almost entirely on Scheme and the functional aspect.

I was able to do outside-in TDD by stubbing future functions. The stubbing was crude, I just redefined the functions in the test code. I was unhappy with this approach but it worked and I lacked in-depth knowledge of Scheme to come up with a proper way to stub functions. It seemed wrong to pass functions around according to Dependency Inversion Principle, because the called functions were low-level internals and no peer collaborators. In a way I followed Ralf Westphal's approach of True Stepwise Refinement, where he stubbed private functions. In the end I thought about deleting (some) unit tests of the internal functions but did not have any conclusive ideas how to do so.

P.S. for Claus
We had agreed to code together and do some serious product development, and again I spent time on weird ideas like Scheme or Assembly. I am sorry.

7 July 2015

Minesweeper "Near the Metal"

Minesweeper
The Minesweeper code kata is a little programming exercise focusing on a subset of the well-known Minesweeper game that comes with a certain operation system. Its assignment is to write a program which accepts an input of arbitrary mine fields, with mine locations marked, and produces the full mine field with all hint values calculated. For example, given the following 4 times 4 mine field
4 4
*...
....
.*..
....
, the same mine field including the hint numbers would look like
*100
2210
1*10
1110
Mine SweeperThe Challenge
Recently the local functional programming group, the Lambdaheads, announced their Minesweeper Challenge. Being a functional programming group, most of the presented solutions used Haskell, F# and other functional languages. I participated and showed them my highly factored object orientated solution in Java, which surely looked as strange to them as their Haskell code was for me.

After seeing a solution in plain C, one participant joked that someone should use Assembly to show an even more low-level implementation. I agreed, it seemed like a great idea at that time, almost as cool as implementing Game of Life in XSLT. As usual I could not let got of the crazy idea. After my first steps in Windows 32 Assembly I was ready for a more complex task.

What about testing?
Although there are people test driving their Assembly, I could not find real unit testing support. The official way to go is to use C/C++ unit testing frameworks and write tests against the global functions in the generated OBJ files. I did not want to learn C this day and created (sort of) an integration test by feeding some mine field into Minesweeper's Standard Input and checking the output manually. Yes, I could have created a minimalist unit testing framework, which is a great exercise to get to know a new language by itself and I have done so in the past, just to keep the flow of TDD. I will come back to this topic later. (Thank you Emmanuel for reminding me of my duties ;-)

Getting Feedback
I wanted to get as much feedback as possible. Feedback is critical when working in an environment as unforgiving as Assembly. In the beginning my integration test did not help me and I split the implementation of my Minesweeper into four parts: Reading Input -> Creating Hints -> Preparing Output -> Printing Results. I decided to work backwards so I could use the result printing to give me feedback about the other stages.

Printing Results
In the beginning the mine field's grid would be a constant string.
max_dimension equ 99

; temp data
grid:   times max_dimension * max_dimension db 'x'
width:  dd      4
height: dd      4
Starting with Hello World I incrementally added to the output until _printGrid would print grid line by line to Standard Out. Then I added support for mine fields of any dimension, using width and height.
_printGrid:
        ; local variables, starting memory[ebp - 4]
numberOfBytesWritten equ -1 * register_size

        enter_method 1                  ; stack frame (macro)
        push    esi
        push    edi

        ; get handle for stdout
        push    STD_OUTPUT_HANDLE
        call    _GetStdHandle@4
        mov     ebx, eax                ; hStdOut

.loop_all_lines:                        ; for (edi = height; edi > 0; edi--)
        mov     esi, 0                  ; address of current line
        mov     edi, [height]           ; loop counter

.loop:
        ; write the next line
        ; BOOL WriteFile( hstdOut, message, length(message), &bytes, null);
        push    NULL
        lea     edx, [ebp + numberOfBytesWritten]
        push    edx
        push    dword [width]
        lea     eax, [grid + esi]
        push    eax
        push    ebx                     ; hstdOut
        call    _WriteFile@20

        ; write a new-line
        push    NULL
        lea     edx, [ebp + numberOfBytesWritten]
        push    edx
        push    len_cr
        push    cr
        push    ebx
        call    _WriteFile@20

.next:
        add     esi, max_dimension      ; go down to next line
        sub     edi, 1                  ; edi--
        jnz     .loop                   ; edi > 0

        pop     edi                     ; drop stack frame
        pop     esi
        exit_method
        ret

cr:
        db      13, 10                  ; Windows \n\r
len_cr  equ     $ - cr
The code above just loops all the grid's lines in esi and prints them followed by a Windows new-line each.

Creating Hints
Next I made the grid mutable by moving it into the data segment and put a real mine field into it.
section .bss

max_dimension equ 4
last_field_in_grid equ max_dimension * max_dimension - 1

grid:   resb    max_dimension * max_dimension
width:  resd    1
height: resd    1

...

_main:

        ; temp copy
        mov     [width], dword 3        ; 3x3 inside 4x4 total space
        mov     [height], dword 3

        mov     eax, [fake_grid + 0]
        mov     [grid + 0], eax
        ...

...

; test cases for solving the game
fake_grid:
        db      '---0---0---00000'      ; empty
;        db      'x--0---0---00000'      ; upper left clip
;        db      '--x0---0---00000'      ; upper right clip
Using _printGrid and these "test cases", I developed _solveGrid to count the number of mines each field is adjacent to.
_solveGrid:
        push    esi
        push    edi

.loop_all_fields_backwards:             ; for (edi = last_field_in_grid; edi >= 0; edi--)
        mov     edi, last_field_in_grid

.loopFields:
        cmp     [grid + edi], byte is_bomb ; is it a bomb? (or incremented bomb field)
        jb      .nextField              ; branch if less than bomb

        ; it is bomb, increment all neighbouring hints
.loop_all_neighbours_backwards:         ; for (ecx = 7; ecx >= 0; ecx--)
        mov     ecx, 7                  ; 8 neighbour coordinates to test

.loopNeighbours:
        mov     esi, edi                ; add to current bomb's position...
        add     esi, dword [around + ecx * register_size]
        cmp     esi, last_field_in_grid ; is the neighbour position valid?
        ja      .nextNeighbour          ; neighbour position is outside

        add     [grid + esi], byte 1    ; else add bomb count for neighbour

.nextNeighbour:
        sub     ecx, 1                  ; ecx--
        jnc     .loopNeighbours         ; ecx >= 0

.nextField:
        sub     edi, 1                  ; edi--
        jnc     .loopFields             ; edi >= 0

        pop     edi
        pop     esi
        ret

is_bomb equ     'x'

around: dd      - max_dimension - 1
        dd      - max_dimension
        dd      - max_dimension + 1
        dd      - 1
        dd        1
        dd        max_dimension - 1
        dd        max_dimension
        dd        max_dimension + 1
_solveGrid iterates all fields in grid using edi, even the ones outside the mine field. If the field is a bomb (contains an 'x'), The code loops ecx for all eight neighbours and increments their field indexed by esi. This adds one to byte value that is there, even if it is a bomb. That works as long as the bomb symbol has an ASCII value of at least 9 higher than the symbol of the empty space. In the edges of the field not all neighbours exist, so esi is clipped by last_field_in_grid which prevents array overflow. Interestingly there is no need to test for underflow, i.e. negative indices in esi, because these are also skipped by branch instruction ja. (The actual bit value of negative values is above last_field_in_grid.)

Preparing Output
After counting the adjacent bombs, grid contains the needed information but is not ready to be printed. For example hints need to be numbers.
_formatGrid:
        push    esi
        push    edi

.loop_all_fields_backwards:             ; for (edi = last_field_in_grid; edi >= 0; edi--)
        mov     edi, last_field_in_grid

.loopFields:
        cmp     [grid + edi], byte is_bomb ; is it a bomb?
        jnb      .formatBomb            ; bombs are increased as well, so we check for >=

.formatHint:                            ; it is a hint, need to make it a number
        add     [grid + edi], byte emptyToHint
        jmp     .nextField

.formatBomb:                           ; it is a bomb, reset symbol
        mov     [grid + edi], byte bomb

.nextField:
        sub     edi, 1                  ; edi--
        jnc     .loopFields             ; edi >= 0

        pop     edi
        pop     esi
        ret

is_empty equ    '-'
emptyToHint equ '0' - is_empty
bomb    equ     'B'
This resets bombs to their symbol and converts hints into decimal numbers. emptyToHint is the difference between the input character of the original mine field and the wanted hint digits. For example, if a field was incremented three times it contains '-' + 3 + '0' - '-' = '0' + 3 = '3' now, which is exactly what is need.

Reading Input
Finally I reached the fourth part of the implementation, reading the mine field from Standard Input. Reading the actual grid was similar to writing it, just the opposite direction of data flow, e.g. using _ReadFile@20 system call instead of _WriteFile@20 and skipping the new-line instead of writing it. More interesting was reading the first line containing the dimensions of the grid because these contain decimal numbers of arbitrary length.
_readDigit:
        ; parameters
fileReadHandle equ 4 + 1 * register_size
        ; local variables
numberOfBytesRead equ -1 * register_size
byteBuffer        equ -2 * register_size
number            equ -3 * register_size

        enter_method 3

        mov     [ebp + number], dword 0
.read_next_character:
        lea     edx, [ebp + numberOfBytesRead] ; lpNumberOfBytesRead
        lea     eax, [ebp + byteBuffer] ; lpBuffer
        mov     ebx, [ebp + fileReadHandle] ; hstdIn

        ; read a single character
        push    NULL
        push    edx
        push    dword 1
        push    eax
        push    ebx
        call    _ReadFile@20

        mov     eax, [ebp + byteBuffer]
        and     eax, 0xff
        cmp     eax, '0'
        jb      .finished
        sub     eax, '0'

        ; multiply by 10 and add new number
        mov     ebx, [ebp + number]
        shl     ebx, 1                  ; * 2
        mov     ecx, ebx
        shl     ecx, 2                  ; * 8
        add     ebx, ecx                ; = * 10

        add     ebx, eax
        mov     [ebp + number], ebx
        jmp     .read_next_character

.finished:
        mov     eax, [ebp + number]

        exit_method
        ret
_readDigit reads bytes from its input until it finds something that is white-space. In fact everything that has an ASCII value less than '0' is considered white-space. The currently read value is converted to a number by subtracting the ASCII value of '0' and added as next digit. Of course this is extremely simplified, as extra white-space, Windows new-lines or unexpected characters completely mess up the logic. Fortunately this is just a kata and no production code ;-)

Completed
The reading of the input completed the Minesweeper Kata in Assembly. To avoid repetition I separated the Standard In/Out handles from their actual usage and provided them as arguments to the functions. The final main entry point looked like that:
global  _main

_main:

        call    _getStdInFileHandle
        push    eax                     ; hstdOut 3 times for next calls
        push    eax

        ; read width
        push    eax
        call    _readDigit
        add     esp, register_size      ; clean up parameter
        mov     [width], eax

        ; read height
        ; 2nd eax still pushed
        call    _readDigit
        add     esp, register_size
        mov     [height], eax

        ; read grid
        ; 3rd eax still pushed
        call    _readGrid
        add     esp, register_size

        call    _solveGrid
        call    _formatGrid

        call    _getStdOutFileHandle

        push    eax                     ; hstdOut
        call    _printGrid
        add     esp, register_size

        jmp     _exit
If you want to see the whole kata, the complete source in here.

Done?
The kata is finished, but there are several issues remaining. Its design was influenced by my need for feedback through the console output. I am wondering how an implementation would look like if I had followed a strict TDD approach. I guess it would be less coupled to system calls at least. Also I am unhappy with its internal coupling. All four major functions depend on the grid and its internal structure, e.g. they need to know max_dimension. Following D.L. Parnas' criteria to decompose systems, it would be favourable to decouple the data from the different algorithms. The grid could be wrapped in its own module (OBJ) allowing only API access, which would add indirection, a lot of subroutine calls and the need to copy data around. This feels against the spirit of raw Assembly. It seems I will have to revisit Minesweeper again.

29 May 2015

How to Organise Your Code Katas

If you read my blog you know that I like code katas. I did my first one back in 2004 after reading Kent Beck's Test Driven Development book. I was learning Ruby and Kent had recommended creating an xUnit implementation as an exercise to get to know a new language. I did not know it was a kata, I just developed my personal RUnit following the TDD principles.

Over the years I did similar exercises and started to perform formal katas somewhere in 2009/2010. I used them for personal practise and for demo, e.g. to show students how TDD could look like as part of my QA guest lecture. At my first Code Retreat I noticed that pairing on a code kata gave me more insights, so I looked for people who would spend some time with me practising, usually remotely.

Tip: Keep the source of your katas (or at least a record)
I do keep the code of my katas. Even at Code Retreats where you are supposed to delete your code, I manage to recover the source from local history or version control. When I use online tools like Cyber-Dojo, I write down the session id and come back later to recover the code. (I know I am a bad person. ;-)

At the time of writing, I have worked on more than 230 code katas resulting in almost 300 sessions of personal or paired practise. (In remote katas we sometimes tackle larger problems and then work more than one session on it.) I have a lot of kata sources and they are all over my hard-disc. I managed to collect some of them in dedicated repositories, one for each programming language, but many are in their own projects, or even mixed up with other code in early "learning" repositories. It is a mess. (Probably it does not matter, but it is a mess nevertheless.)

Shells, organized neatlyTip: Collect all your katas in one place
In her article about code katas, Iris Classon gave some practical advice regarding katas, e.g. to collect them all in one place, to be able to compare solutions. I really liked the idea and recently I found some time to collect my katas in one place - or so I thought.

Tip: Name your code katas consistently, even across languages
I faced some problems. First not all my katas followed the same naming conventions, e.g. prime_factors and primefactors were good enough for me, but not for a unified collection. Most of my katas were in version control and I did not want to rename or move large numbers of files, because I would lose history. (Again history did not matter for katas, especially as I never looked at it - but I was not able to drop practises I followed every day.)

Tip: Put your katas in kata-only repositories
I managed to extract katas out of mixed repositories using hg convert --filemap with a filemap of simple inclusions, preserving the whole history. I also fixed some inconsistent kata folders with a filemap of renames. But hg convert created new, unrelated repositories and I had to drop and recreate some of my repos.

My vision was to place the same katas regardless of language near one another, so I would be able to count and compare them. But I did not find a way to do that with all the different languages and keeping the code working. How would I combine Java, NodeJS, Ruby and Scala sources in a consistent way, other than separating them by source folder, which they already were. I failed to merge all my katas and looked for alternatives.

In the end I created a little script that would search my hard-disc for katas, normalise their names and collect them in a single place. I grouped the sources first by kata name and then by date. The programming language did not seem that important for a combined collection and ended up after the date, resulting in the name pattern [name of kata]/[ISO date] [- optional comment] ([programming language]). The whole collection looked like:
All Katas
|-- bankocr
|-- bowlinggame
    |-- 20120924 (Java)
        `-- BowlingTest.java
    |-- 20130307 (Scala)
        `-- BowlingGameSuite.scala
    |-- 20130414 (JavaScript)
        `-- BowlingGameSpec.js
    `-- ...
|-- fizzbuzz
`-- ...
Tip: Compare your katas
In the beginning I believed that the code of the kata, the final product, did not matter, that only the process of getting there, the practise, was important. That was the reason why people published kata-casts, because the final code did not represent much. Later I discovered that looking at code of a problem that I knew well, and reading comments regarding that code, also had value. So I searched the web for source code and recordings of the katas I had done. I planned to look at them and to compare them with my solutions and to learn from them even more. Of course I never had the time to do this.

But now I can see all exercises I ever did at one glance. Now I have the opportunity to compare my solutions across time and languages. This is the perfect time to include my bookmarks of katas as well. This is going to be interesting because I never had a second look at my katas before.

31 May 2014

Game of Life Apache Ant

This post is about the second half of my quest to create Conway's Game of Life using a plain Apache Ant build script. In the first half I test-drove the code up to target apply_rules which determined if a given cell would be reborn, live on or die. This part is about applying the rules of the game to whole generations. Here are the test cases to identify the next generation.
<target name="all-test-targets" description="run all test targets">
    ...
    <antcall target="test-next-gen-living-with-no-neighbours-dies" />
    <antcall target="test-next-gen-empty-with-three-neighbours-comes-alive" />
</target>

<target name="test-next-gen-empty-with-three-neighbours-comes-alive">
    <make-tmp-dir />
    <antcall target="create_3x3_grid" />
    <touch file="${test.temp_dir}/.y/.x.x/cell" />
    <touch file="${test.temp_dir}/.y.y/.x/cell" />
    <touch file="${test.temp_dir}/.y.y/.x.x/cell" />

    <antcall target="next_generation">
        <param name="p_cell_location" value="${test.temp_dir}/.y/.x" />
    </antcall>
    <assert-file-exists file="${test.temp_dir}/.y/.x/next" />
</target>

...

<property name="cell.marker_will_live" value="next" />

<target name="next_generation" depends="apply_rules" if="cell.will_live"
      description="creates a 'next' file if a cell in the given location
                   'p_cell_location' will be in the next generation.">

    <touch file="${p_cell_location}/${cell.marker_will_live}" />
</target>
The target next_generation marks a cell which will live (on) by creating an empty marker file inside its folder.

Center of the Milky Way Galaxy (NASA, Chandra, 111009)The Universe is (maybe) infinite
In the previous part I defined the universe as a folder structure containing all cells.
universe/
    .y/
      .x/
      .x.x/
      ...
    .y.y/
      .x/
      .x.x/
      ...
    .y.y.y/
    ...
The universe is 2-dimensional and has a certain size. To support universes of arbitrary size I started testing for 2 times 2 grids,
<import file="lib/asserts.xml" />
<import file="universe-build.xml" />

<target name="test-create-empty-2x2-universe">
    <make-tmp-dir />

    <antcall target="create_universe">
        <param name="p_universe_location" value="${test.temp_dir}" />
        <param name="p_universe_size" value="2" />
    </antcall>

    <assert-file-exists file="${test.temp_dir}/universe/.y/.x" />
    <assert-file-exists file="${test.temp_dir}/universe/.y/.x.x" />
    <assert-file-exists file="${test.temp_dir}/universe/.y.y/.x" />
    <assert-file-exists file="${test.temp_dir}/universe/.y.y/.x.x" />
</target>
and then for 3 times 3, 4 times 4 and so on. The creation of each universe was straight forward, but there was a lot of duplication in the different creation targets. Creating an 1 by 1 universe was trivial and adding dimensions step by step seemed a good way to remove duplication.
<target name="create_universe_3" depends="create_universe_2">
    <antcall target="universe_add_dimension" />
</target>

<target name="create_universe_2" depends="create_universe_1">
    <antcall target="universe_add_dimension" />
</target>

<target name="create_universe_1" if="universe.location">
    <mkdir dir="${universe.location}/.y/.x" />
</target>
Increasing the grid's first dimension, the y- or row-dimension, of an existing grid is done by adding a new row folder .y.y.y. Adding the second, x- or column-dimension means adding another column .x.x.x to each row folder .y, .y.y and so on. In Ant this can be done using copy and regexpmapper adding another .x or, respectively .y to the matched group of .xs or .ys.
<macrodef name="universe_add_row"
      description="copies the row folders and renames them as additional row.">
    <sequential>
        <copy todir="${universe.location}" includeEmptyDirs="true" overwrite="false">
            <fileset dir="${universe.location}" includes="${universe.struct}" />
            <regexpmapper from="^(.*\.y)(/.*\.x)$$" to="\1.y/\2" handledirsep="yes" />
        </copy>
    </sequential>
</macrodef>

<macrodef name="universe_add_column"
      description="copies the column folders and renames them as additional column.">
    <sequential>
        <copy todir="${universe.location}" includeEmptyDirs="true" overwrite="false">
            <fileset dir="${universe.location}" includes="${universe.struct}" />
            <regexpmapper from="^(.*\.x)$$" to="\1.x" />
        </copy>
    </sequential>
</macrodef>

<target name="universe_add_dimension" if="universe.location"
      description="adds one dimension in column- and row-folders.">
    <universe_add_column />
    <universe_add_row />
</target>
That removed all duplicated mkdir commands in the creation targets. Still I was not happy with that solution because I needed to provide a target <target name="create_universe_N"> and all previous targets for each dimension N I wanted to support. I spent some time trying to resolve this but failed. Ant does not provide any kind of loop construct and does not allow for recursion when calling targets. (Using Ant-Contrib's extensions like For was out of the question because I wanted to write idiomatic Ant which is rather declarative than imperative.) So the current solution only supports grids up to a fixed dimension.

GenerationsGenerations
After creating universes of (almost) arbitrary size and seeding them I had to iterate all cells (folders) to update the whole universe at once. I did not need any new code, just a way to execute the cell-build.xml script inside each cell (folder) of the universe. After creating a (sort of integration) test for the desired functionality, I added a final target to the cell-build.xml that initialised the cell's location (p_cell_location) with the current build script's directory (${basedir}).
<target name="next_gen_for_basedir_cell"
      description="creates a 'next' file if the cell in the
                   basedir will be in the next generation.">

    <antcall target="next_generation">
        <param name="p_cell_location" value="${basedir}" />
    </antcall>
</target>
Then, after some experiments, I was able to use Ant's subant task to execute the logic for each cell inside each cell's folder.
<property name="universe.base_dir" value="universe" />
<property name="universe.struct" value="*/*" />
<property name="cell.build_file" value="cell-build.xml" />

<target name="next_generation" if="p_universe_location"
        description="applies the rules for next generation for each cell of
        the universe folder structure in location 'p_universe_location'.">

    <subant genericantfile="${cell.build_file}">
        <dirset dir="${p_universe_location}/${universe.base_dir}"
                includes="${universe.struct}" />
    </subant>
</target>
Including */* in the dirset selects only cells (the leaf directories) and no intermediate ones. I have never used subant before but I am still amazed by its power. It is a great tool to get rid of duplication or complicated series of targets. Even using an Ant extension with its loop would not produce such a concise way of iterating all cells.

The above code creates empty marker files (next) for all cells that will be alive in the next generation. All that is left is to delete the old generation (${cell.marker_alive}) and rename the new generation (${cell.marker_will_live}) to the current one.
<target name="evolve" depends="next_generation" if="p_universe_location"
      description="evolves the whole universe folder structure in location 'p_universe_location'.">

    <property name="universe.location" location="${p_universe_location}/${universe.base_dir}" />
    <delete dir="${universe.location}" includes="${universe.struct}/${cell.marker_alive}" />
    <copy todir="${universe.location}" includeEmptyDirs="false" overwrite="false">
        <fileset dir="${universe.location}" includes="${universe.struct}/${cell.marker_will_live}" />
        <regexpmapper from="^(.*)${cell.marker_will_live}$$" to="\1${cell.marker_alive}" />
    </copy>
    <delete dir="${universe.location}" includes="${universe.struct}/${cell.marker_will_live}" />
</target>
The final test is more an acceptance test than a unit test because it exercises all rules and functionality by evolving a whole universe which has been seeded a blinker.
<target name="test-evolve-updates-all-cells">
    <make-tmp-dir />

    <antcall target="create_universe">
        <param name="p_universe_location" value="${test.temp_dir}" />
        <param name="p_universe_size" value="3" />
    </antcall>

    <!-- seed blinker -->
    <universe_seed_cell location="${test.temp_dir}" row=".y.y" column=".x" />
    <universe_seed_cell location="${test.temp_dir}" row=".y.y" column=".x.x" />
    <universe_seed_cell location="${test.temp_dir}" row=".y.y" column=".x.x.x" />

    <!-- run GoL -->
    <antcall target="evolve">
        <param name="p_universe_location" value="${test.temp_dir}" />
    </antcall>

    <assert-file-does-not-exist file="${test.temp_dir}/universe/.y.y/.x/cell" />
    <assert-file-does-not-exist file="${test.temp_dir}/universe/.y.y/.x.x.x/cell" />

    <assert-file-exists file="${test.temp_dir}/universe/.y/.x.x/cell" />
    <assert-file-exists file="${test.temp_dir}/universe/.y.y/.x.x/cell" />
    <assert-file-exists file="${test.temp_dir}/universe/.y.y.y/.x.x/cell" />
</target>
It works! ;-) Here is proof in form of a little animation of the Ant Game of Life in action:Ant Game of Life Dir Listings